31.8.22

31.08.2022 Afternoon Imaging AR3089

 *

 Wednesday 31st 65F Sunny periods with lots of cloud. 

16.06 [CET] shaky and soft seeing again. Large clouds quickly ended initial captures.

 I increased the gain to exaggerate brightness imbalance across the frame. Then lifted the entire filter stack with a cord. Finally returning for an even balance. However, the presence of Ellerman bombs suggest a shift from H-a into the blue. Though a search suggest they are hotspots.

Gain 118, 7ms, 88fps, 50/1000 stacked. 

 Following captures suffered from severe, thermal boiling of the image. Could it be the margins of clouds causing thermals? 

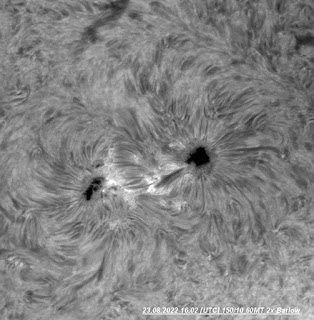
 The largest spot on the west of the group has a delicate, arching, light bridge.

16.30 A steadier moment? Intermediate captures were very soft.

 I am now sorting poorer captures upon opening in AS!3. If the initial image shows softness there is no point in continuing to stacking. Some detail should be visible in the opening image. 

 If the stacked image in AS!3 still shows little detail. Then it is not usually worth opening in ImPPG.


16.51 A retuning has altered the brightness gradient across the frame. Brighter at top right. AS!3 has cropped the image.


Taking a break to see if the seeing improves later.


17.31 Another retuning and refocusing. 

The image looks coarser. Still a diagonal imbalance.


18.16 A late capture just before the trees eclipsed the sun.


*

30.8.22

30.08.2022 Morning imaging AR3089

 *

Tuesday 30th 60F. Bright but overcast. The sun is teasing through the cloud.

 10.30 Set up bit no images yet.  Exposure 10ms Gain 220!

  10.38 Through solid cloud!


11.04 Better but still through thick, high cloud.


There is no blue sky anywhere near the sun. 

I'm giving up for the moment.


17.33 Tried again as the cloud cleared.  

Quite pleased with this one. My best image so far. More even brightness. Lots of detail. Finally getting somewhere.

The seeing went completely bad within a minute of this capture. Not sure why. Local solar heating effect? I had to open and turn the dome just prior to capturing this one. Perhaps the shutters were in shade and then warmed quickly in the direct sunshine? 

 It might be the telescope. Cooled down in the closed dome and then faced into the sun. The image on the monitor is boiling furiously. I am unable to find sharp focus. The sun is now very near to the trees. Gone.


*

29.8.22

29.08.2022 Imaging with Lunt 60MT etalon.

 *

Monday 29th 63F, windy and sunny afternoon. 

13.24 First image of SE limb. I am being blinded by the sun. So hope the processing isn't too extreme.

 88fps. 6.2ms. 50/1000 frames stacked in AS!3.

The seeing is very shaky.


13.37 AR3089. Struggling with full SSDs. The wind is getting very noisy on the back of the dome. Slightly uneven brightness.


 13.58 AR3089 Similar but with the Lunt etalon retuned. Thin, high cloud keeps intervening.


16.15 I have come back out again and it has clouded over! 

16.55 I keep trying. The wind sounds lighter but there is more cloud. This one is more dramatic.


Coming up to 18.00 but still no better seeing nor images. Lots of heavy cloud with thin cloud layers in between. There is no clear blue at all. The sun is approaching the tree tops. I might as well give up for today.


*

26.8.22

26.08.2022 Dome movement.

 *

 Friday 26th 75F, bright overcast and humid.

 I have ordered a couple of cubic metres of self-compacting gravel. This will be used to solidify the expanded plinth on which the observatory stands.

 It is very difficult to turn into the space behind the house. So I decided to move the fibreglass dome backwards. I laid a lot of 4x4 timbers on the ground in an arc to the NW of the dome. Then used another length of 4x4 to lift on the west side and lever the dome sideways.

 It worked too! I gained about 1.5m or 5' of extra clearance for turning. If the lorry can  tip the gravel in the best position it will avoid moving it a long way. I could move the dome even further back but I am far too hot and tired for the moment. I need a rest.  

 The gravel was safely delivered. It was quite a close fit between the hedges as it was a large tipper truck. There was no chance it could turn. I shall wait until it is cooler before I start shovelling it into wheelbarrows. The barrow is posed at midway on the pile for scale.

  Meanwhile, I have been trying to find a better way. To support the very long, H-alpha filter stack on the tail end of the telescope. Unfortunately, the etalon and the FT focuser bases are not compatible. They share a similar V-groove holding arrangement but differ in diameter. I shall have to find a better way.


*

24.8.22

24.08.2022 60MT etalon imaging trials continue.

*

Wednesday 24th I have been experimenting with the long, overhanging tube. To support the camera in various directions via cord suspended from a length of studding. I am still trying to even out the brightness across the image frame. Not with the greatest of success so far. The seeing conditions are the worst I have seen. With violent shaking, defocusing and general softness.

 78F/83F. The temperature in the dome is 83F. I am sitting here in my shorts. Hoping to let the light breeze cool my torse. I am drinking water at intervals.

16.27 Best image today. Magnetic bristles are beginning to show themselves in the processed image. Very dark on the left.


16.43 84F/29C in the dome. Slightly different processing.


16.56 84F/29C Taking a break to cool down indoors.


17.44 I'm back! Still 84F in the dome. Seeing still soft and shaky.


 18.23 Seeing slightly improved.


 18.37 74F in the dome. Much more comfortable.


 18.42 The waving trees intervened briefly.

Last image today.

Much more even brightness across the image.


*

23.8.22

23.08.2022 60MT etalon trials continue. AR3085

 *

Tuesday 23rd Bright start then overcast then sun in the afternoon. Thin, high cloud with a gusty wind. Max 76F.

I started the morning by collimating the 150mm objective and FT focuser. Both had been removed and replaced when I shortened the main tube. They weren't far out of alignment but are better now.

16.35 76F. Windy! First decent image today. Though hardly sharp and detailed. Complex light bridge is visible over the umbra on lower left spot. I am hoping the seeing conditions will improve. I believe the image brightness is more even after collimation.

 17.00 Seeing conditions remain unchanged. I am struggling to find best focus and best tuning. So I have paused for afternoon tea. 

 It is ironic that I have never previously succeeded with a 2x Barlow. It was always "too powerful" for the seeing conditions compared to the GPCs. It effectively doubles the the focal length to 3m. Now I have the Barlow sitting in front of the camera. 

 17.27 Another image rescued from the shaking mush on the monitor. The first hint of magnetic bristles.

 The one thing I haven't done [yet] is to rotate the Lunt Blocking Filter relative to the etalon. This is something I always did with the PST etalon. I even marked the BF with a bit of red tape to ensure "correct alignment." 

 I just tried this and believe I found a best orientation where the field was darkest and most even. Unfortunately the image shaking and softness on the monitor does not help.

18.02 I added a long aluminium tube and lifted the camera end of the stack with a cord. Crude but effective in combating the obvious sag.


18.21 Seeing steadying but not much sharper. Thin, high cloud is probably to blame.


 18.30 Image has gone dark. Trees and cloud.

The end of today's trials 


*

22.8.22

22.08.2022 Lunt 60MT imaging trials continue: AR3085

 *

Monday 22nd 61F bright but very cloudy from the SW.  A few "teaser" gaps between the clouds. Early trials suggested I change to the 2.6x GPC to capture AR3085. A double spot with flaring mid northeastern quadrant.

09.49 First [half] decent image today. Pressure tuning the 60MT etalon for detail then focusing. 

  Yet again ImPPG is hardening and sharpening the imported, stacked image from AS!3. I am having to reduce L-R to minimum 0.5.


10.08  I have changed to the 2x Orion Shorty Barlow but was blocked from viewing by a huge cumulus cloud.

 Interesting curved filament over the lower left spot's umbra.


10.15 The seeing is too poor for the 2x Barlow but fun anyway.

 I have changed to 1000 frames instead of my usual 500. Still only stacking 50 frames.


10.31 This one opened in ImPPG without the
heavy sharpening.


11.00 It became progressively more cloudy. So I gave up. Hoping to return later if the cloud clears.

 Here is the complete image train with 2" Orion Shorty Barlow.. You can understand why I tried using a 2" diagonal to avoid having such a foolishly long assembly. The diagonal was quickly abandoned as too unstable and dangerous.

A long assembly is very prone to sag. Making collimation of the camera's optical axis impossible without external support. Tilting of the camera sensor could lead to all sorts of optical problems in the image.

 I can't just enclose the entire filter filter stack in a closed tube. It has to be fully accessible along its length for tuning and focusing adjustment in the middle. With the likely insertion/removal of further components along the length. This is vital when changing GPCs or fitting the Barlow. Some sort of external, tubular truss would work. Provided it was large enough and open enough for easy hand access. 

 Then some means has to be found to support the camera within the truss. The camera does have a rear, threaded screw hole. So it could be supported from a plate at the extreme end of the truss. The back plate would have to be adjustable along the length of the truss. So parallel tubes make much more sense than a tapered arrangement of tubes. 

 An open truss with baffle mounted components risks stray light entering the camera. Though the truss could be sleeved with a black, cloth sock. The truss must resist flexure in all planes. Because it rotates around its axis as the telescope tracks across the sky.  Ideally the truss wants to be as light as possible. To avoid a severe imbalance of the telescope. It must be stiff at the same time to avoid adding its own flexure.


*

21.8.22

21.08.2022 Lunt 60MT etalon imaging trials.

 *

Sunday 21st 65-70F, sunny all morning. Cloudy and windy in the afternoon.

 Following on from yesterday's struggle with uneven image brightness: I am continuing to experiment with focus and etalon tuning settings.  

 I have inserted the 2.6x GPC in the camera nosepiece to narrow the field of view. Even then I had to heavily crop the image. Just to remove off band brightness at the edges of the image.

10.4.  I repeatedly readjusted the tuning and focus. The image field is much more even in brightness and detail. I am using the 912x912 frame size as usual.


 11.00 More even brightness but [dare I say it]  rather boring! (?)


 11.30  Strange AR on the eastern limb. I have yet to confirm the correct orientation of the sun's image. [After fitting the diagonal.] I need an image with a clear, dominant feature.


11.50 First attempt at capturing proms with the new etalon. I made NO attempt to retune for the proms. A GPC would have been a good idea to increase the image scale. I had to heavily crop the image to make them visible.


12.02 Fitted the 2x GPC to the camera nose for more scale. Retuned the Lunt 60MT etalon for the darkest and most even brightness. Much more sense of surface relief. Perhaps a bit over-sharpened. Though I think I am finally beginning to get somewhere.

 There is still some increased brightness from the left [eastern] side. Which could easily be cropped out. I will keep trying.

 The 2x GPC seems to provide the optimum evenness of brightness. The 1.6x GPC retains the ring-shaped, sweet spot.


12.36 2x GPC.

It is becoming too windy to continue. The telescope is being blown about. Pause for lunch.


PLEASE IGNORE ANY MENTION OR ILLUSTRATIONS OF MY MOUNTING THE ETALON DIRECTLY TO A STAR DIAGONAL! IT WAS A BAD IDEA!

THERE IS A VERY REAL RISK OF ROTATION: OF THE HEAVY ETALON-FILTER ASSEMBLY AROUND THE FOCUSER AXIS!

POTENTIALLY LEADING TO CATASTROPHIC DESTRUCTION OF THE ETALON, FILTER ASSEMBLY AND THE CAMERA! PERHAPS THE ENTIRE TELESCOPE ITSELF! EVEN THE MOUNTING COULD SUFFER SEVERE DAMAGE!

DO NOT TRY THIS AT HOME!

YOU HAVE BEEN WARNED!!

I CANNOT BE HELD RESPONSIBLE FOR ANY CONSTRUCTION OVER WHICH I HAD NO DIRECT SUPERVISION!


*

20.8.22

20.08.2022 Lunt 60MT etalon mod. Main tube shortening: First H-alpha light.

 *

  Saturday 20th 58F, speckled cloud with mostly veiled sunshine. 

My existing 6" f/10 iStar H-alpha telescope has a focal plane 33cm from the backplate.

The 2.5" FT focuser is 11cm long at minimum inward travel. Its full travel is 8.9cm.

The etalon extension uses up 4cm of optical path length.

33 - 15 [11+4] = 18cm.

The desired position of the etalon lens [from focus to the face of its housing] = 26.4.

26.4  - 18 =  8.4cm. This is the minimum length which must be removed from the main tube.

However, a bit of leeway is extremely valuable. To allow for miscalculations or precise etalon tuning. The mid position of the focuser adds 4.4cm.

8.4 + 4.4cm = 12.8cm.  This much is the minimum length which must be removed from the main tube. To bring the etalon to 26.4cm from the focal plane. Having to remove and dismantle the entire telescope twice. Just to saw a bit more off the main tube. Is a serious problem. So cutting off a little extra length would probably be wise. To be safe, I think I shall saw off 15cm rather than 13cm. Done.

First I checked the focal plane. Which was 48cm from the backplate. iStar objective only. No other optics.

So, 48-26.4 = 21.6cm from the backplate to the black face of the 60MT etalon housing. Check.

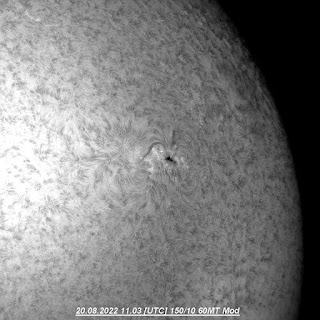
It was 13.03 [CET] before I captured my first tuned image with the new etalon. Some more tuning to do. The brightness is very asymmetric. I can't blame the thin high cloud for this. Only a general softening of the image.


 14.00 The cloud is thickening into clumps but lower now. With clear blue in between instead of hazy white. I shall continue to experiment with tuning and focusing this afternoon.

 The third image shows the effect of deliberately boosting contrast.The ring shaped "sweet spot" is clearly visible. Can I tune out this ring by adjusting the position of the Lunt etalon? Tuning, vis the pressure knob, did not improve the uneven brightness.

14.21 Further tuning did nor help to spread the sweet spot. The presence of Ellerman bombs suggest the etalon is not centred on H-alpha.

 Cloud is thickening.  Making it impossible to continue.


*

19.8.22

19.08.2022 Lunt 60MT mod. Etalon extension.

 *

 The Lunt 60MT provides easily separated modules. To allow a larger aperture telescope "Mod" or conversion to H-alpha.

 The entire Lunt 60MT telescope weighs close to 4kg. Of which the objective, tube and clamshell add 1.5kg. 

 I decided to attach the etalon and focuser to the 2.5" FT focuser of my 150mm [6"] f/10 iStar via the etalon nosepiece. The thread of the nosepiece in the etalon housing is of adequate length to carry the load. I just needed to make a conversion of the [51.8] 52mm nosepiece to a 2" push fit. [50.8mm] I shall bore out a standard 35mm long x 2" extension to achieve this. I used an Omegon extension which had to be ordered online.

 The 35mm x 2" extension has arrived in the post. I lost no time in chucking it in my lathe. To bore it out by ~1mm to 52mm. Unfortunately the depth of the groove for the bronze clamping ring was much reduced. 

 There followed much fiddling with a small boring bar. By twisting the tool horizontally I was able to deepen the groove while maintaining square edges. An internal grooving bar would have helped but I don't have one. 

 Eventually the bronze ring of the extension sank low enough that it fitted over the Lunt's filter nosepiece.  This image [left] shows the interior of the extension turned to the larger internal diameter. There is no need to blacken the bright metal because the light will not reach it.

 I could then refit the thumbscrews to achieve a firm and even clamping pressure on the etalon nosepiece. I did not want a sloppy fit. Which might have caused flexure.


 The second image shows the extension in place fitted onto the Lunt 60mm MT etalon nosepiece. 

 This allows the Lunt etalon to fit securely into any 2" focuser adapter. Further extensions can be screwed into this etalon extension. 

 This is also the same thread as 2" filters. So these too can be added to provide thermal protection for the Lunt etalon, blocking filter and camera. 

 The Lunt etalon housing is a sturdy lump of heavy metal. Weight 1.3kg by itself. The Lunt etalon, focuser, blocking filter and ZWO camera will be cantilevered off the etalon extension. The all-up weight being 2.5kg. So it needs to be adequately strong and stiff. 

 The entire H-alpha assembly will be inserted into the iStar's beam at 264mm inside focus. Measured from the front collimating lens. The face of this lens is level with the large, black face of the etalon housing. A handy reference. 

Achieving this position may require the main tube of the modified telescope to be shortened. Not something to be taken lightly where a high quality telescope is involved. This would probably cause a serious loss of its resale value.

The 60mm Lunt objective is not needed for this "Mod." So it and the main tube will be stored away safely.


*


16.8.22

16.08.2022 Imaging Lunt 60MT

 *

Tuesday 16th another hot day. Windy and cloudy at times. I continue to asses the quality of the Lunt 60MT etalon. Still within complete 60MT telescope with B1200S2 blocking filter and ASI174 camera fitted. I have the little Lunt in a tube ring mounted onto one of the 150mm tube rings.

It is now late and the sun has set behind the local trees. I'll post the processed images and add text later.

The little Lunt H-alpha telescope was on the wrong side of the 150mm telescope. Which itself was on the wrong side of the mounting. So reaching the focuser and tuning knob from the monitor was impossible. 

I set focusing to the sharpest I could manage and then tried tuning. Boosting exposure length produced large variations in brightness on the disk.

 I used this variation to retune. To achieve the most even and darkest image. The results are shown here.

The monitor showed the entire sun's disk as about 6" across. 912x912 was safer than 800x800 in capturing the whole disk within the SharpCap frame. I could then crop allow the disk to fill the frame.

 The image on the monitor looked completely stable compared with the hugely enlarged image I am used to seeing from the 6"/150mm telescope.

 The image did not look as sharp as I would have liked but focus was pretty close to optimum. N doubt the seeing condition were not ideal.

 I find the slow motion on the Lunt focuser very useful. Unlike the FT focusers on my larger refractors. The latter seem to be too slow to achieve very much.

 Yet again I was having problems with ImPPG. It instantly sharpened the AS!3 images to ridiculously grainy. So that I had to set Lucy Richardson to the minimum setting of 0.5. Raising this figure ruined any chance of a useful image.

 Once set to 0.5 I could only add the tiniest degree of change to the sliders before the images were ruined by over-sharpening.  

 There is something very wrong here but I have no idea what. The images should have been useful at the default settings. By default L-R should be at 1.0.


Of the four images I have processed and posted here, I think number 3 at 16.32 [UTC]is the clearest. The others show variations of texture and brightness across the disk.

 My apologies for the variations in orientation. The camera was rotating as I struggled to reach the tuning knob and focuser. I tried flipping the third image horizontally but that didn't help.

 In addition to the problems mentioned I had to reload SharpCap. It was refusing to record videos onto an almost empty SSD. I had to delete a couple of dozen earlier videos before it would behave itself.

 Both AS!3 and ImPPG could not find earlier processed images. In fact I don't even recognise the 3rd image in comparison with the others. It could only come from today or yesterday. Because I haven't been able to capture the full sun's disk until now. Very odd! 


*


14.8.22

14.08.2022 NOT a box opening. First H-a light.

 *

 Sunday 14th. 

 A very large box has arrived. I had been waiting for it for over four months. Waiting for the very first, brand new telescope I have ever bought. My first new, commercial telescope in seventy five years. Well, strictly speaking, I started building telescopes in my early-mid teens. So you could say this is my first new telescope in 60 years of passionate [obsessive-compulsive] interest in astronomy and telescopes in particular. In fact I prefer telescopes to most kind of astronomy.

 Within the two large, nested boxes, was a large, metal, storage case. No unboxing videos for me. I wanted to see why I had been waiting impatiently for all of those months. The telescope was bigger, but much shorter than I had imagined. Strangely, it was probably ten times the weight I had imagined. It actually felt as if it was constructed of solid metal. Somewhere between solid steel and solid aluminium. 

 Thankfully it was cosmetically flawless. At least to my eyes. A few greasy fingerprints on the completely pointless "dewshield." Which provided little protection against dew but looked the part. 

 Nor were there any hideous design flaws which an obsessive-compulsive, lifetime telescope maker would see as a deal breaker. 

 There were no instructions. Just a large card telling the buyer to search for a URL online. No joy. The supposed "Manual-Instructions download did not exist. A bit of online digging [with the usual, rushed typos] produced enough information not to be considered "armed and dangerous." 

 I quickly mounted the shiny new "lump" onto a Sirui gimbal mounting on a Manfrotto carbon fibre tripod. The results were disappointing to say the least. It is true that I have not done much visual observing in H-alpha. I have become a committed "imager." 

 I tried a range of eyepieces. Despite persisting I saw little more than a plain red disk with a few tiny prominences. More Google homework was obviously needed. The sharpness of the proms was a good sign.

 I watched several YouTube videos on the particular telescope in question. It seems I was not making any obvious mistakes. I added a better star diagonal and could see fleeting glimpses of surface detail. This was not what I paid for. Nor waited all those months. 

 Later that afternoon I dragged "The Lump" back outside and found the sun. Steadily the surface detail popped into view. I was "learning to see" again. It was several years since I had used an eyepiece in deep red, H-alpha light. 

 The sun sank lower and the trees beckoned.  So I moved along the drive. To where a gate provided a clearer view. Things kept improving as I ran back and forth to the house. Collecting more eyepieces to try. I even tried my binoviewer but couldn't reach focus with the star diagonal in place. 

 Eventually the sun sank low enough for a straight view through the binoviewer. No star diagonal eating up the focal length. I tried various GPCs and pairs of eyepieces. As I constantly refocused and retuned the huge, brass pump knob the sun suddenly snapped into clarity. A pair of 20mm Meade 4000 Plossls and the 1.6x GPC had finally provided the magic.

 I was utterly mesmerised! My usual dinner preparation time went by as I sat on my little chair and stared and stared. The detail and its sharpness were mind blowing! Filaments were so finely engraved that they could be clearly discerned as stranded. The sunspots were inky black and their surroundings "as clear as day."  

 All on an apparent disk size I would have considered " rather modest" in diameter compared to my usual field of view.  Where I would struggle to keep a single sunspot in the ROI on the monitor. So as not to miss anything nearby. Like a filament or flaring. Or magnetic bristles.

 Dinner time passed and I was still glued to my chair as the sun sank behind the trees. Twice I had moved further along the drive. To get the last dregs of the sun through gaps in the hedge before it finally sank out of sight. 

 Today's task is to find a way to use the binoviewer with a star diagonal. I need the comfort. I am much too old to be tipping my head back at 50ยบ! A cushion for the chair would be good too. Then there is the matter of getting the camera attached. To see what it can really do on a full, solar disk. 

 It took ages to confirm that I could not reach inward focus with any of my GPCs on the binoviewer's nosepiece. Despite T-S claims that the 2.6x neutralised the binoviewers glass path length.

 In the end I added the 2x GPC [Williams 2x Barlow nosepiece] to the nosepiece of the T-S 1.25" star diagonal. This provided plenty of outward focuser travel but at the expense of higher powers. Easily solved by using a pair of 26mm eyepieces instead of the 20mm. Which work fine with the binoviewers looking straight through the focuser. I have a pair of 32mm and 40mm should I need lower powers.

 The next step is to insert the ZWOASI174MM camera. To see where that comes to focus. It is 82F in the shade out of doors and getting hotter. Which means I feel very hot when I am exposed to the full sun.

 First image. I can hardly see the laptop screen! Just a test before I go indoors t see what I have on the PC screen. Lots of detail but the blind processing is awful! I should not have touched it in ImPPG. Grossly over-sharpened and uneven brightness. 

 I need to see the sun's image on a big screen as I capture it. 50/100 frames. No drive. 88fps. I'd had better fix the new telescope to the mounting somewhere. So I can be in the shade of the dome and see the 27" monitor. I'll be back!

 2nd [camera] light. Through cloud. The 60mm is now clamped in a tube ring fixed onto the 150mm f/10. Tracking with 50/500 frames stacked. 912x912 in SharpCap. Still overdone in ImPPG. Cropped slightly in PhotoFiltre. An improvement over the earlier image. This is using the ZWO ASI174MM camera. Probably not a great match.

 It is hot and cloudy this afternoon. 80F. After giving up for a while I can't even centre on the sun. No brightness means no shadows to guide me.
 

 18.08  Brief clearing through thin cloud. Processing more gentle in ImPPG. 800x800 in SharpCap. 100fps. Gain 0 Exposure 2.25ms. 50/500 stacked in AS!3.


*