*
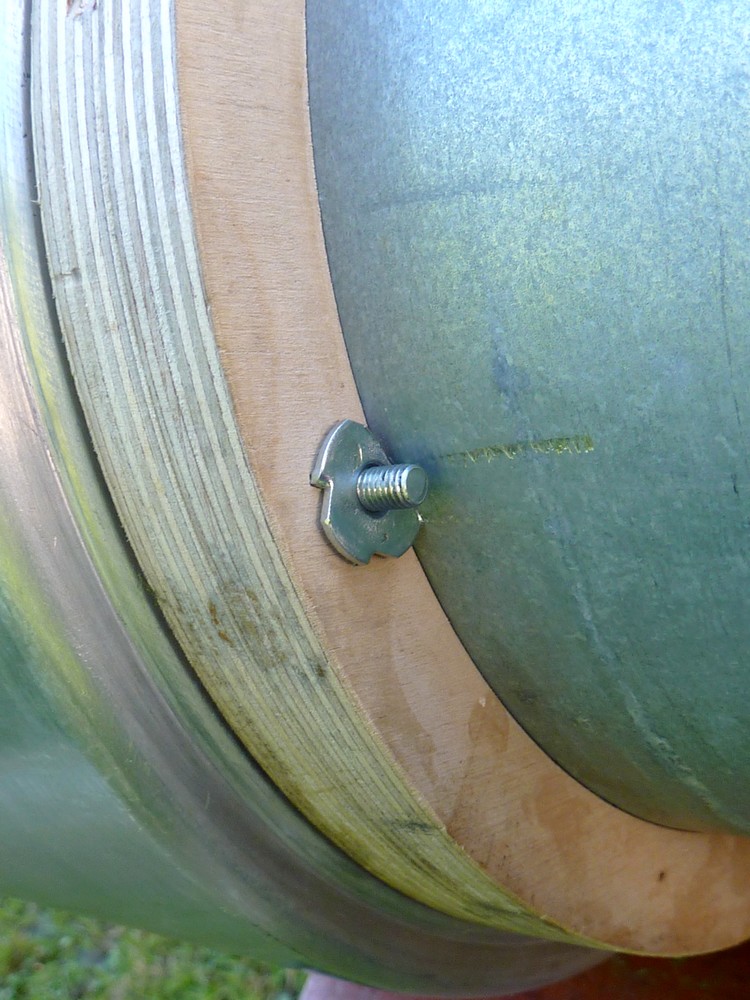
Since I used an 8" main tube, with a 7" aperture lens, the cell fixing screws were very close to the tube wall. I bought some long, cross-head screws to go through the cell flange and the birch rings I had previously glued together. The small, pressed flange on the end of the tube resists the pull of the screws and weight of the objective cell.
I needed a fixed nut, which would not rotate with screw adjustments, so I used a T-nut with one edge sawn off to just clear the main tube. The spikes on the T-nut face are bedded into the plywood ring to further resist rotation. I greased the threads to avoid rusting of the zinc plated steel. The plywood rings still need to be painted to tidy them up. I had hoped to find another 10" saucepan which can be cut off at the base and the bottom bored out to slide over the main tube. This profiled alloy ring would cover the plywood rings and hopefully look like a solid aluminium counter-cell. Not really necessary, of course, but I think it would improve the appearance without adding weight. Not only will it provide decorative weather protection but the ring will resist any expansion or loosening of the plywood rings over time.

The view of and through the iStar objective lens in place on the OTA. The matt black, painted dewshield surrounds the lens and is sandwiched between the lens flange and the plywood rings. This gives the three push screws of the push-pull, lens collimation adjustment something to press against without digging in. The screws might well sink into the surface in the long term if pressing only on the plywood which would alter the collimation.
The lens is completely transparent to the human eye but the apple green anti-reflection coating becomes visible in the camera flash. The dust is also invisible, until caught by the flash, but does no harm.

Two satin chromed, brass, drawer handles and a Skywatcher [?] 9x50 finder are now attached to the OTA. I shall probably add another handle at the focuser end to avoid having to point the telescope by grabbing the focuser. Brass lasts well out of doors while coated steel rusts rapidly. I checked with a magnet in the shop to ensure I didn't buy the rusting kind. The finder and handles only moved the OTA balance point by about an inch towards the focuser. Here the focuser is set to infinity in the middle of its travel with the
star diagonal held in place by a 2" extender with compression ring. The focuser rotates smoothly
in the back plate. Since the back plate is a tight, friction fit it can be aligned and then radial self-tapping screws used to hold it firmly in place. Otherwise I'd use push pull screws with a leveling plate. I am still considering mass loading the back plate out of sight inside for a better tube balance point.
A sliding balance weight on a bar at the focuser end will help. I am looking for a suitable towel rail as a materials donor for this task. This will further improve the balance without unnecessary ballast. The counterweight can be adjusted for different weights of accessories fitted in the focuser. Such a long OTA is very sensitive to changes in moment arm. I shall add a carrying handle somewhere in the middle when I know where it will clear the tube rings. [Which are on order after sending the last ones back due to cracking.] An 8" diameter main tube is much easier to carry than a 12" but having comfortable carrying handles adds greatly to mobility and security.

The OTA is progressing nicely as it rests on my old folding workbenches. Very handy for holding the tube securely with it resting in the fully open jaws. The G-cramps are extra insurance for when I am frequently rotating the tube to work on it. Handy too as a stand for checking the half-mile distant trees through the eyepiece. Nicely crisp and free of false colour at 74x despite the shimmering thermal effects.
For scale: The 8" diameter, main tube is now 6' long from the back of the dewshield to the focuser back plate. The focal length is a nominal 7'. [7" aperture @ f/12] A handy saucepan lid slides over the dewshield for extra security. Friction fit, insertion-type, lens covers can easily take the matt black paint off the dewshield.
Click on any image for an enlargement.
*


No comments:
Post a Comment