30.11.19

30.11.19 A martyr to dew!

*

Saturday 30th Nov. 34F. -2C white frost overnight. Almost clear sky at 10am as the last of the frost melts off the top of the dome in bright sunlight. Just checked Stellarium and the sun doesn't get above 13° today.

10.40, 37F  and I am all set up with the sun looking crisp in H-a on the screen. Everything is covered in dew. A neighbour's birch has just grown into my field of view! Grr?

Skiing trousers, two thick jumpers, thermal vest, t-shirt and duvet jacket. I'm wearing my walking boots over thick, loop pile socks to try to keep my feet warm. Baseball cap [for the peak] under a fur lined, trapper's hat.

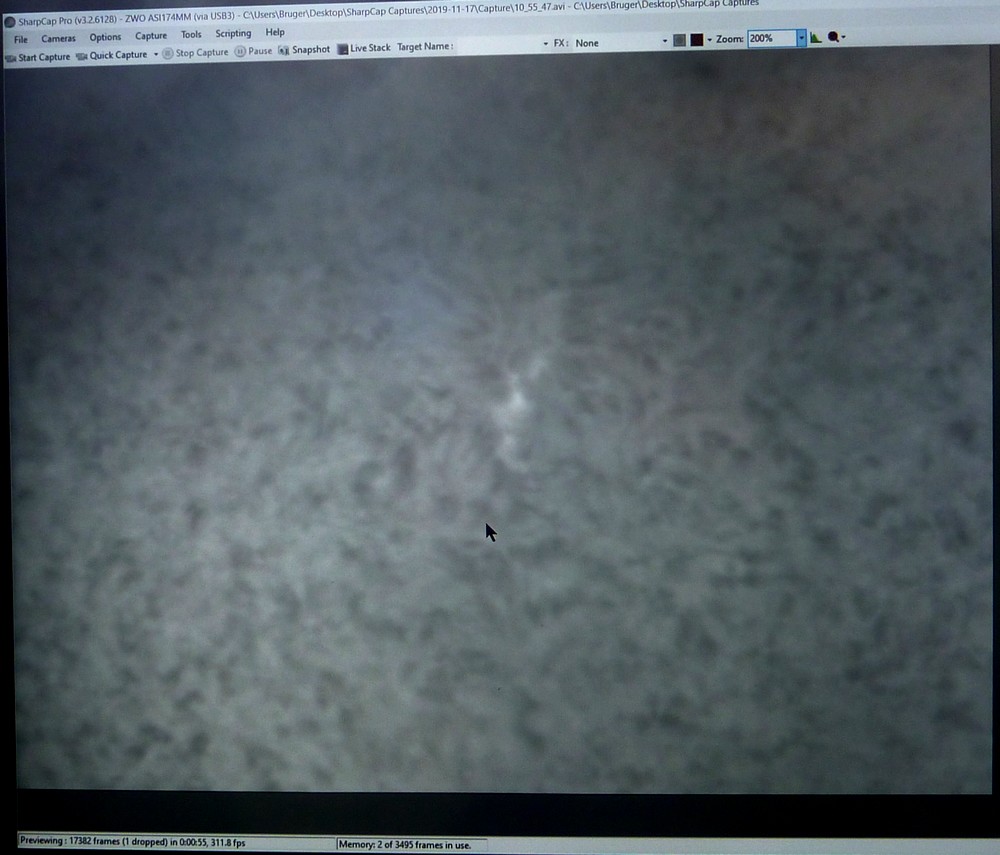
Horribly asymmetrical variation of brightness across the field of view. I have the etalon fully turned one way. I ought to try moving the screw to another hole on the etalon. Not much difference. Then try the tilt plates. See SharpCap 'snap' on the right.

Whoops! I just checked the 6" objective. Solid dew! It's no wonder I have light and shadows on the image! I can't reach to see into the dewshield so I used a compact mirror instead. Will it clear at 36F in the dome? I don't have a hair drier. It is odd how sharp the surface texture looks despite a full aperture covering of dew. The 7" is covered in droplets so is even worse! I am losing valuable sun time with probably the best seeing of the day.

I haven't been using any objective lens covers so far. The telescopes obviously became chilled overnight. Opening the dome to the sun raises the air temperature above the dew point. While the massive lumps of glass are lagging badly behind. I have now wrapped the 6" cell and dewshield in thick, closed cell foam to try and speed up the drying process. There  is a clear crescent of glass now.

Then it clouded over so I went shopping. I am now the proud owner of a recycled Braun Mini hairdrier. £2.50 equivalent from the charity shop. The cloud has cleared as I enjoy lunch. So I shall be back out there ASAP.

Sun lost behind the roof. Slewed to the Moon with the 7" but it is getting cloudy again. Eventually the cloud cleared and I captured lots of overlapping ideos of the moon with the ASI174. The idea was to process them and then let ICE stitch them together. Getting 200fps! The downside was the poor seeing conditions. Soft, with special "thermal" effects racing across the image on the screen. The moon was just above the ridge of the roof and the woodstove was lit. Hardly surprising the moon was mush.

I have capped both lenses and wrapped the upper OTAs and cells in closed cell foam, camping mattress material. Only -1C forecast.


*

29.11.19

29.11.19 Back to the sun!

*

Friday: 36F. Early cloud cleared to the promised sunshine just before 11am. A strong and gusty north westerly is roaring around the dome and in the surrounding trees. Fortunately I am looking south east so the telescopes are remaining sheltered and still. 

The image is covered in thermal waves on the monitor as I capture videos of weak and dim prominences. Like looking through the water in a tumbling stream. Gong-Ha is showing some markings near the easterly, solar limb. All I have is an elongated lighter spot. Except it looks too far south to be the correct disturbance.  I am getting very low fps from the ASI174. Usually up in the 300s fps it is 1/10 of that. I didn't have High Speed engaged in SharpCap. It has shot up to nearly 400fps now!

The sunshine continued until after lunch when cloud started drifting across the image. I captured lots of videos for later processing.

My new sets of  o-rings arrived 45, 46 & 47 x 1.5mm and all were too thin. I have tried rocking the outer shell with the adjustment band in place but it makes no difference [at all] to the image.

Looseness of the etalon adjustment won't matter with the drive belt in place. The belt will safely lock the adjustment wherever it stops. It just feels loose in my fingers. So I have returned to the original 42 x 2mm rings. Which are very stiff. The etalon ring was still too stiff to turn using 1.6mm monofilament packing rings after rubbing between folded sandpaper to take off any possible high spots. Which makes no sense unless it is the hardness. Rubber o-rings must flatten against the outer shell. Dismantling the etalon and replacing the rings is now a 1 minute job after so much practice.

As I am still waiting for the toothed timing belts to arrive I am back to manual adjustment. Which is much easier after lunch following the meridian flip. This places the focusers and cameras within easy reach. The sun is noticeably lower in the sky than last time I was imaging. That was before the overcast weather descended.

3pm and the sun has sunk below the ridge of the house roof. A tiny, crescent moon is dragging along the horizon to the south.
 

*

26.11.19

Remote etalon drive: Pt.7

 *


UPDATE: The 1.6mm strimmer line did not work. It fitted in the groove and could be forced under the outer shell, with a struggle, but the friction was far too high. [Though lower than the original O-rings]

I have now used 1.3mm strimmer monofilament but this is slightly undersized for a hard material. Slightly better than 1.3mm copper cored, plastic covered flex but not by much.

I hardly dare to suggest 1.5mm monofilament because I haven't tried it. Being softer, 1.6mm rubber O-rings might work but again I can't speak from experience. Slightly thicker O-rings might work just as well. Provided it was less than the original 2mm. If you order any online, without a hands on trial, then you are on your own.

After endless searching and failing to find a Danish dealer I ordered some 50mm x 1.5mm nitrile O-rings from the UK. Almost giveaway prices for a packet of 10 [£1.50] plus very modest postal charges. Delivery time unknown but they should fit in a tiny envelope. Letter post? Could be only a few days.

Still waiting for the 250mm 120T GT2 timing belts from a UK eBay dealer. The one size the Danish dealer was out of stock. Grr!

Wednesday: Have now ordered several diameters of o-ring [in pairs] from the UK with a 1.5mm cross section. 1.5mm is the missing size in monofilament. I am reliably informed that 47mm x 1.7mm o-rings work well for those who find their etalon too floppy. The linked UK business no longer stocks that size! I turned a mandrel to test the internal diameter of my own o-rings. 42mm x2mm. 

Thursday: Wet all day.

Friday: Sunshine promised but breezy from the north. Can I enjoy some imaging time? 


*

23.11.19

PST etalon motor drive. Pt.6 further thoughts.

*

The motor driven etalon band needs a reduction in turning friction to function well. After thinking about it some more it occurred to me that there are alternatives to Teflon tape wrapping. As the o-rings are the only source of friction one should concentrate on those.

I tried fitting only one o-ring and it made no discernible difference to friction. Fail.

Modification could include replacement with slightly thinner o-rings of the same diameter.
Or, thinning the original o-rings slightly by abrasion. Though I certainly would not recommend doing this in situ. The o-rings would need to be removed from the inner shell of the etalon housing. For reduction in overall diameter by sanding with a cylinder of abrasive paper. 

A suitable mandrel would be required to hold the rings firmly [by stretching] for sandpapering. A perfectionist, with a lathe, could make a copy of the etalon inner shell complete with grooves. Though I doubt it would be necessary to make the grooves. Most o-rings, by their very nature, do not easily roll along a bar but remain in one orientation unless deliberately rolled from the side. Usually they just slide sideways without rolling. So sanding will slightly flatten only the curved, outer surface.

O-rings are available in a huge range of sizes and materials from specialists. The "mileage" they suffer in an etalon housing suggests the most common black rubber type is perfectly adequate.

The original PST O-rings in my own etalon housing are 51mm measured across the grooves x 2mm thick. Which suggests that 50 x 1.5mm might do the rick. I have checked the stock o-rings [locally] and their range includes 51mm x 1.6mm. A reduction of .8mm on overall diameter.

Whether these companies deal with private customers is the next hurdle. Many Danish businesses prefer to specialise in wholesale only. Leaving the private customer to find a source elsewhere. There is certainly no sales website for private customers to pay for small quantities of anything. Fail.

Which means going to eBay and the UK many times. With large postal charges for a signed-for service to avoid the career crooks. Who routinely say they never received the item and claim a refund. Then put the item on eBay. Fail.

Some companies sell round, rubber o-ring materials in long lengths to make your own o-rings. Now there's an idea! What everyday materials could replace the o-rings with something more slippery? Heavy, monofilament, nylon fishing line? Or grass strimmer line. Fine cord? Time to start looking!

I have been searching for plastic coated wire/flex in 1.5mm to replace the o-rings in the grooves. Amazingly difficult to find. Loads of 1.2mm or 2mm but nothing in between. So I used some 1.2mm and friction remained very low at the expense of a little extra slop. I have boxes and boxes of cables, from multiple disciplines, but no 1.5mm OD. The strimmer monofilament was also 1.2mm.

Tried 1.5mm brake cable, solid brass wire and solid copper wire. All too stiff. Copper cored, multi-strand flex is still the best so far.

For the truly adventurous there are stepped diameters of strimmer [grass trimmer] "wire" in monofilament nylon. 1.3 and 1.6mm are small change for a 15m length. Stiffness is unknown at 1.6mm but would seem an ideal candidate to remove the last of the outer drum slop. Not that it would matter with belt drive. It just seems a bit sloppy for my taste.

So another whole page of text dedicated to finding [about] 6" [15cm] of something better to replace the PST O-rings. It is Saturday and the nearest big DIY outlets close at 2pm. So it will just have to wait until Monday. This is weird! I searched online and none of the local DIY chains has 1.6mm nylon line in stock. I have had to order it online.


*


22.11.19

PST etalon tuning, motor drive. Pt.5: Rebuilding etalon housing for NON-Dummies.

*
I CAN ACCEPT NO RESPONSIBILITY IF YOU VOLUNTARILY CHOOSE TO COPY MY SKILLED AND HIGHLY EXPERIENCED EXAMPLE. I HAVE BEEN DISMANTLING "STUFF" FOR WELL OVER 60 YEARS.


Ever onwards:

Here we see the etalon, outer housing minus its O-rings. The vital screw rests in its rightful place of honour at the centre of the O-rings. Note the narrow grooves in the etalon housing where the O-rings would normally sit. The O-rings produce far too much friction for motor belt drive. Different lube didn't seem to help [at all] and might migrate into the optics if too runny. Some lubricants are designed to migrate. So be warned!

Here I show how far the inner etalon arc can move. About 160+ degrees. This is with a suitable bar [drill] fitted in a single drive hole. Remember to return the arc to its original [central] position or you might lose vital etalon tuning range. Which would mean dismantling it all over again.

Here I have shown the offset of the screw hole in the outer shell. [arrowed]  You can see that the offset forces the outer shell to fit only one way around. If you tried it the other way the screw would completely miss the hole. Or the shell would hang uselessly off the side of the etalon housing.


And, now, let's pretend I have re-wrapped the inner shell with Teflon tape so I can reassemble the outer shell. The last post showed the Teflon tape wrapped shell. It only remains to put that vital drive screw back in to hold everything safely together.

Then put the knurled, etalon adjustment band back over the etalon shell for the motor drive belt to run on. Finish off with the rear AOK Swiss, PST etalon adapter.

I am awaiting new and shorter drive belts. Once I have them I can confirm what length you will need for remote, Skywatcher focuser motor, etalon tuning. Only after I had ordered the longer ones did I realise that I wanted a much more compact motor arrangement.

The final image shows the etalon back between the AOK adapters. I was able to be far more generous with the Teflon tape this time. For which I was rewarded with improved stability. While I am waiting for the new belts I may as well try one O-ring instead of two.


Click on any image for an enlargement.
*


PST etalon tuning motor drive Pt.4 Dismantling The Etalon housing for NON-dummies.

*

I CAN ACCEPT NO RESPONSIBILITY IF YOU VOLUNTARILY CHOOSE TO COPY MY SKILLED AND HIGHLY EXPERIENCED EXAMPLE. I HAVE BEEN DISMANTLING "STUFF" FOR WELL OVER 60 YEARS. 

My original posts on dismantling my PST were grouped around early February 2018:  

https://fullerscopes.blogspot.com/2018/02/pst-dismantling-images-of-parts.html

You may need to move back and forth through several "chapters" of Older and Newer posts of that period to see all of it. Blogs normally update in reverse time.

Because so few people have seen the PST etalon dismantled I have photographed the various hidden parts. The inner workings remain safe from direct, physical contact if you proceed with the utmost care. No attempt to reach the active inner parts is desirable and certainly not shown here. History records that few etalons survive such "open heart surgery."

Removal of the etalon assembly from the PST gold tube requires a pair of sturdy strap wrenches. I almost broke mine in the desperate struggle to break the rock hard, red, thread locking compound. The trick is to have something useful left behind after the dismantling. A sledge hammer and cold chisel may be a lot quicker but leaves little to rescue for further use. Proceed with the utmost caution if you feel you really must copy my foolish example.

I can well understand the factory wanting to secure the PST against "idiots" taking it apart. i.e. Those who feel "entitled" to be fully protected from all self-harm.

My etalon group (or assembly) is already separated from its PST. It lives happily between the two, matching AOK Swiss PST etalon adapters. The PST has unusual thread sizes at either end. Again [probably] to protect "idiots" from committing self-harm in a dangerous lash-up.

The light from the telescope objective enters from the right in this image. The AOK front adapter screws into the PST etalon and has a 2" push fit for standard 2" telescope focusers. The rear AOK adapter screws over the back of the etalon assembly. It has a female 2" socket for whatever follows.

Here is a view of the female side of the etalon beside the front adapter. The sharp eyed will note the glass in the AOK adapter. This is a Baader 1.125 GPC to bring my Celestron CR150 f/8 to f/10 to better suit the PST etalon. I promise to clean it before it all goes back together.

The original PST was built this way and prefers f/10 for best performance. This is because the PST etalon consists of two lenses sandwiching the etalon itself. The etalon itself must see parallel light to function well. The optically weak, Baader 1.125 GPC does the job by stretching the focal length and resulting focal ratio to better suit the PST etalon + lens group.

Moving on: Here the knurled etalon tuning band has been pulled back. It looks like metal but is actually made of tough rubber. Note the cross-head screw protruding from the tape. This is the etalon drive screw and connects the inner and outer parts of the etalon. Lose that little screw and tuning becomes impossible. The PST probably wants to go into the waste basket. If only to avoid further torture at your hands!

Drop the etalon onto concrete and your etalon is extremely unlikely to survive the fall. Unsurprisingly, PSTs aren't guaranteed against being dropped by "idiots." If you object to the term "idiots" then enter a more pleasing, PC term [for] yourself.

The knurled ring is placed carefully aside. We'll want this to go back on. So the tuning band can be used, as normal, when we put it all back together.

Now take your watchmaker sized, cross-head screwdriver and remove that little screw. No need to remove the security tape. You are long past any hope of a Meade guarantee rescuing you from your own evil intent.

Just poke about with the screwdriver until it seats firmly in the cross-head. Don't round off the cross-head socket or you can't dismantle the etalon any further. Press hard and the screw should unscrew. It may be small in diameter but it is surprisingly long.

The screw is actually dual-purpose. It's second trick, beyond driving the inner, etalon adjustment is holding the etalon shells together. Take note of the Teflon tape wrapping the inner etalon shell. Note the deliberate offset. If you cover the slot then the drive screw can't reach the inner arc. Where the magic happens when you tune your PST etalon.

SEE THE NEXT EXCITING EPISODE in Pt.5.


 Click on any image for an enlargement.
*

20.11.19

PST etalon motor drive Pt.3 Mock-up with foolishly long drive belts.

*
I was cheated! Early sunshine found me in the dome setting up for imaging the sun. Before long it was completely overcast! Uniformly grey. Grr!

New version of SharpCap safely downloaded onto the laptop.  v3.2.6137.

I used some solar down time to compare camera and eyepiece focus points on 500 yard distant treetops. A thread on SGL, by a novice, solar scope owner, raised some useful points I had never thought to check for myself before now.

The ZWO cameras seem to focus at the same point relative to the 1.25" nosepiece regardless of sensor position or body size. Going on a sample of two. Possibly three. 120, 174 & 178.

This seems logical to avoid searching for focus after a mid session camera swap. A 2x WO Barlow on the camera nosepiece pushed the camera position 25mm outwards. Eyepiece focus was 22mm further out with the camera and Barlow removed. 

Worth remembering. Or adding to my observatory notice board. Memory like a sieve? Print the vital stuff and hang it on the wall to save searching back through my blog.

The post van doesn't usually arrive until after lunch. The timing belts are confirmed out for delivery today. I don't have a belt long enough to test the motor on the etalon band. No proof of pudding where reality is untested. Talk of the devil! The post van has brought my timing belts at 12:00.

The etalon drive requires some considerable tension! I fixed the motor bracket in a vice and held the PST etalon stack in my hand. It is 43F in the dome. The etalon adjustment feels stiffer than ever! Needs more friction between timing belt and etalon band. As I suspected the etalon band is too slippery for the rubber timing belt to get enough grip without lots of tension.

It seems counter-intuitive but I reversed the band and had more grip on the smooth side. Should I try a lighter grease to reduce friction of the underlying 0-rings? Removing the O-rings removed all friction but things became very sloppy. The etalon inner drive ring is effortless to move within its range of arc. A radial screw joins the two to provide the drive between the inner and outer rings.

So the friction in the O-rings is the only real difficulty. The outer ring is far too floppy without them. I'm going to try silicone car door seal grease. Instead I found some pure silicone oil for O-ring plumbing lubrication. Applied sparingly but thoroughly to the rubbing surfaces. Sadly this did not have the desired effect. The friction hardly dropped at all! I haven't used enough to leak into the etalon optical system. I had a good clean up afterwards, with clean tissue, to avoid migration.

What about PTFE/Teflon plumbing tape? Remove the O-rings and replace them with a couple of turns of tape. It's not as if there is much relative movement and no real loads to speak of. Concentricity between the rubbing surfaces with minimum slop is all that is required.

A rough wind of tape later to test the theory: Put in the drive screw. Effortless rotation! The O-rings really are where all the friction lies. The O-rings provide smooth stability between the rings and deter involuntary tuning. They are just a little too tight for comfort.This  explains the subjective sensation that gripping the band between finger and thumb tightens the movement. While wrapping a finger around the etalon band feels smoother.

Both belts proved to be too long. More shorter belts ordered. My search of a DIY outlet provided only stainless steel hose clips. Even then, they only had 60mm and I needed slightly greater diameter.

*

19.11.19

PST Etalon tuning, motor drive Pt.2 I do the [simple] maths.

*

I spent the morning measuring parts with vernier calipers and calculating timing belt lengths. 

The Helical focuser drum is 70mm in Ø. It rotates very easily compared to the PST etalon band.

The PST etalon band is 61mm in outside Ø. It has an embossed finish to provide friction.
The bare, etalon drum is 58.5 with the band removed but has a tiny raised ridge to keep the band in place.

My smallest GT2 pulley has 14 teeth from memory.
The drive belt for the FT focuser is 100mm long.

Next I needed to arrive at a suitable center to center distance for the motor pulley[s] relative to the diameter of the driven circumference.

I reasoned that driven diameter x Pi/2 would give me a nominal tooth count to use in an online belt calculator. They usually want a tooth count to make any progress.

I ended up ordering a 280mm belt and a 300mm. These lengths do seem extreme but they have to divided in half and wrapped around the transmission components. Circumferences always use up a lot of length. The belts are really quite inexpensive. In fact the postal charges were slightly more than the two belts put together.

I can progress with testing drive reliability once I have the belts here by using my existing Skywatcher motor. The belts will arrive tomorrow thanks to online dealers who care about rapid turnaround of orders.

I have searched online for suitable 60-61mm clamps to fit the AOK Swiss PST etalon adapters. The loads on the clamp are low. So a reasonable cosmetic appearance is arguably rather more important than sheer strength. Nobody wants to see an ugly exhaust clamp half way down their H-alpha telescope! Nor a screw hose clamp.

It would be easy to simply bolt the motor mounting plate [provided] to the AOK etalon adapter. However, this is a rather fixed arrangement. Rotation of the two motors, relative to each other, becomes awkward. One motor will face the talon. While the other will face the helical focuser. I'd much prefer a neat clamp for each. A visit to a large DIY outlet is indicated.

I could bore a 60mm hole in a piece of black plastic sheet and then cut it in half. This is what I had to do with the FT clamp. I wanted a compact arrangement with the motor laid low over the pinion housing. The difficulty lay in drilling down 2" [50mm] through the edge of the plastic to take clamping bolts. The FT has a stainless steel conical section behind one focusing knob. I decided to use that as my clamping surface. Not an easy task. Because the parallel section was narrower than the plastic sheet. The conical shoulder didn't help.

Despite all this, the focus motor worked very well and looked fine from a distance. Providing a revolution in my ability to focus precisely without touching the telescope. I was sidetracked by a focus motor control box which promised much but instantly crashed SharpCap. A recent software update seems to have overcome these difficulties.


*

18.11.19

18.11.19 PST etalon tuning, motor drive. PT.1 Thinking furiously.

*

Monday 18th November. For some time I have been mulling about using a Skywatcher focuser motor to drive the PST etalon adjustment remotely. While I'm there I really ought to have another motor on the helical focuser. The adjustments required are often too small to see. Those who have never tried a motor driven focuser would be surprised how a tiny degree of rotation can make a huge difference in appearance of the camera's image on the monitor. 

To that end I have measured the pull required at a tangent from the rim of my PST etalon. I arranged a thin cord in the form of a Prusik loop wrapped around the PST etalon band. This showed that I needed 2.8lbs of weight to make the ring rotate smoothly without stopping. A small excess of force will be useful for reliability.

The Skywatcher 12V gearbox motor easily raises most loads on the FT focuser. So I added 2.8 lbs to the Lacerta prism and the motor could still raise that weight on 12V. Though there is the matter of the ratio between the pinion and its rack. I'm talking about the focuser's direct drive knob here. Not the 10:1, slow motion knob. One rotation of either of the direct drive [black] knobs causes a 20mm movement of the drawtube and its rack.

To calculate the ratio you measure the movement of the rack caused by one full rotation of the driving pinion. One rotation is the active circumference of the pinion. A small pinion will provide a different ratio from a large pinion. The number of teeth on the pinion or the rack don't matter for this example. 

Where a belt drive is used, from the motor to the etalon band, the tiny pulley on the motor provides a lower gear ratio than if both were the same size. The actual number of teeth is again irrelevant because the etalon ring is structured rather than toothed. The drive relies on friction between the toothed belt and the etalon ring.

Now I ought to wrap a thin cord around the Skywatcher pinion to measure its ability to pull.Yet again I used a cord Prusik loop. By locking the cord to the toothed, timing belt I could hang weights from the belt while the motor was used to raise them. There was no hesitation in lifting a 1.5kg weight. [3.3lbs] There is a gear reduction ratio between the small pulley on the motor relative to the diameter of the etalon band. The ratio can be multiplied by the motor's ability to lift weights.The PST etalon band is 60mm in diameter. The present, timing pulley on the motor is 9mm Ø. So there is a minimum 10:1 increase in torque from the motor pulley to the etalon band.

Without doing any maths it is obvious the the motor can easily turn the etalon band. This is provided there is enough friction between the toothed belt and the etalon band. The band is rather slippery [slick] so may need some tension on the belt to achieve a reliable drive. Alternatively a "grippier" surface could be added to the band or the metal band beneath it. A rubber band. Or even better, an inverted timing belt, stretched tightly over the band with its teeth outwards.

The problem is calculating the exact dimensions of a suitable timing belt to grip the etalon band inside out. There is a risk that the belt's teeth will splæay to cause pitch problems. I'll use the same GT2 [2mm pitch x 8mm wide] pulleys and belts. Just as I did on my big, FT focuser.  I have duly ordered two Skywatcher motors. The other will be used for the helical focuser.

*

17.11.19

Sunday 17.11.19 Oh, Solar me, oh!

*

Sunday am: 11:00 41F. Weak sunshine with wind and some cloud increasing. Several modest prominences and one, paler, disturbed region in the solar southern hemisphere. It feels cold in the dome due to the wind.

I have captured lots of videos but  Registax is misbehaving. In a desperate bid to have something to show for my efforts I tried AS!3 [Autostakkert] and iMPPG to process some results. Then tried harder in PhotoFiltre to augment the final image. I usually, recolour the final images in PhotoFiltre7. Not with any great success. As can be seen on the right. Realistic sharpness of the final image still eludes me. Yet, the image cannot be sharpened artificially without producing digital artefacts. I am usually using 640x480.

The next image shows how imppg can bring out a 3D effect from exactly the same image. Though still not crisply.

Spreading the detail outwards requires a delicate touch and probably a lot more practice. Subtlety is not remotely easy to achieve. I have no clue as to the desirable settings and can't ever remember the details from the guides. The "chrysanthemum" effect arrived by sheer chance. As I played with the wiggly lines laid over the histogram on the right in iMPPG.

The third image is a photograph taken straight from my 25" monitor. It shows the active imaging screen in SharpCap. The "live" detail and huge scale is obvious. Though, in reality, is subject to various degrees of thermal tremors. Which a still photo cannot capture. Note the variation in brightness over the vertical depth of the frame.

I don't have any software to even out this variation. Though I believe Photoshop does. Having just watched an expert's video on using Photoshop to augment a solar image I am almost grateful that I don't have Photoshop. The number of steps, choices and selections is well past my sell-by date. I struggle to remember the basics of Registax and Autostakkert! I have the memory of a net.
 
"Lucky imaging" software is supposed to iron out the differences between the [software] chosen frames of the captured video. The faster the video camera the shorter the time span for avoiding camera shake or poor guiding. The faster the camera the more frames can be captured in a given time span. More frames means more data.

Camera speed is highly dependent on image brightness and frame size. A 640x480 frame of the solar surface in H-alpha can mean 350fps with the ASI174. While a small fraction of the limb with a dim prominence can mean the camera drops right back to 30fps. Prominences are usually made visible by over-exposure of the solar surface in H-alpha. It is not possible to see them in white light with normal, amateur equipment.

Camera speed is also dependent on the computer hardware. USB3, short cable lengths and a really fast hard drive [SSD] are important. The file sizes for video capture can be enormous as frame size increases. I rarely use the full 1936x1216 for video capture in SharpCap. Reserving the full frame only for finding objects. Things like the Sun and Moon. Which are elusive when Goto means something else altogether.


Click on any image for an enlargement.

*

15.11.19

15.11.19 Worm springs eternal?

*

Friday. Cold, grey and windy. I decided to look at the RA drive worm to try and reduce backlash. The strong spring I had used was either on or off. 15lbs to achieve midway stretch. So I found another spring in my marmalade jar collection of springs. 

This one took only 4-5 lbs to stretch half way measured on the fisherman's "spring balance." I duly fitted it in place of the stronger spring but gained nothing obvious. The stepper motor still stalled if I tensioned the spring too much. So I slacked it right off until there was no stretch at all. And still the motor stalled going both ways in RA.

Another asymmetric balance problem methinks. The telescopes wanted to match the counterweights for level. One on either side of the PA. They should balance completely irrespective of position or pointing angle. This needs urgent attention with the clutches let off.

Have paused for lunch and then it is back to balancing and testing for stalls on slews. Fortunately the "Simple handset" [paddle] is all that is needed to slew the mounting. No laptop, computer or IH2 required. More on this later.

Completely freeing the worms was essential, as usual, rather than just the clutch screws. There is still too much friction on the shafts even with the clutch screws loosened. The clutches are simply plastic plugs pressed against the shaft by three radial screws in the wormwheel boss. Originally supplied with only one clutch screw by Mount Beacon.

The balance proved to be fine with only a very slight bias in favour of the telescopes. I tried hanging very small weights off the counterweights on a cord but it made no difference to the RA motor stalling.

Gently "helping" the telescopes in either direction also has zero effect on stalling. It's not an inertia thing either. Stalling often occurs mid slew rather than at the beginning of a paddle button press. I am using white grease to lubricate the worms and it seems to remain in place. The motors do not [usually] stall if I allow some backlash. The stalling problem is due to my desire to avoid any "slop."

Thanks to the 50mm bore, self-aligning, flange ball bearings, friction is very low on both axes when freed from the drag of the wormwheel clutches. I can only assume that there is variable friction between the contact surfaces of the worm and its wormwheel. Perhaps I should lap the worm against the wheel for a few hours? Perhaps make up a simple jig for the lathe? There isn't much room for a motor to drive the worm in-situ. Though it would make most sense to lap the worm while still attached to the mounting. The geometry between the worm and wheel would change under any other circumstances.

*

14.11.19

14.11.19 AR2752 and proms.

*

Thursday: After a grey and misty morning the sun came out at 1pm. For how long? About an hour before cloud came over.

The new "sunspot" AR2752 [deceased] looks very disturbed in the general area. Particularly to the SW.


A prom at 2 o'clock on the limb.


Another prom at 10 o'clock.


I confirmed that the view through the two ZWO cameras is inverted 180° relative to each other. I am using the blue, USB3 exit port as my reference. The scale of the image in the ASI174 [left] is much smaller than  the ASI120 [Right]. Both images taken of a bird in the tree tops at 500 yards distance using the Vixen 90mm f/11.


Click on any image for an enlargement.

*

13.11.19

13.11.19 Astronomy Tools camera sensor matching to focal length.

*
The following website was mentioned in passing on a ZWO video on YouTube.


I have used the sensor & pixel size calculator tool for my 6" f/8 H-alpha and my 180mm f/12 iStar refractor with and without Barlows. The coloured bar at the bottom of each screen shows the suitability of the ZWO ASI174 camera sensor match to each instrument. Though the emphasis seems to be on deep sky rather than Solar, Lunar or Planetary imaging. Better seeing conditions make the present instrument camera options more suitable. Precision guiding is assumed with longer focal lengths. The ASI174 is know to have a modestly sized sensor with large pixels. It is a popular camera for Solar imaging.

The following Calculator screens were copied straight from the Astronomy Tools Calculator website, cropped and resized. Click on any individual image for an enlargement:


The details are in the boxes. The Astronomy Tools Calculator can find the sensor and pixel size from  entering the camera model.


Click on any image for an enlargement. 
*

11.11.19

11.11.19 Mercury Transit. Spot the difference?

*

13:45[CET] and still waiting for a clearance to get a fix on the sun. Then I can leave the drives running and wait for further clearances. [If any!]

Bright patches keep teasing but don't cross the sun to give me a disk. I have the ZWOASI120 in the Vixen 90mm f/11 for white light. The ASI174 in the 6" H-alpha. Both shutters open for the moment despite the cold, gusty wind.

I need another solar filtered finder on the other side of the instruments for the "afternoon shift." Meridian reversal turns the whole lot "upside down." The 90mm and finder are three feet above my head at this time of year! 

14:00 Success! Captured some rushed 500 frame videos of Mercury well onto the disk. I am actively using the exposure slider to keep the sun visible enough to see Mercury. Just like playing slide guitar. Heavy plates of cloud with thinner areas are a real tease. As usual there are lots of blue patches overhead. It is no use monitoring the sunshine on the obs. wall. The sky is often bright enough to light up the dome without exposing the sun's disk.

Registax keeps crashing on alignment! I have had to go over to AS!3 to have anything to show for a couple of hours of frustration. It could all have been so different. Weather permitting!

Before a total overcast I was finally getting convention cells to go with tiny Mercury.

I have more videos on the laptop which need to be sent to the external SSD. Then I can transfer them to the PC for processing in relaxed comfort indoors.

We have some floppy, but quite heavy, knitted, greenhouse shade net. I thought I might drape a length down the observation slit to reduce wind inside the dome. It would need a gap or hole for the telescope to see through. The limited, vertical range of the telescopes  could be managed with an overlong length of net being raised and lowered. Tension and retention would be needed at the top and bottom to stop it blowing away. Though it seems quite stable in wind. Unlike conventional cloth. I wonder if it would help with "dome seeing" when it is hot?


*

Monday 11th Novemebr 2019. The big [little planet] transit day!

*

Warning: Looking at the sun is very dangerous!
 

Sunglasses and welding glasses are not safe!
Don't listen to any ignorant fool who says they are safe! They aren't!
Mercury is so tiny you won't see it against the sun anyway.

Not even with your special "eclipse glasses." So why take the risk?
 

Never look at the sun though any telescope nor binoculars not specifically designed and approved for solar use!
Not even for a second!! Instant and permanent blindness will surely follow!


Amateur astronomers know what works safely. Or should do!
They spend lots of time and money ensuring their own safety.
They buy very special solar filters and exotic telescopes:
Which completely block the sun's invisible heat [IR and UV!]
Only a tiny amount of the remaining light 0.001% is ever allowed through.
  Their special solar viewing equipment is designed to avoid the very serious dangers of

 permanent blindness.

Watch the Mercury transit safely, online or on TV.
 

You will see far more, far more clearly online or on TV.
Than any idiotic lash up you can possibly think of yourself!


Monday 11th. With a grey overcast forecast looming over us, the sun is out. I have been for my morning walk to capture the low sun against the now familiar, rural backdrops. 

10:15 40F Morning coffee over and I can go and play in the dome. Making mayhem while the sun shines.

11:15 41F  I'm really fighting the wind. It is blowing straight from the sun's direction. The shutters keep blowing shut [sic] because I deliberately left the bolts off. I can still image through the small gap as long as I keep it aligned properly and use a spacer on the base ring.

Tried FireCap but it couldn't keep a lock on the sun in this wind.  It also produced horrible, off-axis glare which completely vanishes with SharpCap. Same frame size, 640x480 and matching exposure and gain.

Lower cloud is blowing from the south now. With the high cloud going the opposite way.

Four nice sets of proms at 2, 4, 8 and 10 o'clock on the limb. I have captured several videos of each using SharpCap. Just in case the wind spoilt things midway.

11:35 Nearly 2 hours to go before ingress at 1.35 CET. If the sun is clear it is possible that Mercury is visible in H-alpha against a prominence or the chromosphere. I ought to try and pin down the point of ingress while I still have time.

Ingress at ~1.34 [CET] at about 9 o'clock on the limb travelling westwards. Transit finishes well beyond local sunset.

11:42 Clouding over rapidly from the south. 😢
12.35 An hour to go and the sun keeps teasing with fleeting brightness. Gone back indoors to warm up. The wind makes it feel much colder even in the half closed dome.


*

10.11.19

Sunday 10.11.19 Wrestling with software!

*

Sunday: 32-43F. 0C. Early sunshine looks promising. Though there is lots of cloud and some mist.
Tomorrow's forecast is still for solid cloud and even a few showers. Sunshine again on Tuesday. I shall be 85 by the time Mercury shows off its miniscule self against the sun's disk again. By then I shall probably be up to my ankles in sea water here at a modest 60 meters, 200' above 2019 sea levels.

After morning coffee I'm off to the observatory to test the driving and imaging software again. I shall need to wrap up warm!

I have been doing some homework on computer memory and can expand both the internal RAM and the SSD at some expense. My ASUS has a big cover underneath. Which exposes both the SSD and RAM with the removal of two screws. I'd have to transfer the Windows 10 OS over if I choose a bigger SSD.

Three restarts later. Not a good start! Finally I now have C-Du-C, FireCapture and HitechAstro DC Focus playing nicely together. I had plenty of time because the sun quickly disappeared behind thick cloud!

I have reset FireCapture display scale several times but nothing changed. Then I had to do another restart and FireCapture is now suddenly visible without using an electron microscope! Why, oh why, oh why, oh why, would software be so clever it can tell you have a high res. display and laptop?

Then hides the means to change it several miles below the surface of totally inscrutable symbols. Display adjustment controls should be at the very top in huge writing! I have wasted hours and hours over several months trying to get FireCapture to adapt to my screen resolution and laptop.  

Why would imaging software needs its own special settings just to be visible? Every other app, including Windows and the browser are now in huge text!

Solar tracking stopped on the meridian again! I have already had to reverse Dec drive direction this morning. The cursor headed straight down into the darkness below the horizon on its way to the sun.

FireCapture offers auto-guiding but resented my first attempt with the ASI120. It has sent me back to Settings >  Hardware > Telescope. No idea why.

I'm enjoying lunch indoors and warming up after hours out in the dome. Where it had reached about 40F. Now I am indoors the sunshine is continuous. I haven't had more than a minute of clear sunshine all morning!

Back out again and fired up everything. FireCapture is now huge and I still have no idea how to change it back! Totally opaque!

I managed to get auto-guiding going without a clue how I did it in the end. I have four arrows in the corner of the live capture frame with flashing red arrows for correction. Is it using the live image from the 174 in H-alpha or the added 120 in the Vixen 90mm?

ASCOM wouldn't play on auto-guiding via FireCapture so I had to set to "ST4 internal" on camera. I am being constantly teased by cloud! I am also being tormented by off axis brightness. I think I need the tilt plates. Duly applied but with only limited usefulness.

Pulled the ST4 plug on the 120 "guide" camera and FireCap is still auto-guiding happily in H-alpha. Wow? It was short lived though, because the cloud kept dimming the image beyond FireCapture's ability to lock onto an anchor. I still haven't found how to keep an accessible link to open FireCapture. It seems it has to be run from the download every single time. Can that be true?

So, I returned to SharpCap and captured loads of videos of the nice proms. I have them on the external SSD so I can work in comfort processing them indoors on the PC. A couple of hours of unbroken sunshine. Tomorrow is still forecast to be solid cloudy all day. Grr!


*

9.11.19

9.11.19 Uninstall everything and start all over again.

*

Saturday morning: 41F, cloud and thick mist. From the comfort of indoors I cleared off all additional imaging software on the laptop.

Now I am back in the cold and damp observatory from where the AWR electronics cannot be easily removed to play indoors. Everything in the building is covered in condensation or dew!

I have uninstalled C-Du-C, Registax, HitechAstro focusing, PHD2 guiding & SharpCap. The intention is to add one software at a time until AWR-ASCOM breaks. I don't have a target for the AWR Goto drives. So I can only start from the parking position with a fresh Calibration/Sync. The USB/serial cable has been inserted directly into a laptop USB3 port instead of a brand new, 4x USB3 hub. The hub is presently providing ports for the wireless mouse and keyboard dongles. I need one of each and there will be no spare USB ports on the laptop. More importantly, I didn't want anything to interfere with the signals along the serial cable.

Let's start with C-Du-C: 4.2.4046 from Source Forge. NOT A GOOD START!! AWR-ASCOM does not exist! When I repaired the AWR-ASCOM driver and downloaded a new version of C-Du-C it crashed repeatedly. I can't close C-Du-C except via a full Windows restart. C-Du-C cannot connect to AWR-ASCOM. I have re-selected AWR-ASCOM Telescope after it disappeared from the Choosing list. "Empty string."

1pm. As a subscriber I have a link to the Tigra download of the AWR-ASCOM driver. 2 hours and much button pressing later, C-Du-C finally woke up and spoke to me! In a woman's voice. Some messages seem to be cut off at the beginning. Which makes life very confusing. I haven't found the off button to shut her up yet.

I'd like to Sync on the sky but can't without any sun. I have re-entered my observatory site coordinates which seems to have become corrupted during the new C-Du-C download. C-Du-C has changed and lost some familiar buttons. The important button to confirm a slew has actually landed on an object has gone. A right click offers options. I do prefer the new mouse dragging effects. It was a constant struggle to avoid a circular sky before the new download.

3pm, 43F and I'm still hoping to get a glimpse of the sun despite the endless cloud. I have downloaded Autostakkert to avoid having any more problems with Registax. Perhaps I ought to do the same with FireCapture to avoid the crashes with SharpCap?

BTW: I am running a fully up to date, Asus W10 laptop with 8GB of Ram, 256GB onboard SSD and several USB3 and USB C ports. I back up regularly to an external 1TB SSD when I found a 500MB SSD filled up too quickly for backup during an all day, solar imaging session.

From doing some homework about the fast, large chip, ASI174 camera I would be better off with a dedicated imaging PC. One with lots of USB3 ports. Each with individual PS/controllers. Masses of RAM and a big onboard SSD. Some imagers use a gaming laptop. They also leave out antivirus software to avoid slowing things down. I use a dedicated USB3 port for the camera. Even the little ASI120MC didn't like going through the 4xUSB3 hub. The ASI174 is much faster with a much bigger chip. So much more demanding of USB power and sheer machine and memory speed.

I could swap the onboard SSD for a much bigger one and might be able to add more RAM. Though that still leaves the USB3 ports as a potential limitation.

I tend to blog and browse [wirelessly] in the observatory while waiting endlessly for cloud to pass over. So security is probably worth having. Unless I use something else for the Internet and keep a dedicated imaging machine isolated. Or even air-gapped. I noticed that Google backup was slugging 8.5% of my CPU when I checked.

The Mercury Transit is now only 2 days away on Monday the 11th of November 2019. I shan't be happy if I can't capture some videos and images. Not that the weather is cooperative. Solid cloud is promised by one forecast service. Showers and sunny periods by another. Quite windy too from the SW. Which is the direction of the sun after lunch when the transit starts at 13.35 [CET] locally.


*


7-8.11.19 Lunar imaging and more software chaos!

*

Thursday evening: Cloud also spoilt a potential half moon, imaging session. It is completely overcast now at 20.00.

Friday: I found a lot of large, aluminium box sections in bright and clean aluminium at the scrap yard. They were so nice I went back with the car to fetch them all. The longest was 2 meters of 100 x 200 x 3mm [6'6" x 4" x 8" x 1/8"]. With several shorter lengths. There were other, smaller sizes of rectangular, box section too. Now all I need is the inspiration to make good use of it all. It was far too good to leave behind. A bit heavy for a beam telescope but an English mounting would do. I'll think of something.

Friday evening was another attempt at lunar imaging. However, the seeing was really awful again. With violent thermal shaking and variable, thin, high cloud obscuring the surface. A strong lunar halo varied over a couple of hours and there were few to no stars visible in a milky sky. Near the end of my two hour struggle there was just a hint of a Plato craterlet on the screen. It had vanished by the time I had mangled it with Registax.

Registax crashed so many times this evening I may have to give up on it. I had uninstalled and downloaded a fresh Registax package and update. Nearly every time I tried to "Align" the active screen went white and blank and the lunar image never returned. The Set Align Points system is also broken. It did not change the number of points regardless of slider Strength or numerical setting. It was throwing a ridiculous 400-600 or more, red spots, which were not removable nor even variable. Though I could add more by clicking on the screen!

An AWR-ASCOM "denied connection" popped up every single time I tried to make a new SharpCap setting in the menus on the right. HitechAstro's focuser panel showed NO ASCOM connection. PHD2 could not connect to ASCOM. I kept getting notices saying that things would not work without "main machine" running. "AWR-ASCOM Connection denied" again and again. I ran another ASCOM Diagnostics check but all seemed well with only a few exceptions. Does ASCOM diagnostics check the AWR-ASCOM driver?

On both evenings AWR demanded a Calibration Sync of the Parking Place before it would allow a Set Park. On both occasions, despite getting a fresh calibration it missed the moon using C-Du-C guidance by a mile on both slews. By ten degrees at least. Later, when I reached the Meridian, there was the usual bleep, Lunar tracking stopped and the moon began to race across the SharpCap screen! I had to restart Lunar tracking several times over both evenings. This happened during solar imaging earlier on Thursday when it suddenly forgot to track. See the next, exciting episode!


*

7.11.19

7.11.19 The latest iteration of the 6" H-alpha telescope.

 *


This image shows the latest arrangement of my highly modified, 6" f/8 H-alpha telescope.

It is now providing truly startling images and views. At ~£10,000, the cost of a commercial 150mm H-alpha telescope is well beyond my pocket. For my much more modest investment I am very happy indeed with the results. I can use high powers, atmosphere permitting, thanks to the larger aperture.

You do the maths:

A cheap, secondhand 6" f/8 Celestron CR150HD  + an overpriced, secondhand PST + 90mm Baader [internal] D-ERF + Maier ITF + Baader 1.125 GPC + cheap helical focuser. Plus the AOK Swiss etalon adapters and various 2", T2 & 1.25" extenders.

I'd like to make a proper support system for the very long, cantilevered filtration stack. It is vital that the spacing of the various components is accurate. They can't just be moved around arbitrarily, relative to the focal plane of the main objective.

It has been fun reaching this point. Even frustrating at times. I am very grateful to all the solar enthusiasts who offered vital advice along the way.

I must apologise that this blog is not a more useful, construction reference. The build has been scattered over about a year of online research, advice and putting it all together in stages. I am constantly learning and recognise that the image processing software is still my Achilles Heel to much better final images.

Observing and imaging the sun has become my main pastime. It has finally separated me from my almost obsessive cycling of previous years. Up to 10,000 miles per year before I gradually cut back. The very real risk of an accident or personal ijury increases with every extra mile and every year which passes.

Now in my early 70s I am now at home, most days, instead of being many miles from home fighting the wind. My home-made, domed observatory has become my daily centre for relaxed but intense activity and creativity. Yet I am always within easy reach should my wife need me for a chore.

At the same time I am not cluttering up the happy home by moping around, watching TV or browsing. The present arrangement suits us both. When the weather is uncooperative for astronomy, I can still work on the equipment or the buildings. While I wait for cloud to clear I am thinking about improvements.
 
After 12.00 heavy cloud obscured the sun.  The cloud seems to be coming from the SE and became progressively worse. With the sun so low, up here at 55N, its light has to take a far greater, slanting journey to reach me through the atmosphere. Meaning that there is always a far greater risk of cloud intervening. It has now reached 15.00 and there is very little prospect of clear skies. It was 16.30 before the sky cleared. The sun having long gone to bed.

Cloud also spoilt a potential half moon, imaging session. It is completely overcast now at 20.00.

Friday evening was another attempt at lunar imaging. However, the seeing was awful again. With violent thermal shaking and thin, high cloud. A strong halo varied over a couple of hours and there were few to no stars visible. Near the end of my struggle there was just a hint of a Plato craterlet but it had vanished by the time I had mangled it with Registax.

Registax crashed so many times I may have to give up on it. Every time I tried to Align the active screen went white and blank and never returned. The Align Points is broken. It did not change the number regardless of Strength. It was throwing 400-600 red spots which were not removable nor variable. 

An AWR-ASCOM "denied connection" popped up every time I tried to use SharpCap. HitechAstro's panel showed no ASCOM connection. PHD2 could not connect to ASCOM. Connection denied again. I ran another ASCOM Diagnostics check but all seemed well with a few exceptions.


*

7th November 2019 ZWO174 Solar Surface.

*

Thursday 7th 43F, sunny periods. Back to the sun. Nothing very visible in white light.

The ZWO120 is back to its old tricks of masking the picture.


Fortunately, the ZWO174 is still working well. With nicely defined mono views of the solar surface. I have been capturing videos of the surface including two surface features in the northern hemisphere. With an 800x600 window I am getting 320-340fps!

Only a few small proms visible so I am ignoring them for the moment.

SharpCap keeps reporting problems with AWR-ASCOM and connection failure every time I ask SC to do anything. Yet again, Solar tracking stops arbitrarily and has to be restarted on the IH2 handset. For the third time this morning.

I tried iMPPG on the image [right] but as usual it started off pre-sharpened from Registax. Any further adjustment merely made matters worse. So I gently massaged it in PhotoFiltre7 and recoloured the mono image instead.

The three images right show successive darkening and sharpening. None of which are remotely as successful as iMPPG in skilled hands. I have tried to bring out the lighter coloured flares at the centre of the image and the darker one at top right of the image.

I processed my captured surface videos similarly and tried Ms ICE on them. It couldn't stitch them together to make a disk. It may be that I had not enough overlap between the images. It is difficult to judge but it probably needs more than nine "segments" to provide suitable overlaps.

Click on any image for an enlargement.
*

3.11.19

Sunday pm ASCOM, PHD2, SharpCap, etc.

*

Sunday 3rd, afternoon 13.45 50F, weak sunshine, cloud from the south east. More hours of being teased by cloud! I spent time trying different things with the software. AWR-ASCOM seems to have gone into a sulk. I managed to get PHD2 to work [sort of] with ASCOM set to Generic Host. I was having to work by artificial light to avoid rain. The only light I could use was the overhead white bulbs with the all-sky camera.

When I was able to open the shutters I had the idea that PHD2 should stop the movement of normal drive speed when I focused on distant trees. It didn't have any effect. I presume it wasn't supposed to work like that anyway. I was having to use the shortest possible exposure to see anything on the PHD2 screen. 0.02ms? Can't remember the details now. Trying to get it to show the sun was hard work too when it peered out briefly. The limb was barely visible through the cloud.

Monday 4th: Heavy overcast and steady rain all day.  I fitted a length of aluminium angle to the right edge of the desk to stop the mouse becoming a lemming. It would be all too easy to drop or brush the mouse into the void over the stairs. Ask me how I know this. By fitting the angle to the underside there was no ridge to disturb the mat. A new, Logitech M705 wireless mouse was less than £25 online delivered next day despite ordering on a Sunday afternoon. I like the thumb controlled, backwards and forwards buttons.

After that I fitted a length of stiff plastic [gutter] netting across the gap where my feet would normally rest against the pier. Except that I had a left a 4" horizontal gap, above the observatory floor, to stop my toes accidentally kicking the pier during image capture. Instead of which I kept kicking things into the void.

Tuesday 5th 42F. Heavy overcast and rain all morning. I need a screen to protect my old down jacket from the white grease on the PA wormwheel. I thought I might buy an aluminium, baking pan, 33cm in diameter. If I made a clearance hole for the 50mm polar axis shaft then the pan could float on top of the wormwheel.

That would be rather smarter than a simple strip to keep stray clothing away from the wormwheel. The pan would also need a notch cut out for the worm and its housing. Unfortunately this won't work as hoped. The "clutch" pressure screws would be inaccessible. An alternative would be to have the pan underneath the wormwheel. Even so it would far deeper than necessary.

Wednesday 6th: With a leaden sky between myself and the sun I decided to make a clamping collar for the Polar Axis. The screw camp I had before had slowly worked its way down the PA. Only by a thou' or two but enough to risk the worm and wormwheel getting out of proper alignment. So I turned and parted off a 4" Ø disk of scrap, yellow brass. Then bored it to 50mm and drilled and threaded it for 3 x M8 hex socket head, stainless steel, clamping screws at 120° apart.

When I slewed the mounting with the AWR Simple Handset I was greeted with relative silence. Yesterday, when using the IH2 the RA motor was very noisy. I cannot say whether the reduction in noise was the result of using the brass clamping ring as a slide hammer. To tap the wormwheel gently upwards against its stop ring.

Click on any image for an enlargement.


*

Sunday 3rd Nov. ASCOM, PHD2 & HitechAstro.

 *

After a whole day of steady rain [Sat] it cleared in the early evening to reveal a low, crescent moon. I went back out to image it but was repeatedly thwarted by AWR-ASCOM error notices. The videos I managed to capture failed to provide anything worthwhile. It was easily the worst "seeing" or lack of it,  I have ever witnessed.  I'll try again in the morning to discover which of the assorted programs ASCOM disliked so much. I was running C-Du-C, SharpCap, HitechAstro focuser and PHD2 simultaneously.

Sunday: 50F, grey overcast with occasional rain. Back out to the obs. to try and get PHD2 to behave with AWR-ASCOM. Still getting error messages. I am photographing the error notices on the screen to avoid taxing my memory but could use Screen Capture, I suppose. I am using the distant 600 meter trees as a target.

I managed to get PHD2 to work [for a while] with it set to ASCOM Hub. It refuses to connect to, or work with AWR-ASCOM. When I tried to open SharpCap I lost the camera in PHD2 and it would not return even when I closed all the other apps. I tried pulling the cable and connecting again with no luck.

The problems with HitechAstro DC Focuser seem to have settle down after the latest [1.4] software download. Though I can't tell if it is doing anything behind the scenes.

I tried AsiCap and Guiding. It went crackers and slewed wildly all over the place. Interesting, while it lasted, but there seems to be no control settings. Two and a half hours wasted without obvious outcome or cures.

I hear that AS!3 can image and guide at the same time. I suppose that will have to be be my next parabolic learning curve.

Click on any image for an enlargement.

*

2.11.19

November 2nd: Pottering in the observatory.

*

Saturday and very wet. So I decided to tidy the observatory floor. Which had accumulated stuff, tools and junk from ongoing mods to the dome drive system. 

Half way through I made the Declination drive cable as near to "through the mounting" as was possible with least effort. The AWR drive system uses large, multi-pin connecting plugs. So I needed holes large enough to allow the plugs to slip through easily. That meant drilling a couple of 35mm holes in the plywood of the plinth cladding at observatory level.

In the absence of a suitable clip being handy I hung the Dec cable from a zip tie as close as possible to the PA. Then passed the Dec cable down though the large [access] hand hole in the support fork covering plate. Then hid the bulk of the spare cable length inside the plinth. The mounting can now be swung through 180° around the Polar Axis without any undesirable tension being placed on the Declination drive cable. I'll take a picture in daylight if it ever stops raining.

"Proper" equatorial mountings have hollow PAs. To allow multiple cables to pass through with minimum radius or twist. I had no access to large diameter stainless steel tube. Not could I probably afford the huge bearings required to support them. I bought my 50mm bore, flanged, self-aligning bearings as a special offer. For less than you can pay for silly little, mass produced, skateboard bearings.  Modern mountings have to cope with far more cables than those of the past. Where only a single synchronous motor drive to the PA was likely.

I filed a slot in my AWR IH2 support stand. Which I had made of plywood to tilt up the drive control paddle at a more comfortable angle. Making it easy to use while still lying on the desk in front of the computer monitor. When lying either flat, or vertical, I found it extremely awkward to input the coordinates of the parking position via at least a dozen button presses. As is required every single time I switch on the AWR-ASCOM drive system. I'll count the total number of button presses one day. Only if I remember, when I am really bored with watching clouds.

The paddle cables can now exit smoothly down through holes drilled in the desk top without risk of damage. The IH2 paddle is safely trapped between the base of the monitor and the wireless computer keyboard. Without touching either. I don't want to short circuit the mechanical isolation of the pier. Upon which the 25" computer monitor is hung by a secure plate.

The bare, birch plywood desk top now needs painting or covering somehow. It is slowly staining with black mould. No use using the matt black, blackboard paint. Because it is not resistant to mould. The observatory walls, which I had carefully painted matt black, are steadily going white and cloudy with mould! Probably because the paint, intended for children's indoor use, lacks a suitably toxic fungicide.

After a whole day of steady rain it cleared in the early evening to reveal a low, crescent moon. I went back out to image it but was repeatedly thwarted by AWR-ASCOM error notices. The videos I managed to capture failed to provide anything worthwhile. It was easily the worst "seeing" or lack of it,  I have ever witnessed.  I'll try again in the morning to discover which of the assorted programs ASCOM disliked so much. I was running C-Du-C, SharpCap, HitechAstro focuser and PHD2 simultaneously.


*