30.9.21

30.09.2021 Of wedges and things.

 *

Thursday 30th 48-56F. Wet morning, sunny later. Windy all day. Shopped for a discount tub of wedges.

I checked the new, smaller wedges but they were hopeless. Too thin, all over, and too short as well.

It looks as if I need to thin the yellow wedges locally. To avoid them pushing the brackets out too far. Ideally the wedges would be sanded to a radius, from midway up to the top, on the back. Except that side needs to grip the dome's CSM, layup surface as firmly as possible. 

These wedges are slightly flexible. So might well follow the dome's gentle radius if I sanded the front. Where the shelf bracket will be pressing. The bottom of the bracket needs to be be firmly supported by the thickness of the yellow wedge. It is only higher up that the bracket is pushed outwards. 

I ought to offer up a sacrificial, older wedge to the disk sander. Just to see if I can reduce the bracket's overhang of the base ring. Yellow is a bit "loud" but I can always pretend they are high visibility. This might actually be useful in poor lighting.

Well, that was easy. A few seconds against the sanding disk and [only] the top edge was suitably thinner. I did it in stages to avoid overdoing the taper. The bracket was now in perfect contact, against the dome, from top to bottom. Now I have to buy lots more yellow wedges!

Knudsen also do a black wedge of identical size. However, they are only available in packs of 100. Do I care enough about appearance to waste money on barely seen wedges behind shelf brackets? Will I ever find a use for 70 extra wedges? Probably not.

Pressing the plywood base ring outwards, against the dome, is important. Otherwise a gap could appear before the brackets are safely screwed down onto the plywood ring. 

Further screws could be driven downward at an angle. Into the dome's reinforcing rib between the brackets. This is best done after the brackets are all secured by the bolts and screws. The fiberglass rib is very sturdy from multiple layers of glass fiber. Which are laid up over the foam former. 

Suitably large and long, stainless steel, self-tapping screws could get a really firm grip in this mass of GRP. Further reinforcing the base ring's location. Drilling pilot holes would be vital. To avoid these screws pushing the base ring off the dome's reinforcing rib. Or away from the inner surface of the dome. 

Earlier, I was considering using long, fixing bolts rather than screws. Passing down through the 36mm thick ring and the 60mm deep rib but I'd need a very special drill. Just to be able to drill so close to the dome's overhanging curve. Most drill bodies are far too bulky. Trying to drill from underneath would require the entire dome be raised by a foot or more. Even that would need a long series drill bit and infinite patience. 

Modern, parallel sided, "wood" screws should get a solid grip. Provided the pilot holes are the correct size. I don't think there is any need for patent fixing systems. Nor wall plugs. A final, generous bead of silicone sealer around the base ring, against the dome, will help to secure the base ring structure. While avoiding condensation from running behind the ring. Possibly causing long term damage.


*

29.9.21

29.09.2021 Base ring bracket spacing.

 *

Wednesday 29th 59F heavy overcast. 

Another thought: Toothed, plastic wedges are readily available in many different forms. Used by builders and carpenters for fitting floors, doors and windows.

One could be fixed behind every bracket to fill the gap and resist the pressure from the bracket fixing bolts. 

These wedges have very high load capacity. The toothed texture, intended to allow secure stacking, should grip the inside of the GRP dome like a clam.

The 150mm x 25mm, yellow wedges are too tall. There is a 90mm tall wedge [in brown] only 15mm deep. These would fill the gap nicely. Without pushing the brackets any further over the inner edge of the base ring.

I sawed a yellow wedge to 90mm long x 15mm deep. Just to see how it would fit. The spring in the shelf bracket is easily taken up by the lower bolt. I was able to achieve this even with a spring clamp. Note how the bracket no longer [sic] protrudes over the inner edge of the base ring. The brackets could be sawn off shorter but would then be prone to rust.

Having decided to continue with the shelf brackets I needed to mark their position. First I double checked the bottom edge of the skirt was level using the universal laser level. Then I checked the height to the lower screw hole in the brackets while resting on three arcs. 22 cm up from the lower edge. 
 
There followed measuring of the external circumference, at that height, using a surveyors, fiberglass, tape measure. The doorway proved to be 3m wide at skirt level. Each half circumference measured from the edge of the doorway was 5.15m. Allowing fifteen brackets at 34cm spacing. Making 29 brackets in all. I marked the center of the middle [roof] segment. There isn't room for two brackets. So 14 each side and one in the middle.
 
Then it was time to mark out the dome using a pencil in a beam compass. Measure up 22cm and scribe an arc at that level. Repeat. Repeat again. Lots of crouching and sideways shuffling. Multiple arcs creeping ahead of each other. I should have started at the back center instead of from the doorway! A couple of  millimeters, per arc, adds up when there are fourteen of them. 
 
Today's effort was finished off by drilling three, very small, pilot holes at the intended bolt height. I could then confirm the holes lay on the laser, level line inside the dome.

 
*


28.9.21

28.09.2021 Bracket clearance from the dome.

 *

Tuesday continued: Following on from yesterday's discussion on the base ring brackets. That post was getting a bit long.

Today I arranged a triple layer of 12mm ply arcs on top of the dome rib to mock up the base ring. The shelf brackets was arranged with the long leg vertical.

The gap behind the shelf bracket increased to 16mm as shown! These shelf brackets are far too stiff to change their angle. Any attempt to do so would probably result in their destruction. They rely on the relatively thin section being reinforced by their pressed form. 

The image is slightly misleading because the bracket is being pushed inwards at the top by the dome curvature. Rotating the image, to capture this rotation, just makes the bottom leg look wrong.

I could make a strip of 16mm ply and kerf saw it to make it flexible to follow the inside curve of the dome. Or, a strip of 12mm ply standing on edge going right around the dome? 

Both ideas would offer advantages. Even support for the brackets and even resistance for the base ring against lifting. The brackets would probably adopt a slightly more acute angle when bolted to the dome. Though the considerable resistance from the brackets might force the base ring downwards.

A strip of 16mm ply could be tapered on its vertical axis on the table saw. This would fill the gap behind the brackets more efficiently than 12mm. The strip could even be glued down on top of the base ring. This would help to spread the upward loads on the base ring and increase its vertical stiffness. I'll ponder further on the possibilities.


*

28.09.2021 Imaging.

 *

Tuesday 28th 57F, clear and sunny. Steady seeing but transparency poor.

10.46 Large disturbed area on the western limb. My clumsy attempt to bring out detail has lost the limb in darkness.


10.48 New AR on eastern limb.


11.03  Dreadful image. Opens from AS!3 as pre-sharpened in ImPPG. Yet no sharpening applied. Struggling with the PST etalon sweet spot again.


14.07 Back after lunch.  Better than this morning.


 14.15 The AR on the eastern limb.


 I seem to have spent the entire day trying to tune the PST etalon. Rotating the BF relative to the etalon went on for hours with nothing to show for it. Each, small rotation required optimizing rotation and tilt of the etalon. I also tried lots of settings with AS!3 but it made no difference to the sharpening once opened in ImPPG.


*

27.9.21

27.09.2021 Base ring fixing brackets v applied load.

 *

Monday 27th 59F, heavy overcast with rain promised. 

Using "proper" U-form, shelf brackets to fix the base ring to the dome is looking a bit expensive! For no real reason I have settled on the completed dome weighing 500kg or 1000lbs. The GRP dome itself is supposed to weigh 220kg. Or about 500lbs.

To which I have added the plywood shutter and slit ribs. Plus the base ring. I have cut out the "roof" segment to make the observation  slit. Then filled it back in again with the overlapping shutters. 

The only, real GRP addition is to cover the open doorway. Partially filled with the shutters. Partially with spare triangles of GRP on either side. I suppose I should work out a rough area of the open doorway. Then calculate the added weight from closing it in as a fraction of the total. 

The curved area of a hemisphere of 2.15m radius is 29m². The area of the doorway is about 2m².  So 220kg = 29-2 = 27m² = 8kg/m². The door area weighs 16kg extra. Making the GRP 236kg in total. 

Plus all that Baltic birch plywood for the ribs at 22kg per sheet. I have lost count of how many sheets I have bought. Let's assume 10 sheets for 220kg. That doubles the original weight to about 500kg. So not that far out as a wild guess. There are brackets and screws and bolts too but not that much more weight.

4.3m Ø x Pi = 13.5m circumference. Call it 12m without the shutter area. Even at a rather mean, half meter spacing that means 24 brackets. [Ignoring the shutter area.]  Halve the spacing again and I'm looking at nearly 50 brackets! 

Hopefully 50 brackets would spread the upward loads sufficiently. 500kg/50 = 10kg each. Assuming an all up weight of 500kg that is a 500% safety margin. I had better start saving for more shelf brackets! Then I can start saving for more rubber washers to seal the fixing bolts. Two bolts per bracket? Eek! 

The three, dome segments are held together by bolts at 20cm spacing. I used 40cm spacing on the shutters. Which looked quite appropriate. 50cm spacing wouldn't look too out of place on the skirt for the base ring bolts. 

What about 30 brackets at 40cm spacing? Better safe than sorry? 500kg/30 =16kg per bracket. That's still a 400% safety margin with a claimed load capacity of 65kg each. I wonder what the safety margin has been allowed for by the manufacturers? It would be risky to claim 65kg if that was all they could tolerate as a fail weight! Do I want to risk losing a bracket by giving one a destructive load test?

Using simple, bent metal, angle brackets would be half the price but leave the strength as a complete unknown. I could have used the slotted brackets which I used on the outer shutter ribs. Half the price of shelf brackets but a lot [literally] rides on the base ring. Every kg has to be resisted in an upward direction. 

If the ring gives way then the dome drops. Probably to jam fast on top of the building. Even the act of lowering it into place on the rollers could easily put excessive local loads on small sections of the ring. All depending on the skill of the crane operator. Which might still be me at the controls of a Manitou! 😳

A trip to town provided 13 more shelf brackets for a total of 30. Of rubber washers, they were, yet again, lying through their teeth. Only four packs on the rack. Their website claims 30 packs in stock at that branch. The staff member on the checkout told me that they were on order and waiting for more stock. Last time I had a 30 minute telephone call [including waiting time] with customer services who told me the shop should provide what they had. There was no rationing. I was twice refused an order for ten packs on their web shop too. Lying seems to be their stock in trade.

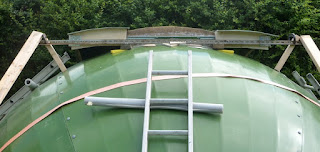
The image at the top shows a single shelf bracket. [125x150mm.] Though I think it makes more sense to have the long leg standing up inside the dome. A large, stainless steel washer will fill the [arrowed] gap caused by the dome's curvature. Two rows of 10mm fixing bolts will then spread the loads nicely over a large area of the thickened, dome skirt. The same, large washers will press against the shelf brackets under the nuts.


26.9.21

26.09.2021 Imaging.

 *

Sunday 26th 56F, overcast clearing to very cloudy from the south west. Short periods of early sunshine.

10.29 First image shows the PST etalon "sweet spot" ring. A darker, on-band ring of greater detail. The SE and NW corners of the frame are lighter and relatively featureless.

To be partially rid of it requires constant fiddling with the etalon tuning in rotation and tilt. The blocking filter has to be clocked [rotated} to match the etalon. I align the BF with the focuser drive shaft.

Improvements demand some sunshine to be able to even out the detail and brightness to the best of my ability. It has now clouded over completely!


Back to the dome and marking the joints on the next layer of the base ring. See the previous [Older] post. Second layer marked and cut. I skewed the joints the opposite way to the 1st layer. As one arc is shorter I shall have to be careful about staggering the joints. A 1/3 rotation until the next short arc, on the next layer, will help.

16.05 A clearing of the heavy overcast.


16.54 The other AR in the north.


 17.03. The trees are about to eclipse the sun.

Pushed this one a bit harder in the processing.

It looks busy but not quite as much, fine detail as the earlier capture. [Above]


*

26.09.2021 Base ring construction hurdles.

 *

Sunday 26th 55F, heavy overcast.

I have several serious hurdles to overcome with constructing and fitting the base ring. As usual, I shall discuss the problems in text. I find this helps me to see possible options for progress.

Fitting the arcs together into the base ring requires a second layer. Then a third. The arcs are butt-jointed and rely on lamination over the many [staggered] joints for strength. The base ring soon becomes impossible to move let alone fit into the dome. Despite the considerable weight the ring will be flexible and fragile until the glue is fully set. 

I can slide the part rings under the dome skirt and into the dome. Rather than carrying long sections around the dome and in through the narrow access triangles. Having the shutters open would help. As well as providing much better working light. Though the open observation slit is still on the "wrong side" of the dome from the working area ground outside with any pretensions of flatness. Not to mention enough room for a full, 4.3m Ø circle.

The ground under the dome is sloping from a minimum of about an inch clearance to well over eight inches. So packing up to the base ring level from the bare ground is a serious problem. The battens and nails I used to support the ring are merely guides and could not support the full weight of the triple laminated ring.

I could bring in a load of self-compacting gravel. To bring the floor up to level. Lots of hard work just to support the base ring for assembly! Poor access for wheelbarrows too unless I remove the heavy shutters. No room to bring the car trailer near enough to shovel straight in though "the doorway."

Clamping the arcs into a ring, while the glue sets, would require a huge number of clamps. The full circumference is over 12metres or 36'. Clamps need space above and below for the jaws. Not ideal when working on uneven ground. 

Spring clamps may be more affordable but probably don't have the required pressure to assure the glue joints are close enough. The butt-joints need to be brought closely together for maximum strength and stiffness and kept that way. Or final accuracy of diameter goes awry.

The base ring's shelf brackets or [simpler] angle brackets need to be bolted through the GRP dome. This requires accuracy of level to avoid wandering lines. They must all be evenly spaced not to look horribly amateurish. I can only mark the level with the 360° laser from inside the dome.

Until all three layers of ring are complete the brackets can't be used for support. Or can they? Longer bolts to support the rings while the glue dries? The bolts can't project downwards or they will strike the dome rotation rollers. Countersunk bolts, fitted from below the ring, make most sense. These would leave the roller track free of obstructions.

Do I glue sections of arc together on the ground outside? hen carry them into the dome? The joints between sections are unlikely to remain tight enough. Lots of wood screws can be used to hold the layers together while the glue dries. Though this can only happen from above. There isn't room to drive screws from below. Screws could be lost inside the ring for holding the first two layers together.  Hidden by the third layer when glued on top. 

Wood screws have to be shorter than two laminations. Or vicious points protrude! Which means shorter screws with limited holding power. The screws need pilot holes to avoid locking up without adding any clamping pressure. I normally drive the screws home. Back them out again. Then finally drive them home. This helps to ensure some clamping between layers. I use a rechargeable drill as a Torx driver of course.  

Now add the lack of a solid dome at the entrance and the ongoing requirement for easy access. Once the ring reaches the slit area there is a huge potential hurdle. A full ring is much easier to measure and ensure roundness. Once the ring is compete there is an exposed length well above the ground. Which needs to be strong enough to support the considerable weight of the shutters. The shutters also have to be accurately shortened to sit on top of the base ring. Catch22 at every stage. I had better come up with a workable plan! 


*


25.9.21

25.09.2021 Base ring arcs + imaging:

 *

Saturday 25th 60F, overcast clearing to rather cloudy later. 

First I laid out the bottom layer of the base ring on the ground. A tarpaulin kept the plywood dry. I have marked off the overlaps at an angle to ensure there are no weak joints. Need to cut them next. Then a second layer, with staggered joints, will have to be marked out.

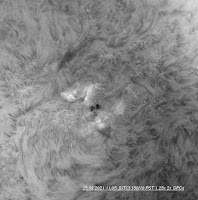
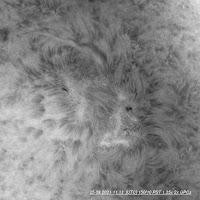
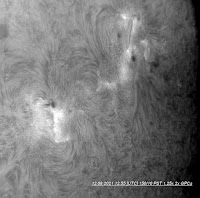
11.50: Imaging. Two ARs with groups of spots. AR2871 in the south. AR2872 in the northern hemisphere. Seeing, between clouds, is fairly steady and modestly transparent. Say 3/5 for both. If only I could maximize these conditions.

Yet again I am struggling with the PST etalon,  sweet spot ring. I am getting very strange results despite not changing anything between captures. Nor during processing. The images look superficially sharp but don't bare close examination. 

13.05 [CET] Improved the tuning by clocking the blocking filter against the etalon. Better spread, but still a darker stripe across the image.


13.13 AR2872 Horribly off-band in the south east corner.


14.18 A mixture of dark and light.

Thin, high cloud has taken over from the bigger and denser clouds. It has spoiled the transparency.


 14.27 Still uneven lighting and off-Ha band areas.

Changed to 1.6x GPC for a wider view. Probably not helpful when it comes to etalon sweet spots.

It doesn't look like it but the 5kg weight really is in the middle of the circle. A radius bar pivots on a 10mm bolt. I used a weight to avoid making further holes in the lightweight tarpaulin.

All the skewed joints of the 8.5 arcs of the first layer have been cut on the miter saw.


16.20  Returned from cutting the joints for the first layer of the base ring. Where there is no obvious cloud the sky is white. 


*

24.9.21

24.09.2021 Base ring arcs.

 *

Friday 24th 60F, bright and breezy start soon became heavy overcast. Yesterday's storm went unnoticed in the shelter of our garden and trees. Though it did pour down a few times. A few twigs were ripped off the tallest willow.

I have cut out the last eight, dome, base ring arcs from 12mm Baltic Birch plywood. 16x1.5=~24m. That is a long cut with a jigsaw. 

Next I shall trim them with the router against a pattern. The arcs were cut out very close to the scribed lines. So there shouldn't be much material to remove.

I had to dash out and tidy up during lunch because of rain! Grr!

It was still raining lightly later. As I trim routed then orbital sanded the last of the arcs. Enough to complete the base ring in three layers for 36mm overall thickness. The birch plywood is very prone to dark staining when left out in damp surroundings. Even when covered by a tarpaulin. Presumably a form of mould.


*

23.9.21

23.09.2021 A bit of a storm later.

 *

Thursday 23rd 58F. Overcast with fierce gales, gusting to 50mph, forecast for later. The trees have been blowing about all morning. With sheets of rain after lunch.

I turned the shutters on the plywood dome into the expected wind direction. Though we are best protected from the west, to north west, by tall trees and hedges. The image shows the view from higher ground to the west.

The main worry is the chance of a large branch breaking off. From the trees to the north of the observatory. These tower, rather menacingly, high over the building. 

Felling them would require a tractor and long rope. To pull them safely away from the garden as they fell. I have considered lopping off the most dangerous branches but would never risk it myself.


*

22.9.21

22.09.2021

 *

Wednesday 22nd 60F, blue skies but cloudy from the west. 

I spent some time evening out the coverage of the GRP shutter covers on the ribs. Trying to move them by hand just didn't work. 

So I used long lengths of 2x4! The resistance was provided by pairs of 2x4 clamped together. These were placed with one end against the shutter rib and the other braced against a paving slab. After a few [noisy] bangs, with my battering ram, the overlap on each side was even. I had to slacken off the nuts on all the slotted brackets first. Then wallop the edge of the shutters near the top with a 3m/10' long length of 2x4.

11.28 [CET] Imaging. Not bad detail but the PST etalon sweet spot ring is harsh this morning. I have aligned the BF with the focuser drive rod. It hasn't helped. 

Nor has the sheer quantity of cloud. I am not having enough time to re-tune during the brief bright periods.

12.22 After much tuning and tilting and rotating the BF relative to the etalon. Just for a change I relaxed the Noise and AP settings in AS!3.14. It actually seemed slightly better than the tighter settings.


12.22  The same image but further processed in PhotoFiltre7. Auto Levels + Gamma + Contrast + Histogram. These are my standard steps with most Solar images.


12.49 Still experimenting. Hovering the cursor over any image should bring up the details hidden in the image name. 


14.33 Back after lunch. More fiddling with the etalon and refocusing.


15.28 The wind is blowing the telescopes around.

912x912 cropped.


 *

20.9.21

20.09.2021

 *

Monday 20th  50F. Almost clear skies with bright sunshine. 

09.50 [CET]. First [poor] image. New AR2871 on SE limb.

Increasing cloud streaming across from the north east.


10.01 More cloud. Thermal agitation.

Disturbed region, with spot,  just south of the equator. Potential name AR2872.


There was soon so much cloud I gave up and went back to working on the dome. I arranged the slotted angle across the top of the dome and leveled it. Then I braced it with 2x4s and 2x2s. 

Finally I was able to drag the shutters apart. The rib base level is the main problem. The height is critical to avoiding the shutters not following the slit ribs. Or arching over them. 

In theory I could now screw the top boards to the drawer slides. Though it may be premature given the base ring arrangements have not been fixed. With the arrival of autumn it would be very useful to have the shutters mobile. I could then quickly close them if a shower came along. Wheels or rollers could be temporarily attached to the bottoms of the ribs. This would allow free movement along a plank resting on the ground. This would not be too much of a hurdle. Particularly when moving constantly in and out of the dome while using it as a covered workshop.

Afternoon. Back to imaging. To discover the worst seeing conditions ever. 

Back to the dome. I decided to use the last vestiges of my common sense. To close the shutters ready for tomorrow's rain. The drawer slides ought to be attached to the shutter boards first. Then the slides can be screwed to the zenith board with the shutters wide open and propped.

*

19.9.21

19.09.2021 Shutters and top boards.

 *

Sunday 19th 57F, overcast.

The laminated shutter zenith boards were successfully glued overnight. So I un-clamped, trimmed and roughly sanded them to match the pattern. 

The dome slopes upwards where the boards will sit. So they ought to be relieved slightly at the back to ensure clearance. I had placed the edge of the observation slit cut-out deliberately beyond the zenith. Just to ensure rain did not collect behind the zenith board. 

The overhanging shutters will help to shelter the twin boards. They also enjoy natural drainage from the curvature of the dome. So I shall leave them as they are to rest lightly on the dome. This will help to unload the drawer slides during their normally closed condition.

The top of the ribs will be brought upright by sturdy angle brackets. Which will securely connect the corners of the shutters between ribs and boards. Overhanging brackets will join the inner shutter ribs to the boards. These brackets must bridge over the zenith board with clearance. Otherwise they would lock up the shutters. 

I had notched the inner ribs on the plywood dome but didn't much like the potential weakening effect. So I have searched for a long enough bracket to reach over both, very thick, zenith boards. 36mm x 2 plus the depth of the drawer slides. 

I will have to get some furniture assembly, tension dowels. To avoid using wood screws into the plywood end grain of the shutters to hold these inner brackets. Which is guaranteed to split the plies.

I have now removed the second outer rib and routed a chamfer on the outer edge. This will improve the weather seal and allow the GRP cover to rest more evenly on the outer rib. I had already chamfered the other, outer rib.

Both outer ribs are back in place and the brackets fastened. The shutter top boards are in place. Held by angle brackets I made from 10x4" roofing, hole plates. I may replace these if I can find something more sturdy with equal legs. 

I need longer brackets to connect the ends to the inner ribs to the top boards. The brackets I have aren't long enough. While being unsuitable for mounting on the top edge of the inner ribs. I may mount angle profiles in line with the ribs to help support these brackets.

*

18.9.21

18.09.2021 Shutter top boards.


 *

Saturday 18th 61F, heavy overcast cleared to sunny periods with lots of cloud.

I started on the shutter zenith boards using a 12mm template. Having scribed the top and bottom edges to match the surfaces I cut it out. There followed lots of trimming to get a nice fit. 

Then I scribed the bottom edge, where it rested on the dome, using the scrap piece of flexible plastic. This gave me the necessary, working clearance. A tight fit might have jammed the shutters in the closed position. While a close fit would aid in support by relieving the drawer slides of some of the weight when [normally] closed.

The outer rib, on the left, is still leaning. The template edges are both upright. Having been marked off carefully using an accurate level when the template was in place. I clamped a crowbar to the rib and was able to bring it upright. Though it still wants to lean over.

Now I shall make a template for the opposite side. Hopefully it will be a mirror edition of the first. Once that is completed I shall triple the thickness by gluing and laminating. 

The triple 12mm laminated boards were cut out and glued in the afternoon. With enough secondhand clamps to sink a battleship.


*

17.9.21

17.09.2021 Lowering the shutter profile.

 *

Friday 17th heavy overcast and cooler at 56F. 

Having notched the shutter ribs by 30mm vertically I had to remove all the fixing brackets. Otherwise the shutters couldn't drop to match the potentially lower profile. 

The image shows the latest and lowest shutter profile. With the ribs now clearing the dome by only 20mm. The ribs have to have depth to ensure enough stiffness. So can't be made any slimmer. There is no problem with clearance because the shutters move further away from the dome as they open.

I still need to rout the chamfer on the top of the second rib to match the first. This will avoid having a sharp, right angle pressing against the underside of the shutter covers. Which would tend to resist lying flat.

Drizzle stopped play in the afternoon. Though I was able to work inside the dome. So completed re-fixing the brackets. There is a heavy overcast and it was very dark in there with the shutters closed. The triangular openings are facing the high hedge. So very little light gets in. I doubt there will be any need to paint the interior traditional black. Green is supposed to be restful.


*

16.9.21

16.09.2021

 *

Thursday 16th 58-63F. A cloudy day with rain. 

I visited the city on an errand. So did some shopping while I was there.

I bought an M16 0.7ton rated eye-bolt for the pulley system. About a fiver [£5] equivalent from a crane spares and lifting equipment outlet.

A visit to a huge DIY store found the last dregs of discontinued, stainless steel, shelf brackets. I had used these for the plywood dome for supporting the steering rollers. The brackets were simply bolted to the rotation roller steel work. So I wanted to continue with this arrangement on the larger dome.

The zinc plated, mild steel brackets weren't nearly so stiff. They also rusted slowly. I was able to buy the last five, SS brackets. Which is quite a useful number. For some reason they wont sell the reserve stock online from their other outlets. Click and Collect only. Which makes driving for miles, for a few more brackets, pointlessly uneconomical.


*

15.9.21

15.09.2021 Shutter rib straightening.

 *

Wednesday 15th 57F, breezy and cloudy. Pink sky in the east. All day rain forecast.

It started to rain just after 11am. By which time I had removed the sloping and curved, outer, shutter rib. First I used a trimming bit to even out the upper edge. Then tilted the router's adjustable, base plate. To put a lateral chamfer on the top, outer edge. This now matches the slope of the GRP shutter. 

There is considerable downward pressure, from the brackets and clamping bolts on the outer edge of the rib. This might have been fighting the inward slope on the shutter's underside surface. 

I sanded the rib and left it to sag against the unwanted curvature. There was plenty of room for the rib inside the dome. The rib is clamped horizontally onto a B&D workbench. Which will keep it out of the rain while I experiment with undoing the rib's distortion.

The image shows how I can notch the underside of the shutter ribs. This will allow the shutter to sink a little lower onto the dome. Present clearance is 50mm over the length of the shutter rib. I always planned to have very low profile shutters. This aim was missed somewhere along the way. The drawer slides just have to clear the undersides of the GRP shutters. I should be able to close the gap between the ribs and the dome a little more. The wind will then flow over the shutters without turbulence. The shutters being spherical, to match the dome, will continue the curve of the dome without the usual obstruction. 


*

14.9.21

14.09.2021 Afternoon imaging.

 *

 Tuesday14th 63F, overcast  morning cleared mid-afternoon.

Examination of the dome indicated that the outer shutter ribs are curving inwards at their centers. This may be what is causing the ribs to slope. I shall slacken the bracket nuts and try to straighten out the ribs. One of the unique advantages of having adjustment slots.

 Imaging: 

15.30 AR2866&8 on the limb. Seeing conditions awful. Heavy thermal shaking.

16.40 My first image with any detail. The brightness variation suggests off-band tuning and PST etalon sweet spot problems.  


16.54 The western limb.


16.48 NW limb.  Seeing becoming more steady and transparency improving.


 17.25 Cloud streaming across the sun. It looks like the trees have been cheated of their eclipse value.


*

13.9.21

13.09.2021

 *

Monday 13th 65F, overcast or cloudy. 

I managed to lower the shutters a little. The shutter arc clearance above the dome is now 50mm or about 2". 

To lower it any further I would need to notch the shutter ribs to fit over the projection around the original doorway. This not only reinforces the doorway cut-out, but provides a narrow gutter. To avoid rain running straight down over the open doorway. 

Despite its small size the gutter works well. Probably due to the curvature of the dome and limited capture area. Notching the shutter ribs would not weaken them by much. Cutting the gutter away would point the run-off under the shutters. How much rib to cut away and where is a variable. Depending on the height of the shutters. Should I treat it as a purely vertical drop in level throughout? Or an inwards movement as well?

I am still struggling with the sideways tilt of one outer  rib. I removed all the brackets and increased the angle of each. No difference.

It brightened in the afternoon but not remotely clear enough for imaging.


*


12.9.21

12.09.2021 Afternoon imaging.

 *

 Afternoon. The cloud from the west cleared enough to risk some imaging. Rather breezy.

14.45 [CET] The complex AR2866 & 8 spots. Retuning the PST etalon for a more even, on-band H-a image. Not great, but promising for a first capture.


14.55 Slightly better.


 15.07  What should be blue sky is white.


 16.00 A little more detail?


 16.14


 16.14 Different processing:


*

12.09.2021 Shutter-rib brackets.

 * 

Sunday 12th 64F, heavy showers and very brief sunny periods.

I replaced all the shutter-rib brackets. This required they all be set to an angle. I did this by laying each bracket over a 3" rusty pipe and hitting the exterior of the angle with a hammer. The resulting angle was checked against an earlier bracket. 

The rusty pipe was a mistake. Because it marked the brackets. I didn't have another of a suitable size that wasn't rusty. I expect I shall paint the inside of the dome black eventually. Along with the  brackets. 

I cam now fine tune the spacing of the shutters when they close. The same for the shutter ribs closing against the slit ribs.

Finally having enough rubber washers allowed me to finish sealing the last of the bolts. Some had proved to be leaky in heavy rain. So the washers were placed under the domed heads of the bolts which hold the dome together. Also of the shutters bracket bolts, as well, of course. 

There must be over 80 bolts in all. Each had to have the nuts and washers removed on the inside. Then hit with a loaded plastic hammer to push them out. Then I'd go outside the dome to pull the bolts out. To enable me to fit the rubber washers. 

Then I'd push them back in. Returning inside the dome to carefully fit the nuts and washers again. Without pushing the screws back out. Finally cranking the nuts tight. 

This squashed the rubber washers almost flat and matched their new size to the bolt heads. Leaving the domed headed bolts flush with the dome surface and the rubber washers protected from UV.

Afternoon. The cloud from the west cleared enough to risk some imaging. Rather breezy. See next episode for the results.


*