29.10.20

2910.200

 *

Thursday 29th 58/51F. Late morning start after cloud clearance. My first captures using the internal SSDs. I have yet to reset the date and timing format of the images in SharpCap. I was choosing my moments as the seeing settled briefly on the monitor. 2.5 seconds for 500 frames with roughly 5ms exposures.

Better seeing conditions today and the wind has finally dropped. I am using the 1.6x GPC for minimum magnification to capture the whole AR feature.

After struggling with lopsided lighting of the image I removed the etalon element from its cell. Then wrapped it in PTFE plumbing tape. This improved the rather sloppy, etalon collimation and produced more even illumination across the image.

This is just one image of many. I will post more later but have to go out now.

The sun was behind the trees on my return. Grr!

Here I have tried a little harder with the processing of my last captured image. Probably over-sharpened now.

The image is very flat. With only modest sharpness. It lacks any sense of reality. There is a no illusion of changing elevation or realistic texture in the fine detail. The thin cloud may have been responsible.

I haven't looked at my earlier captures yet but presume they are all inferior. The seeing had improved slowly but steadily with solar altitude.


*

28.10.20

28.10.20 Amazingly complex AR!

 *

14.24 Wednesday 28th: 55/52F. Sunny periods so I quickly opened up. Windy and lots of cloud! 

The laptop seems much quicker with Autostakkert. Wind moving the telescopes. Amazingly complex AR! A whole chain of spots, filaments and a weird "squiggle" just to the east. 

Thermal "boiling" of the image, cloud and wind movement are spoiling my captures.  


14.54 Still struggling again wind, cloud and boiling image.


15.25 Slightly better seeing before it became complete overcast. Still windy and "boiling."


*

28.10.20 Samsung 860 EVO 1TB + M.2 970 EVO 1TB SSDs fitted and working.

 *


Because of the problems with the M.2 970 Pro SSD I ordered a 1TB Samsung 860 EVO for the internal SATA port. There is only one M.2 port and no other HD installed on my ASUS 552VW. Which greatly complicated data migration.

Samsung Magician recognized the new SSD drive on a newly purchased USB3 to SATA cable. So I felt confident to install the drive internally in the empty HD tray. I removed the battery and fitted my anti-static bracelet to avoid potential problems. The HD tray is exposed on the 552 under the long cover plate.

Once installed in the SATA port I used Samsung Data Migration software to send the 256MB SSD with W10 OS to the 1TB 860 EVO. All went smoothly and now the 1TB 860 EVO SSD is booting the laptop. Samsung Magician shows a healthy drive. Phew!

The next step is to try installing the M.2 970 Pro into the M.2 NVMe port, in place of the original Samsung 256MB SSD. To be used as additional, simple, internal storage. Fingers crossed! 🙏 Oddly they don't do a fingers crossed emoticon.

Same precautions as before: The M.2 970 EVO is installed and is now recognized by Samsung Magician as an empty, healthy drive. So now I have 2TB of fast, onboard storage instead of only 256GB as purchased. 

What a huge relief! I already have 16GB of DDR4 RAM so that should be enough for high frame rate imaging. Though I could max out at 32GB. It could be just my imagination but the laptop feels much more responsive than before the new SSD changes.

Google Blogger won't let me place the image properly regardless of size.
 
*


27.10.20

27.10.20 Gales and cloud!

 *

Tuesday 27th 52/50F, southerly gales and lots of cloud. Sun arrived late. Otherwise I could have caught the sun before the dome slit faced into the wind. 

I have only one shutter open and the telescopes are still being jostled.

11.54: The first image was captured though cloud with wind wobbles.

Multiple spots easily visible in white light in the 90mm with Lunt wedge.


12.20 still struggling against cloud and wind. 

I had to close up when it became too noisy and unpleasant in the dome. There is always the risk of dome inflation if the open shutters are facing straight into the wind. Which might cause a detached panel. 

A much lower risk when the shutters are closed. The wind can then flow smoothly over the dome. The sensitive wind vane is gyrating all over the place.


*


23.10.20

23.10.2020

 *

Friday 23rd. 16.00 Mid afternoon glimpse of sunshine. I was set up but continuous cloud is obscuring the sun. The laptop went through a repair cycle when I booted it.

A spot in the west and disturbed surface in the east. Haven't seen any proms yet. Nor much surface detail  if the truth be told.

I captured one video of the spot and that was it. The lighting is very one-sided. I didn't even have a chance to tune the etalon.

It soon became totally overcast. Putting an end to any hope of capturing eastern limb images.


*

22.10.20

22.10.2020 Samsung SSD replacement on a high wire.

 *

Thursday 22nd A windy day with cloud spoilt another potentially sunny day.

I decided to update my imaging laptop's internal M.2 SSD hard drive with a larger and faster M.2 NVMe. I chose a 1TB Samsung EVO970 in the hope of avoiding dangling T5 SSDs in the observatory on the end of short cables. The laptop's USB 3 ports are all full and I have a four port USB3 hub to boot for the wireless mouse and keyboard receivers.

Mistake number one was discovering that there is no other hard drive present except the existing internal 256GB M.2 SSD. Somehow it never crossed my mind. I tried to use Samsung's Migration software to clone the data onto an external 1TB T5. That was mistake number two. I had to clear a lot of old videos off both drives to make more than enough room for the transfer. 

Well over an hour later I was happy that I had enough room and did the file transfer. Mistake number three was swapping the laptop's SSDs. The EVO970 was briefly recognized in BIOS but now I couldn't escape. With or without the T5 attached to the laptop it couldn't find the OS. So it refused to Update Bios changes and allow me to Escape. 

So I swapped the SSD back to the original 256GB. Now it booted normally and I was back in business. The problem is now I can't clone the OS and files onto the EVO970 with only one internal M-2 slot. That was mistake number four.

Mistake number five was ordering the cheapest M-2 external housing online. I was going to move the OS onto the EVO970 that way. Being a pessimistic cynic I checked the manufacturer's website and found it wouldn't suit the EVO970 contacts. SATA only. It couldn't cope with the Type NVMe slot.

By that time it was too late to cancel my order so I had to order another, more expensive case. Mistake No 6? They should both be here tomorrow but I won't open the cheap one so it can be returned without problems. Mistake No7 would be catching the virus when I hand back the unwanted item at the post office.

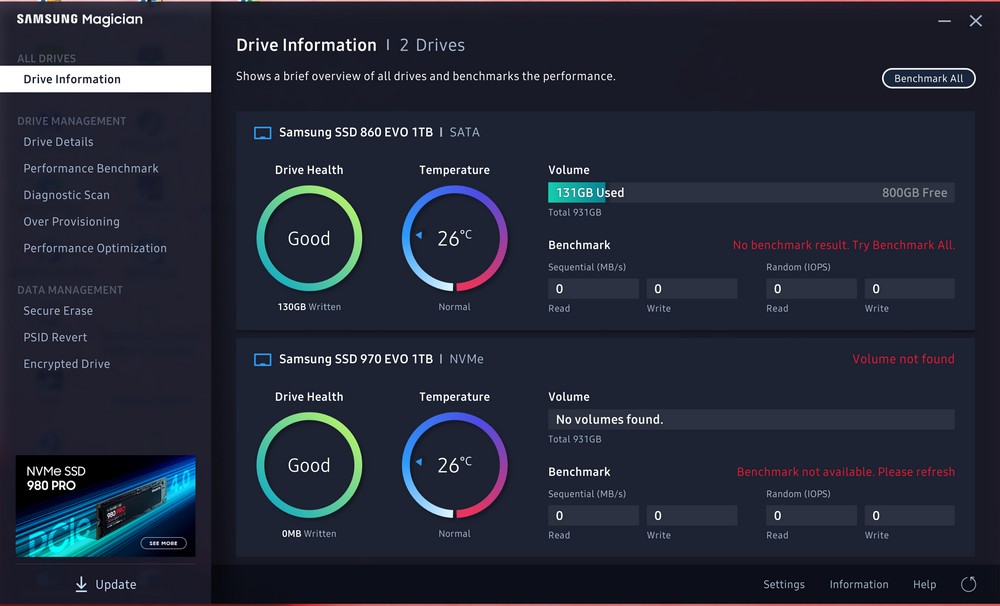
Two whole days completely wasted without getting the EVO970 recognized by Windows or Samsung Magician.  It seems I am not alone. The Internet is full of unhappy EVO970 buyers appealing to computer forums and YouTube posters for advice. 

I bought an external case to suit the EVO970 and it was still not recognized. Fitting the original M.2 SSD into the case from the laptop proved that all the extra kit and cables were working fine. I kept my antistatic, earthing, wrist strap on at all times. 

I connected the EVO970 to my W10 PC via USB3 and it was still not recognized. Though there was a bleep on connection and later removal.

Back to the laptop with a USB-C connection to the Delock 42600. I managed to find it in Samsung Magician and tried to Initialize. That eventually occurred. So I tried the Samsung Data Migration software. It took a very long time to start and then froze on 33%. I gave it ages to complete but finally had to hit the Stop button. It hasn't been recognized since. Windows tells me it stopped something happening because of a mismatch in its address. Presumably to protect my laptop computer.

This leaves me in a quandary. Do I return the EVO970 and forget the whole idea of an upgrade? Or return it and ask for a replacement on the assumption that the first is simply not working properly? 

My online experience in researching EVE970 recognition problems suggests that W10 doesn't like the EVO970. There were  fruitless forum discussions, between far more experienced computer nerds, than I could ever pretend to be. The few supposedly useful suggestions demanded I get past recognition and initialisation again. Which doesn't seem to be happening any time soon. 

Further online research suggests that Samsung Magician can only recognise an M.2 SSD which is plugged directly into the mother board M slot. Not via USB. So how do I get W10 onto the EVO970 if it can't boot the computer without Windows already on it? The laptop has only one M.2 NVMe slot.

Should I continue struggling and perhaps kill my laptop? I would help if I could use the EVO970 as external storage. Leaving the W10 booting internal drive idea until the dust settles. I can't even get that far! I'm looking at well over £150 expenditure so far,. With only frustration and more than two, full days of wasted time to show for it.

What about an internal SSD HD mounted in the internal HD caddy? I wonder if that would work? The caddy was empty and there is a socket on the mother board for a SATA hard drive. I need to do some more homework.

I did due research and discovered serious problems with ASUS laptop computers and Samsung SSDs compatibility. Some Windows updates were updating the BIOS and stopping the previously working SAMSUNG SSDs from booting. 

It really doesn't have to be this difficult! Do these near-monopolies ever do their homework? Do they ever read their own support forums? ASUS obviously doesn't. Not judging by the stream of complaints about a total lack of customer support. 

I asked the dealer when I bought the laptop about adding a bigger SSD and was told they couldn't do it. If I did it myself, then I'd immediately void the guarantee. The machine was supplied with only 256GB of SSD. No other drive. I have been fighting a losing battle with video storage space ever since.


*


19.10.20

19.10.20 AR2776 Sun in better seeing conditions.

 *

Monday 19th Bright, calm and clear with better seeing conditions. No high cloud today.

10.20 ASCOM[AWR] made a complete mess of the first slew to the sun as usual.Though it had not reversed Dec Drive Dir today. As it had done for the last two days.

10.48 51/46F, B1200S2 + 2x GPC on AR2776. Rather odd image. Adjusting etalon for sweet spot and more even illumination. Seeing more detail on the monitor.


11.03 Adjusted etalon for a more natural appearance.


12.03 Better seeing needs less processing.

High cloud appearing now.


My wife insisted on some colour.


White light using the 90mm f/10, Lunt 1.25" wedge and Baader SC filter.


150/1500 used with Barlow and Lunt solar wedge.


Duplicated GPCs for more enlargement. 2x and 2.6x in tandem on the camera snout.

It needs a delicate balance not to overcook these images. There is a bridge on one side of the spot. This easily vanishes with sharpening and darkening in ImPPG. These effects usually occur together and often asymmetrically.

 It clouded over during lunch. 13.30 onwards.

More colour! The image shows the Lunt solar prism mounted on the FT Focuser on the 6". I left the D-ERF in place. This works fine provided I don't add the Baader Solar Continuum filter. The red light from the Baader D-ERF filter is turned black by the green SC filter. 


 *


18.10.20

18.10.2020 AR2776 with cloud.

 *

Sunday 18th 11am 50/47F. Rather cloudy in two layers. From the west. Weak sunshine from a milky sky.

First slew to the sun is pointing upwards at 45°! ASCOM[AWR] has randomly reversed Declination Drive Direction overnight again.

Had a quick look in white light with the Vixen 90 + Lunt wedge + Solar Continuum +20mm. AR2776 is looking very obvious at 50x. 

Tried 2x GPC, Mono8, 800x600, 7.0ms, 150fps, Gain 146. Seeing is

complete mush or clouded over.
Changed to 1.6x GPC. Gain reduced to 90. Seeing
fairly steady but horribly misty. AR2776 has a Y-shaped light bridge and a filament but can't get it sharp enough with this thin, high cloud. Changed to 2x GPC for Gain 80 when clear of cloud. Still no images.

12.15 Trying for white light view of AR2776 but the high cloud is softening and dimming the image. 90mm x1000mm, x2 GPC, ZWO 174MM. Too cloudy. White overcast.

12.44 Finally some clear sunshine! Stacked the Orion 2x Shorty Barlow on the 174 for some H-a trials with the 2x GPC. Cloud!!

15.20 First prom image recognizable as such.

15.36 I had changed to the PST etalon for the prom so tried it on AR2776. Instant detail and contrast. I have overcooked the processing for effect.

Still nothing with the Lunt B1200S2.


16.00 Beginning to see detail from the B1200. Nothing like the PST BF though.

16.30 Reverted to PST BF.


16.30  The same image but processed differently.

The bright, solar flare is clearly seen in both images.


*

17.10.20

17.10.2020 AR2776 in poor seeing conditions.

 *

Saturday 17th 10.00 50/46F calm, clear sky, with bright sunshine.

The first slew was amusing. ASCOM[AWR] had reversed the Dec drive direction overnight. So the telescopes ended up pointing 60° upwards!

No objective dew this morning. Perhaps thanks to the new lens cap?

Poor seeing to start with. Double checked focus at 200mm from the etalon and locked the focuser. Had to reduce to 1.6x GPC to get a sharper image.

10.48 first usable image. Though most of it is due to the magic of ImPPG!

11.00 Only now beginning to see detail on the monitor. Not having to push the processing so hard.

12.07 57/48F  Been struggling for sharpness for an hour. Seeing slightly improved. I need a focuser in front of the camera! 

1.6x GPC needs 233mm etalon to camera [focus] spacing.


This image had extra sharpening.
Blogger image spacing impossible!

This image had both extra sharpening and contrast.


12.20 first cloud has arrived from the north! Suddenly feeling cold.


15.15 A brief glimpse of sunshine. The "weather" has gone around to the west. A teaser! Tracking the sun and waiting for the next break. 
 
16.15 before sudden brightness.
 
 I have received some expert advice on things to try regarding optical alignment and obtaining even illumination/bandwidth across the image. Rotation of each of the numerous, optical elements is advised to find the best image. Each element is sightly tilted. So may well respond to rotation relative to each other.

First I  used the Cheshire eyepiece to align the new focuser using the screw adjustable, leveling base plate. The cross hairs remained central in the red, objective circle as I rotated the focuser. No need for a light. I just pointed the telescope at the sky. There was plenty of light coming through the D-ERF to see the crosshairs clearly silhouetted. I used a compression band, 2" to 1.25" adapter to try and ensure alignment in the focuser's draw tube.


*

16.10.20

16.10.2020 Starlight Instruments 2.5" x 3.5" travel, Feather Touch Focuser FTF2535HD

 *

The base adapter arrived today so I was able to fit the focuser to the iStar H-alpha 6" f/10. The fit and finish on this focuser are flawless on all parts. 

Ownership of a Feather Touch focuser is multifaceted. Its quality of design, appearance and function are worth every penny. It will certainly outlast me despite my almost daily presence in my home-built observatory. Apologies for the white dust. I had been sawing out a circle of polystyrene for the objective protection cap.

Here the base adapter lies in front of the focuser mechanism. It has three sturdy screws with pointed plastic tips. These points locate in the triangular groove in the base of the focuser mechanism. Providing a silky smooth, shake-free rotation of the whole focuser which has to be experienced to be believed.

Now the base adapter has been screwed into the flat base plate via their matching M95 x 1mm thread. The flared, base adapter provides a superb touch of classical design and craftsmanship. Lifting the whole design above the merely functional.

The knurled thumbscrews are exquisite. With a hint of bling in their gold finish. Which is nicely set off by gold finish on the 10:1 slow motion knob on the focuser. 

These screws are large and fine threaded to provide a lifetime of pleasure in effortless adjustment. The base adapter is lined to provide a perfect fit without friction.

Here we see the focuser drawtube at full extent. The FTF 2535HD offers 3.5" of total travel. More than generous for most users.

There is zero slop from the well designed system. The drawtube remains still under load without any creep. Turning the large focusing knobs reminds one of the quality of the rack and pinion mechanism. A fine, bronze, helical rack is matched by the polished, stainless steel, helical pinion. There is absolutely no sense of cogging, lost motion or backlash.

A delight to use and a pleasure to own such a fine piece of equipment. After years of struggling with grossly inferior focusers I am happy to have finally upgraded my focuser to the very best available. "A thing of beauty is a joy forever."

There is a clear aperture of 63mm throughout the drawtube. With incredibly flat, matt black paint on the internal baffles.

And now with the drawtube fully retracted to provide a nicely compact arrangement. I may shorten the main tube of the 6" slightly to provide a greater range of drawtube movement. At present there is only 1cm of rack protruding when the focus is correct at 200mm from the etalon's leading edge to the focal plane. For binoviewer use I may need more inward focus. I shall have to see.

Interestingly, the heavy focuser on its new backplate needed only 1" of main tube movement, up through the rings, to rebalance the OTA. I thought it would be much more.

The thumbscrew facing the camera is a nicely balanced brake. Preventing the drawtube from moving when heavily laden. The focuser has a claimed capacity up to 15lbs. 


This image shows the focuser in place on its new backplate. The etalon/filter stack is arranged correctly for the 2.6x GPC.  Previously I had double checked the 200mm focus point from the etalon. Then locked the focuser with the knurled thumbscrew. receptacle. 

I normally use a rotating, adjustable T2-1.25" eyepiece receptacle. This hold the camera close to the blocking filter. I am still trying to find a compact, T2-1.25" non-rotating, helical focuser.

Here is Starlight Instrument's own web page for the Feather Touch FTF2535HD focuser.

FTF2535HD---Feather Touch® 2.5" Diameter Dual Speed Focuser 3.5" Draw tube travel, and Brake


*


16.10.2020 Unexpected sunshine and nice spot! AR2776

 *

 Friday 16th Oct. 1/47F. Unexpected sunshine showed AR2776 in SE quadrant. Seeing is wobbly mush but I'll keep trying! 

Objectives dewed over. Set the heating bands going and eventually reached 70F. The dew disappeared. 

Light bridges visible on the umbra.

I have a new 3m USB camera cable.

Heating bands reached 70F.


11.12 Seeing improving slightly.

11.20 Cloud has arrived.

24cm from etalon to camera using 2.6x GPC. I have no focuser so must use push pull.


 An image of the telescopes with the heating bands in place on the 6". 
 
Both objectives are dewed over but cleared quite quickly.

The D-ERF is filthy! Dust and pollen are attracted to the dewed surface and stick. I have tried a bulb blower, a hairdrier and a very soft brush but the dirt does not shift. I have now made an aluminium protective cover for the D-ERF. It is lined with plastic to prevent marking of th D-ERF cell. An internal disk of polystyrene will provide some insulation.

The afternoon was plagued by cloud from the  NE.

AR2776 is clearly visible in white light. 
I'd have tried a capture but am still waiting for the cloud to clear.

Which it never really did.


 The etalon/filter stack with the 2.6x GPC on the  camera's nose. Etalon to focus distance is 235mm in this case. So I need at least 15mm travel in a T2-1.25" helical focuser. 

 There is the potential to make more room for a T2 or 48mm helical focuser. By moving the Blocking Filter to a shorter adapter. 

I have removed the 2" helical focuser due to its considerable length.[90mm] There was simply not enough room for it to fit within the 200mm required spacing without a GPC to extend the focus further. A [helical] focuser for the camera is highly desirable to achieve sharp focus. A 1.25" filter thread is vital to allow a range of GPCs to be fitted in front of the camera. The camera usually fits onto a T2 male thread. Which matches the blocking filter. If the camera is attached directly to the blocking filter there is no way to support a GPC.


*

15.10.20

15.10.2020 Take three dew heaters to the observatory?

 *

Thursday 15th A long, grey, cool day despite the promise of lots of sunshine by both national weather services. Wind blowing from the NE. Typical! There is a new AR I could be imaging in the SE.

The new 12V DC PS with cigarette lighter socket arrived. Excellent service from that online dealer as always. I promptly wrapped my three dew heater bands around the telescope. One on the D-ERF and objective cell, the next on the back of the main tube just behind the objective cell. The last band went on the main tube next to the backplate. 

The Hitechastro 4-way, dew heater controller was fixed to the saddle with double sided tape. I hoped that having a single lead to the central controller [from the PS] would avoid tangles. The long leads of the three heater strips were wrapped neatly around the main tube to use up most of their spare length.

The ambient temperature in the dome was 50F. 47F outside. After setting three control knobs to 12 o'clock, each band reached 65F [inside] within a few minutes. I used the sensor of a digital thermometer tucked under each heater strip, in turn, to check their temperatures. There was some variation of a degree or so but hardly worth worrying about. 

I have no idea whether 65F is adequate to rid the objective lens of dew from scratch. I am afraid to run them all night, unattended, because of a possible fire risk. Experience will tell if more heat is required. Wrapping insulation around the dew bands [while I am in attendance] may speed dew removal after a cold night. The aluminium coated, sponge dewshields did nothing useful! 

The dealer has sent the remaining [base] adapter for the FTF2535 by quick mail and free of delivery charge. It should arrive tomorrow. Though, of course, I did have to pay for the adapter itself. There was also an apology for the confusion over the exact parts required. 

The second image shows the massive, FTF, flat, base plate fixed onto the new backplate. I put the backplate back in the lathe and took a light cut with a sharply pointed tool to make a guide circle. Then I drilled and tapped the four holes. The M4 stainless steel screws are slightly too long. So I used packing nuts until I can get the correct length of screws.

The weight is certainly adding up. I'm hoping the increased moment will help to steady the telescopes when it is windy. It will certainly mean moving the OTA up through the rings to achieve tube balance. I will probably have to move the main counterweights much further out too. 

 *


14.10.20

14.10.2020 Making a new backplate for the FTF2535 focuser.

 *

I made a start on a new back plate to fit the new Feather Touch 2.5" x 3.5" for when I finally receive the base adapter. If the focuser is to rotate on this base adapter then the rack will rotate with it. Which means I need a hole with enough clearance for the rack to lie in any orientation. 75mm Ø will be quite close. So a couple of extra mm will avoid any risk of contact. 

The first images shows the 77mm Ø clearance hole for the drawtube. The blank has also been faced, while in the 4-jaw chuck to make it tidy and true. It is important not to remove partially finished items from the chuck if concentricity and truth are important.

Here the blank has been reversed in the 3-jaw chuck with expanded internal jaws. So that it can be stepped at the rim to fit  snugly inside the main tube. It will not look quite as massive once completed and fitted. The weight should "tip" the OTA to a more aesthetic position. At present it is nose heavy with a very long "tail" end to balance.  

I fitted the new backplate in the tube and marked the screw fixing holes. Then I drilled and tapped radial, M4 threaded holes in the step surface. These are to hold the backplate securely in the main tube. I turned a tapered shoulder to make it easier to fit into the springy main tube.


Having been turned from the same blank thickness the new backplate is very similar to the previous one. Only it has a much bigger central hole. I did not want to spoil the old backplate in case I needed one with a 2" bore one day. I had a good length of 180mm, 7"Ø aluminium bar form a flea market for small change. It has lasted me for years and I still have some left. A local engineering company slice it to order on one of their band saws free of charge.

The FTF flat baseplate still needs to be marked and drilled on the new backplate. This flat base plate has levelling screws but I need to be absolutely sure it is central on the backplate. I will probably wait for the arrival of the missing, FTF base adapter just in case it affects centralisation. I can place packing around the drawtube of the completed focuser to ensure perfect concentricity. It shouldn't take more than a couple of minutes to mark and bore the necessary fixing holes. The weight of the complete set-up probably means I'll need my block and tackle to lift it all into place. 😉


*

13.10.2020 A rant about online Feather Touch Focuser sales techniques.

*

To add to yesterday's misery of thick cloud my [partial] new focuser arrived yesterday. Well, bits of it anyway. I can't use it [at all] because there is no base adapter. Every single sales website illustration, online, shows the base adapter fitted. But most only list it in the small print as an "optional" extra. Sometimes somewhere down near the bottom of the web page.


Without the base adapter the FTF focuser is just a very expensive bit of scrap metal! A real cynic could easily call these online sales tactics a scam! You buy a focuser mechanism, but it needs an FTF eyepiece adapter. Plus an FTF base adapter. Which fits another FTF adapter to suit your particular telescope or FTF base plate. 

That is four items in total before the focuser is complete and now fully functional. Yet the normal sales pattern is to list only the price of the mechanism beside an image of a complete FTF focuser with two, vital adapters already fitted. Everything else is listed as "optional." 

I found only one, online dealer who made it very clear that the adapters were necessary and had boxes to select during purchase. 

One dealer did not show the eyepiece adapter at all until a specific focuser was chosen. Then it was right at the very bottom of the page as if by afterthought. 

Shouldn't ALL the online dealers automatically point out that the focuser is absolutely useless without these extra [and very costly] adapters?

Though it must be said that the manufacturer's own website clearly states that adapters are necessary in bright red text. Certainly not "optional" as many online sales websites word it. What about wording these adapters as "absolutely vital" on ALL FTF sales websites?

Would it completely destroy FTF sales if the full price was printed clearly up front? Who visits the manufacturer's website every time you are making a purchase from a more local, online dealer, anyway? 

Is there any other focuser which needs four separate purchases to function at all? Each part has a weird [Metric] thread size just to ensure their purchase. All, at well over €150 extra [Euros] each! 

I found only one dealer's website including the two vital adapters in the correct, full price. Many websites are very vague about these, NON-OPTIONAL expenses! One online dealer even quoted the base price for the mechanism stating clearly that the image showed it complete at that same, base price. Very dodgy sales practice IMO. 

* €719 For the basic FTF2535 rack and pinion/drawtube mechanism.
+ €168 for the 2" adapter
+ €189 for the base adapter
+ €154 for the flat base plate
= €511 + €719
= €1230 total.

This is a 1:1.4 ratio in pricing between the basic R&P focuser mechanism and the three, vital adapters. BTW: The US price is much lower than in Europe.

Add caption

Some will argue that I did not need to choose this specific manufacturer's products. Why not? I think that FTF focusers are superb. Their finish and function is flawless as befits their price. They ooze quality.

My point is that I wanted this particular focuser but I think I should have been told the full price up front. As well as all the vital parts I needed to order to use the focuser as intended. Now I will have to wait more days, pay €189 extra, plus €19 postage for the missing part. Without which I have no functional focuser.  

Some will argue that I should be happy that FTF supplies so many different options. While that may be true, up to a point, there are two adapters which, I believe, must be considered minimum standard fittings. One to fit internationally recognized, standard 2" eyepieces and equipment. 

The other to adapt the unusual base to fit a range of telescopes. Without which there is no way to safely and adequately support the focuser mechanism. Without which "the car has no wheel hubs" to support the choice of after-market wheels. I had ordered the flat plate adapter. Which should have triggered an automatic notice that I'd need the base adapter shown in every online sales image. There must be few amateur astronomers who can manage to make a matching M95x1mm thread.

"Buy your brand new car now! It has no steering wheel, exhaust or fuel tank! These are all optional extras. But it has a very fine engine!" 😇 

My dealer has apologised for the mix-up, and deleted my postage charges. I should have the base adapter in the post on Friday. I am certainly looking forward to using it. Once I have used and enjoyed its superb abilities, I may even delete this post. My frustrations in procuring this superb focuser will be at an end.


*


13.10.20

13.10.2020 A bit of a rant about objective dewing!!

 *

Tuesday 13th 10.am, 54/50F. Bright sunshine with thin cloud. Not so cold overnight. I pulled off the insulating dewshields to discover the objective lens was wet on all three surfaces! Front, back and even between the elements. Only the front surface responded to the hair drier. The rear and interstitial dew became much worse! 

I wouldn't dare leave a dew band running all night because of the fire risk. In fact I couldn't use my heating strips anyway because the Hitechastro control box I was sent has a cigarette lighter plug. I don't have any power supplies with a matching socket. I've had to order a 12V PS with a suitable socket online.


10.45 Here I am an hour after setting up and still can't get a sharp image! 

11.42 Another hour later: First sharp[ish] image but very uneven lighting. Then solid cloud!

12.23 Another image. I have been struggling with thin, obscuring cloud and dew all morning. It was all but impossible to get a sharp enough image to  be sure of best focus.


My 6" iStar objective with interstitial and internal dew. The ugly smear between the elements doesn't look good! It obviously wasn't cleaned very well! I tried warming the cell and main tube with the hairdrier but it made no difference. It took over an hour for the dew to shrink to coin sized. I may make an access door just behind the objective for the hair drier. Though that won't help with the dew between the elements.


 *