30.6.21

30.06.2021 Internal shutter slides.

 *

Wednesday 30th warm but overcast with rain in the afternoon. 

Having spent the entire day discussing different ideas about zenith boards, shutters and external slides I have scrapped the whole idea.

I need to put the slides on the inside of a thick, laminated, dome profile board. The slides must be placed at such a height that they safely clear the dome on each side of the observation slit. This way I can achieve the lowest possible profile for the shutters. So that they don't catch the wind.

The second image shows the [roughly propped up] shutters from the rear of the dome. The shutters are spherical and an exact copy of the dome profile. So I think they can go lower than this. Their curvature and lateral movement, to open, favours clearance from the dome.

A thick, external, laminated, plywood profile, above the dome, would provide increased beam stiffness in conjunction with that below. This will help to support the weight of the shutters and avoid dome flexure. Failing that I shall have to seriously consider metal reinforcement.

After further thought I will have to use aluminium to reinforce the upper and lower zenith boards. The depth isn't sufficient for plywood to do much more than flex and add weight. There has to be a compromise between beam depth and shutter projection. 

Since the loads are mostly downwards the upper structure dominates in beam stiffness. This is the case even if the two layers are bolted in a sandwich over the dome material. The slit facing, zenith board should be full depth and in 10mm thick, aluminium sheet. 

Laminated ply spacers, above and below the dome, will help to spread the loads. With matching, aluminium profiles at the rear. Through [eye] bolting will then enjoy solid resistance. Rather than directly crushing a narrow section of laminated ply. Vertical bolts will compress these sandwiches onto the dome material.

Now I need to make some mock-ups. To see how much clearance I need for the slides and shutters to clear the dome. 


*


29.6.21

29.06.2021 Effect of aperture stops on a 150/10 PST mod telescope.

 *

Tuesday 29th warm but a white and cloudy sky. 

First exercise is to compare 100mm with 150mm apertures without making any other changes. 

I now have a metal "hat" which slips onto the full aperture, 160mm, D-ERF cell. Into which I can insert aperture stops. For this test I cut out a cardboard stop for the 100mm. I simply lifted the "hat" off for full aperture.

Both images were captured within seconds of each other.

The 100mm aperture needed 120 Gain. The 150mm only 60 Gain. 2x GPC in both cases. No change to focuser or etalon tuning.

Identical processing in AS!314 and ImPPG. [Batch of two] 

Saved to PhotoFiltre 7 for conversion from .TIFF to JPEG. No other change except addition of text aperture labels.

The difference is night and day with regards to fine detail.

Unfortunately the telescope moved slightly while I removed the "hat". On tiptoe on a low stepladder! The sun is 51° high. The D-ERF cell is 2.43m off the observatory floor!

To be safe I really ought to repeat the test a number of times in clear, blue sky conditions. One cannot be certain that a thin veil of cloud did not cross, or  move away, between the two exposures.


*

28.6.21

28.06.2021 A massive flare SW of AR12835!

 *


Monday 28th 61/64F bright sunshine form a clear blue sky.

09.30 Started imaging. 2x GPC followed by 2.6x GPC when the seeing cooperated. Stable image at first but soon began to tremble.


10.00 A massive flare in the AR below AR12835!

It was still visible when I darkened SharpCap to black. Almost over by 10.20.


I have uploaded a video of the flare at 10.10[CET] to YT. 

https://youtu.be/4cM9n2aE9OE


11.20 The seeing conditions are still holding up quite well. Though the earlier transparency is lost.

The disturbed region SW of AR12835 is showing definite signs of flaring again. It is brightening all around. Almost as if a lid is holding it down. A CME in the making?


There is a spot emerging near the eastern limb.

I can't capture it clearly. Earlier, I saw a prom, jet or flare just south of it on the limb.


 11.41 Flaring right around the lower AR.


18.11 Returned to test the later seeing conditions.  Not quite as transparent as earlier.


18.38 The vast disturbed region central in the northern hemisphere.


18.56 The trees beckon! The end of an amazing day for seeing conditions. The PST etalon is showing remarkable uniformity of brightness and being on band. For which I have no real answer.

Today just goes to prove that one cannot set any hard and fast rules for local seeing conditions. Nor the timing of the best conditions.

I was busy from 09.30 to 19.30 today. 

More Titebond III glue arrived today. Just as well, because it doesn't go far when I apply glue to both surfaces.


*

27.6.21

27.06.2021 Imaging AR12835 through cloud.

*

Sunday 27th 70/63F, cloudy from the west. With only occasional, brief, sunny periods. Moments of tantalizing transparency. Spoilt by thermal image displacement, defocusing and shaking. 

Now add problems with the PST etalon. I am seeing a dark ring of detail. Off-band, bright patches to right and left. I tried re-wrapping the etalon element with PTFE tape. It made it worse!


12.27 I keep capturing videos during breaks in the cloud.


I have now changed to the 2.6x GPC to try and narrow the field of view. Double, branched light bridge over the more western spot. [AR12835?] Double light bridges over the more eastern spot.


13.20 Very cloudy now. Paused for lunch.

14.25 A little sunshine tempted me back. Still too much cloud and a white sky instead of blue. 


Time to do some more woodwork! 

I wish I hadn't! I had to align three arcs on top of three others with staggered joints. Which meant I couldn't see the joints underneath. What made it worse was working down on the grass. Grass full of warring ant colonies! Plus it was hot and humid working in the veiled sunshine. With perfect hindsight I should have used screws to hold the  arcs as they were assembled. Instead of which, I added dozens of spring clamps. I was being bitten by ants but didn't notice it at first. Perhaps they were gnats? I used G-cramps and F-clamps to ensure the joints were tight.

18.00 Doing some late imaging. Some transparency returning but the image is simmering fiercely. Huge variations in thermal distortion require split second timing and anticipation for a capture. Thin, high cloud crossing too.

If only the cloud would disappear the transparency would work for me.

Only a quarter of an hour before the trees intervene.


 18.54 Last useful image.

18.57 The trees eclipsed the sun.


*

26.6.21

26.06.2021 Early imaging and arc trimming.

 *

Saturday 26th 65-71F, bright but very cloudy from the north west. The seeing is shaky and soft. [On the rare occasions that the sun is visible.]


11.00 The approaching AR [AR12835?]  is forming multiple umbra [dark spots.] A huge filament lies to its south west. It is centred in a very large, disturbed region spreading south and west.


11.17. Improved seeing between the endless clouds.


*

25.6.21

25.06.2021 Imaging between clouds.

 *


Friday 25th 57/62F early sunshine is forecast to be short lived. 

So here I am in the observatory [again] watching clouds crossing the greatly enlarged sun. [Again.]

I might as well have started early on gluing ribs.

Let's try proms. Change the GPC for 2.6x and swap form Lunt to PST BF. 

8.57 Not too bad considering all the cloud.With bigger stuff arriving.

09.13. This prom was so unexpected I have moved it to the top.


It clouded over so I went for my morning walk.


 AR12833 sliding off the disk.


11.21 Changed the GPC to a 2x Barlow. This is captured through cloud.


12.59 Discovered huge disturbed area in the east. Above and below an obvious candidate for an AR award.

Imaging though cloud. This is with the PST BF.


13.50 Returned from lunch. Sky still white between the clouds. ASCOM[AWR] wants to go the wrong way to the sun. I'll have to drive it manually on the paddle!


Captured the disturbed eastern hemisphere with a variety of GPCs and the Lunt BF. 

The sky is bright white. The only blue is low down.

My PST etalon will not provide an even spread across the image at lower powers/wider fields of view.


15.07. More of a close-up with the 2.6x GPC.
 Pushed hard in ImPPG for detail.


Sunny periods after 18.00 but still with milky cloud.

18.21 A brief clearing.


18.43 The cloud persists to the last.


*

24.6.21

24.06.2021 First rib gluing started.

 *

Thursday afternoon. 68F. The sun disappeared around lunch time. To leave the sky bright but overcast.

So I started gluing some arcs into my first dome rib. This will be one of two ribs. Each reinforcing one edge of the observation slit. I had allowed the arcs to stand in the sunshine all morning to ensure they were fully dry. They were rotated at intervals. Just prior to gluing I had used an orbital sander to smooth off any lumps and bumps from earlier screws.

The Titebond III "Ultimate" glue is pleasant to work with. It is about as runny as any other wood glue and spreads easily and evenly with a paint scraper provided one is generous with the glue. I didn't notice any odour.

Having read that clamping can be easily overdone I just used spring clamps all around the edges. I soon had to flip the rib over. To check the joints of the short central section of the lower layer. Which is why all the supporting, timber scraps on the ground are  now in the wrong place. 

I shall pause at only two layers to check the rib's lateral stiffness before adding a third layer. I used 2x16mm on the plywood dome and this left joints on each face. Which are potential hinge points of weakness. Three layers allows staggered joints. Skewing the joints increases joint strength.

I had previously chosen the flattest section of the parking space using a 2m straight edge. The spring clamps were bought in small quantities back when I was building the plywood dome. One can never have enough of them when lots of ribs have to be laminated. Fortunately I shan't need lots of those with the glass-fibre dome. It is meant to be self-supporting and has its own reinforcing GRP ribs moulded in. 

I just need to stiffen the dome where I have cut out a large rectangle for the observation slit. No doubt the dome could survive without these ribs. Though not if the dome has to be lifted in one piece. Certainly not lifted from the supplied rings at the top. Which were designed to support the weight of a much more solid hemisphere. Not one with a meter wide hole cut out of it from the skirt to just past the zenith!

With the shutters removed I had easy access to the dome to store the rib, upright overnight. No point in leaving it lying out on the grass to get damp. It is still clamped up. Glued joints should not to be stressed for 24 hours. So I used G-cramps to clamp some boards across the joints to support the rib securely.

____________________________


Next morning I discovered I had not been generous enough with the glue. Or the clamping? One joint section had an air gap. So I poured glue into the gap and clamped it up well with G-cramps. Since I now have so much glue I'm going to apply it to both surfaces, spread it evenly and clamp it more firmly. The spring clamps probably don't apply enough pressure over such a large area.  

A quarter arc, 24mm thick, two layer rib, 200mm deep is really quite heavy. It will need temporary, internal support to avoid the dome sagging under the weight. I had slotted the end of the rib to slide over the dome material at the zenith. 

The zenith board needs to be marked and cut out first. To ensure the dome hasn't sagged from the weight of the ribs. Despite being sturdy down near the skirt the dome is much thinner away from its panel edges. In fact, light can be seen through it in places. Not a problem provided I respect its limitations in stiffness around the entire slit area. Hence the ribs, of course.


*


24.06.2021

 *

Thursday 24th 60F, early cloud cleared to sunshine. R12833 is approaching the limb. The seeing is poor. Soft and without detail. Some thermal simmering and increasing shaking.

A neighbour has left a bonfire smouldering.

The observatory is full of wood smoke and my nose is streaming.


10.32 I changed to the PST BF and 2.6x GPC to try and catch some proms. Fleeting improved seeing allowed some lucky captures by careful timing.


*

23.6.21

23.06.2021 Orphaned Amazon Parcels!

*

Wednesday 3rd. 60-67F. Overcast and breezy at first.

There is a serious problem with parcel delivery. Amazon provides no personal, customer details on the package label. A bone idle, carrier driver drops a parcel off at a parcel pickup-shop. The parcel should have been delivered direct to my address, of course, but wasn't. There is no way for the parcel pickup shop to contact the customer. Except by snail mail letter? At their own expense?

 I took a chance today and toured my nearest parcel pickup shops. The first sent me away empty handed. The second almost sent me away. Then found my orphaned parcel as he returned to the counter. It was on the shelf. Right next to the till! It was sheer luck I had persevered!

SIX weeks from first placing my order through Amazon I received my Titebond III glue! What a farce for a multi-billion dollar company! The vendor had kindly put a small extra bottle in with my order to compensate for the delay in receipt. None of the Titebond stockists has any stock in Denmark.

With no further excuse not to build some dome/shutter ribs I started [almost] from scratch. I decided that 2x12mm wasn't enough. Certainly not with square, butt joints. So I used up the arcs from the other rib. This gave me plenty of material to maximise stiffness. 

I marked the slanting cuts on the ends of the arcs onto the next arc down. The lines were then cut with the sliding, mitre saw. This gave me three layers of 12mm for a 36mm thick rib 200mm deep. With staggered joints and these same joints with deliberately opposing angles. The image tells far more than my description.

Once glued and screwed together this will form a single, reinforcing rib for one side of the dome slit. I already have galvanized angle brackets to bolt the ribs securely to the dome. Then there will be zenith boards across the top. Plus the 36mm thick, base ring for support at the bottom. 

The plywood arcs have been outside for nearly two months. So they have got slightly damp. The glue demands dry surfaces. It's lucky we have a run of warm, dry weather.


*

22.6.21

22.06.2021 Man with the cleft stick falls at first hurdle!

 *

Tuesday 22nd 54F, overcast but sunny periods promised.

The glue parcel was not delivered yesterday. Just as it was not delivered last time. The universal tracking websites still show the delivery driver is out there somewhere. Bleary eyed from sleeping in his van. Wandering endlessly while searching for our address. No GPS to guide them? Too afraid to knock on a door to ask? The roads are all clearly marked at intervals. The house numbers are on plates on posts beside the road. Even the bus stops have the name of the hamlets and villages printed clearly in black on yellow.

Solar animations? How difficult can it be? Don't ask! I have been struggling to make an animation with some gorgeous, solar videos and images. Which I deliberately captured, at measured intervals, during a period of good seeing. I can't even get a few scruffy images to join hands and dance wildly on my screen! I must have missed that class on Thursday afternoons, when I was at school 60 year ago!

Ever the optimist, I am back in the observatory to do some cloud watching. Sunshine was so brief I didn't capture anything in two hours. So I played with animation. Badly!


21.6.21

21.06.2021 Man with the cleft stick reaches Denmark.

 *

Monday 21st 55F, heavy overcast with rain and thunder promised again. 

After 11 days in transit my Titebond glue has finally arrived in Denmark from Austria. None of the [claimed] Danish Titebond stockists has any stock. Still plenty of time for it to get lost again. The last package went out for delivery, on the tracking, but never arrived. I never did learn who the delivery agents were. Now a repeat of the same. Universal Parcel Tracking App has "Out for Delivery! I have checked about a dozen delivery services with the tracking number but nobody is accepting responsibility. It surely can't be Austria post. It is pouring with rain but I have to keep going out to check the gate. Just in case it has been dumped there.

This must have cost me nearly two months in my new dome build. I need a reliable, "waterproof," exterior glue for laminating the birch plywood ribs. Titebond III is apparently the glue of choice for US woodworkers. 

The crap I used for my plywood dome was anything but "exterior" and not even damp proof. [Despite the blatant lies on the bottle label] It's lucky I screwed and bolted the plywood dome together. Or it would have fallen to pieces by now! It didn't help that the "15 year" "premium," "wood protection" paint fell off within months! Not to mention the "premium," marine," seam sealer which cracked all over.  

Anyone building a plywood dome must figure in all the work and expense. Of a good, thick and ugly coat of fibreglass and resin over the top.


*

19.6.21

19.06.2021 My H-a solar imaging equipment and processing.

 *

In 
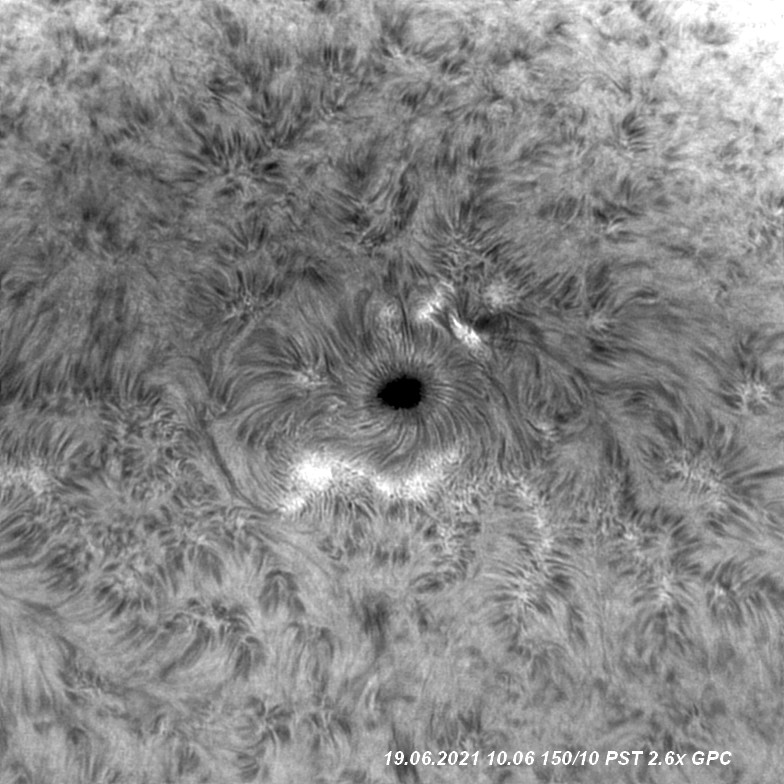
case anyone is interested:  My H-a solar telescope is an iStar 150mm [6"] f/10 H-a, refractor objective in a home made OTA [optical tube assembly] with home made counter cell, back plate and baffle tree. 


H-alpha OTA: Baader 160mm D-ERF full aperture front filter in TE filter housing. Starlight FTF2535HD Feather Touch focuser. Modified PST etalon for H-a, 50mm Beloptik.de KG3 & Baader 35nm H-a protection filters on 2" forward extensions inside the OTA. Lunt B12000S2 straight through, 12mm Blocking filter, Maier ITF, PST BF. Choice of 1.6x, 2x and 2.6x GPCs on ZWO ASI174MM camera nose.  

Massive, home made, all aluminium, GEM equatorial mounting with 50mm [2"] stainless steel axes. 

Mounted on a 13' high, pyramidal, timber pier in a home made, 2 storey observatory supporting my home made, 3m [10'] plywood dome. Goto mounting drives are ASCOM[AWR]Tech[UK.]


Software:Capture:  I'm using SharpCap Pro v3.2.6480, Mono 8 AVI, 800x800 10m/s Gain 60. Zoom 125 for capturing 500 frame, AVI videos.

Software stacking: Autostakkert AS!3 3.01.12 [x64]  Surface, Improved tracking, Noise Robust2, AP size 16. Zoom 160. 75/500 frame selection.

ImPPG: Lucy-Richardson D Sigma [default 1.3] Iterations 50, Sigma 2.6, Amount 1.35.  Saved as 16 bit  .TIFF stills to:

Final image polishing: PhotoFiltre7 image handling software. Histogram, Gamma, Contrast and any cropping. Images saved as JPEGs.

My working method is to capture short videos only in moments of good seeing. This is continuously monitored on a large, 27" hi-res monitor using a much enlarged image. I usually get about 100fps with [arbitrary max] 10m/s exposures and 800x800 windows. My laptop now has twin, internal SSDs after some time using external T5 SSDs on USB3. I try to avoid adding Gain if possible. 

I then process immediately as I continue to capture more videos. All the processing softwares are kept open during capture for quick turnaround. Which means not having to wait fr them to open and make changes to settings each time. 

It would not be an exaggeration to suggest I can quickly publish processed images online. Within 5 minutes of a capture is quite normal. This is quite deliberate on my part. I reasoned that spending lots of time processing to perfection was just not my area of expertise. 

Rapid, repeated processing of new material is similar to bulk improvement by constant iteration. The sheer number of captures and their processing means I must have built a successful routine. Provided the seeing is good enough, then no extra processing will improve my close-ups beyond the personally acceptable. The trick is to set my own standards by comparison with other solar imagers.

Concentrating on solar close-ups was another deliberate choice. There are quite a number of solar imagers with expert skills at full disk image processing. They have etalons and filters which allow much more even lighting than my [humble, secondhand] PST etalon. 

Investing another £1500 in a Daystar Quark is far too much of a gamble with their present lack of quality control. The astro and solar forums are awash with horror stories about poor quality Quarks. Multiple returns, just to obtain an acceptable product, does Daystar's reputation no good at all. Otherwise all solar imagers would [probably] own at least one Quark. There are several varieties.

Solar Spectrum sell well respected filter products but at multiples of everyday pricing. Well beyond my pocket. They can cost as much as a car. By which I mean a much better car than my 20-year old rust bucket!

A small number of manufacturers offer complete solar telescopes. Again at prices which require a fair income. Or very serious dedication to the pastime. Hence my choice of a modified, secondhand PST. Then building the telescopes and mounting to save tens of thousands on instrumentation.

It could be argued that the results from purchasing a Lunt 152mm H-a scope would be superior. The problem is that it costs in excess of £10k and on upwards. A suitable, commercial mounting, to carry a 6" refractor, would run to another £10k. Add another £10k for a smaller dome than I have already built for myself.

I can claim no great expertise at solar imaging. Fortunately I am now getting results which I find acceptable. It was hard, frustrating work getting this far. I had to learn the techniques of capture and processing from scratch in my mid-70s. My mass production, processing methods and the countless hours practising them, help me to learn from my mistakes. Naturally I study other imagers work, advice and equipment. To add to my rather limited sum of specialist knowledge. 

My brain doesn't function well on inscrutable symbols. So several popular softwares remain completely out of reach. Fortunately I have a decade of experience using PhotoFiltre 7. It has just enough tools to finish off my results.

I wish I could claim the later seeing conditions had improved my images but the seeing is absolutely awful now. The wind is also blowing the telescope around. Best to give it all a rest until later. The later session never came around. It became overcast at 18.00.   


*


19.06.2021 H-alpha solar imaging.

 *

Saturday 19th 75F [9.00am] Already hot, bright but thin high cloud again. Milky sky instead of blue.


09.50. 76/73F. Mottled cloud from the south. Sky not very transparent. Changed to 2.6x GPC for more scale.


9.58 Less cloud. More detail.


 10.06. Pushed slightly harder in ImPPG.

 10.10 Far more high cloud  now.

 The seeing has become too mushy to focus the image.


*