30.7.18

Dome build: Dangling by a Sky Hook.

*

Ten days after dispatch from the UK my scaffolding hook has finally turned up. I could actually have saved some time by buying it in Denmark for three times the eBay[UK] asking price for the identical product.  These things are widely available.

I just couldn't bring myself to encourage the greedy Danish dealers. The Danish dealer also wanted more in domestic P&P than eBay[UK] wanted for international postage.

A nice bit of kit with a wide gape for clipping it over anything handy which will easily bear my weight with a wide safety margin for a short fall. The spring loaded, slotted part locks the hook closed. Depressing it allows the hook to open as the slack jaw is pulled towards the hook. The locking part is operated by the base of the thumb and soon becomes automatic. The hook unit is rated at 5860lbs which is just over 2.5 tons.

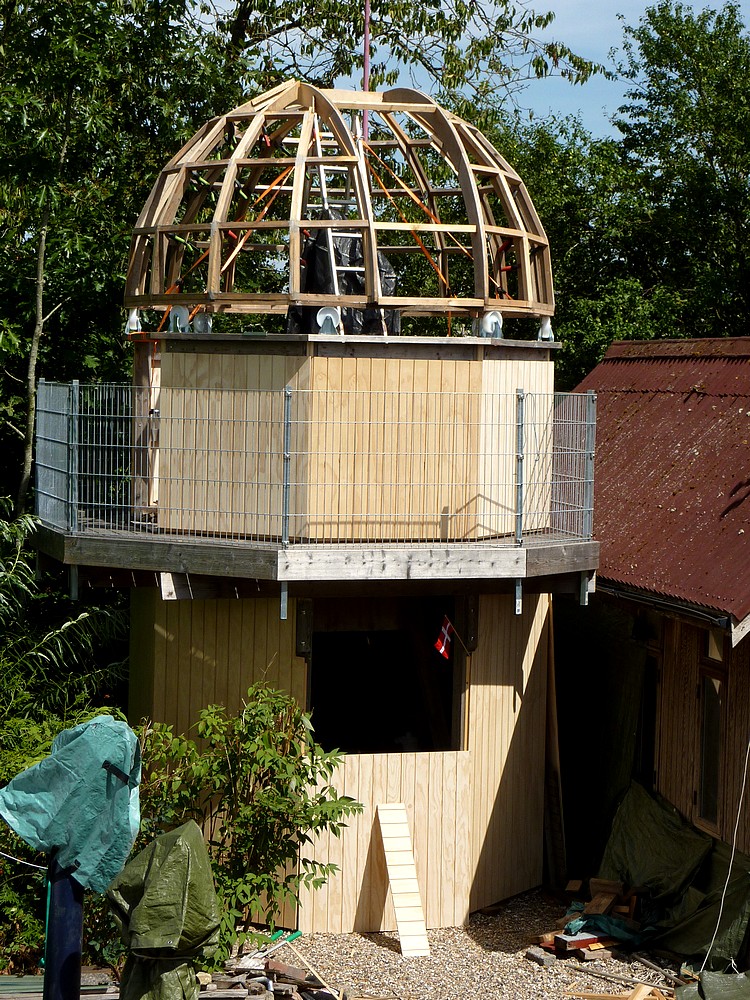
I plan to fit the dome panels from the top of my 5m ladder. This will rest against the veranda rails using a short ladder as a sturdy stand-off. The hook can be clipped over a rung on the ladder to limit my drop in the event of an overambitious reach for the sky. These hooks are often listed with safety lines attached but they always seemed far too long for my purposes. So I shall knit one myself and connect it to my harness with a carabiner.

Tuesday: Spent the morning working on the obs. wall panels tidying up the corner miters. Doubts were cast online over the plywood track on the dome base ring and whether the wheels would dimple the plywood if it is parked in one place for a long time. These doubts have now hopefully receded. Saving me from covering the downward facing track with something harder. 

I have ordered 50 x M6 x 90mm CSK screws for the base ring to hold the lowest horizontal struts securely. I'm hoping these bolts will help to secure the base ring against delamination. The cheap construction adhesive I used has proved to be worthless crap. I have plenty of oversized washers and M6 nuts from the dome bought in bulk to hold the ribs together. So they will now be used up. The online price for A4 stainless steel was only 1/3 of plain steel bolts at the timber merchants.

I am delighted with how little waste I have managed to produce on this project. Where there was an early oversupply of timber it has all been consumed in later stages. Remarkably little plywood was wasted thanks to later uses being found. I still have some 5" larch boards left over but even these could become a secure front door for the octagon. Or as handrails for the veranda fencing? It would need to be made deep enough to allow a sawn slot to fit tightly over the steelwork for added strength and stiffness.

Click on any image for an enlargement.
*

29.7.18

Octagon cladding boards completed.

*

I did a quick mock-up with a half sheet and it worked out fine with a larch board across the top. The image shows the general effect. There is more to it than this though. The larch boards have to be mitered to exact length to fit neatly end to end. Then they need a notch sawn in their bottom inner edges to carry rain out over the boards. I just hope the hornets don't mind me dragging the miter saw outside!

A trial half sheet on the front wall of the observatory. It is held by a couple of screws but not trimmed to size nor beveled yet. Thundery showers are forecast for this evening. We used some spare lengths of gutter to aim the roof down-pipe run-off at the garden where it will really do some good.  The first rain in months needs to be respected. It has been dry for so long I haven't needed to worry about leaving stuff outside overnight. I had better get the 4' x 8' plywood cladding boards cut in half so they can be stored more easily.

Sunday: Here is a slightly later, candid image, taken by my wife, while I was fitting the front boards. I think it gives a better sense of scale for the building and dome than my usual, rather static, progress shots. 

I can't fit the front and back cladding boards until/unless the tall stepladders ladders are taken down. Which can't happen until I finish the dome. Though I could remove the top stabilizer bars. Which aren't doing much good sticking up in the air. That would at least allow the dome to rotate if needed. Duly done and the dome now rotates without catching on the ladder.

Having brought the ladder bases inboard of the obs. wall I added a trial cladding sheet to the front. Like the ground floor, the sheets need to be beveled on their back edges to meet properly.

With the change to slightly cooler conditions I hope to be able to make more rapid progress. I found the upper 80s F heat really difficult to work in. My brother has suggested I use cardboard templates to shape the top tier of thicker ply panels. An excellent idea which I shall certainly try.

I finished fitting the seven panels to the observatory walls before lunch. The Head Gardener thinks it looks like an unfinished admissions booth or even an ice cream sales counter.

It is only 75F @ 13.00 but still feels very warm working in the sunshine. Next I have to add some mitered larch boards below the top of the walls. I thought I'd add some ply pads behind the boards to add more projection and emphasis. This should also improve run-off. Rather than rainwater wicking inside the wall boards.


Click on any image for an enlargement.

*

27.7.18

Octagon cladding cont'd.

 *
Thursday: Started early before the intolerable heat arrives. A 5th panel went on before morning coffee. It is already 81F @ 10am but with a bit of a NE breeze to help cool things down. I ought to get another panel done while it is still in shade on that side.

I haven't yet worked out how to fit the panel which faces the shed. I can't tip the sheet in or out to clear the obstructions. As I have been doing with  all the other panels. I may have to cut it in two horizontally over a cross brace for edge fixing. 85F by the time I'd fitted the 6th panel. That just leaves the shed side panel to do and the doorway. Hopefully the 135cm high panels around the obs. level will be more straightforwards.

The shed side proved to be simple enough after I removed two braces between the shed and the octagon. These were only to hold the building skeleton upright until I could reinforce it with horizontal braces. The 7th panel went on fine after that.

I am delighted to report that the plywood cladding has really stiffened up the octagon. I was just able to get it to shudder slightly if I gave it a good shove from the observatory floor. Before the cladding went on it would sway an inch or so. No doubt the upper panels at observatory level will further stiffen the structure.

Now I have to decide what to do about a door or doors. Should it be a low key shed door or an attempt at a flourish leaning towards ostentation? 

Friday: I took down the obs. wall tarpaulins and fitted the sawn, roof prism profiles ready for boarding the walls. The wall height is about 134cm. Half a 122x244 sheet is only 122. Which leaves me 12cm or 5" short of full height. The 4'x8' sheets cost ~£20 each [equivalent] So that's another £80 if I buy enough sheets to do the job properly. Leaving me with eight, 110cm tall, undersized, half sheets without any obviously useful purpose. I can't even line the obs. walls with them unless I add skirting and cornice.

I could use true half height sheets [122cm] on the outside and add a decorative horizontal timber bar like a skirting board. Or even an upper cornice to make up the difference in height. I have four full sheets left and still lots of long lengths of larch flooring.

Decisions-decisions. The skirting board idea is probably riskier because rain will tend to collect at the bottom. Such a feature will be completely invisible from the ground due to the veranda flooring hiding it from view.

While an upper strip will reinforce the wheel supporting octagon of 2x6s and be clearly visible from the ground as a decorative addition. The top "wheel ring" is already supported by 2x6s on edge. So there is no great need for extra strength. Though it would use up some of my spare larch boarding and [perhaps] add a more finished appearance.

The danger now is that the project will end up with a tall, rather featureless octagon with a dome on top. Which might look rather like an oversized, scale model of stump of pencil with a worn eraser on top! 🙈 But is it art?

It is lucky I decided to add a veranda to add interest and to break up the uniformity of the tall octagon. Only a cynic would argue that the veranda looks like an inverted tutu.

I did a quick mock-up with a half sheet and it worked out fine with a larch board across the top. The image shows the general effect. There is more to it than this though. The larch boards have to be mitered to exact length to fit neatly end to end. Then they need a notch sawn in their bottom inner edges to carry rain out over the boards. I just hope the hornets don't mind me dragging the miter saw outside!


Click on any image for an enlargement.

*

24.7.18

More octagon work. Bracing and cladding.

*

Sunday morning @ 80F was spent cutting 2x4s to frame around the base of the observatory walls. Not only will this support the bottom of the cladding ply but will provide a base for flexible, plastic flashing. A strip from a long roll of wall DPM for block laying is just stiff enough to throw rainwater clear of the base of the observatory walls.

A gap was deliberately left between the veranda and the obs. flooring to allow the DPM to be tucked neatly under the veranda floor.  Or the horizontal portion could be left flat on the veranda floor to throw the dome run-off further out. I'll have to see what looks and works best before making a final decision.

Tuesday I started fitting 12mm, ½" cladding panels onto the octagon walls to help to stiffen it. I imagined the extra weight of the dome on top might set it into resonance if the wind really picked up.

Fitting 4x8 sheets is hard work when they have to be trimmed to exact size and the sun is beating down in 83-84F heat. The table saw can cope with B&D work benches providing in-feed and out-feed support for trimming the panel width. Then I used the router and a 45° trimming bit to bevel the vertical, meeting edges.

I am trying to avoid needing trim strips to hide the vertical joints. There is a lot of preparatory work on the octagon skeleton to sink large screw heads flush and to pull back protruding 2"x 4" noggins which have twisted over time. Two panels done so far.

Thank goodness I chose to size the octagon sides to allow full sheets with minor trimming. I've had to saw off only a 2cm strip so far. Pictures later, though it is hard to see the octagon base with a camera. This is thanks to deliberately grown, decorative shrubs designed to provide some shade and to soften the appearance of the building. These shrubs have just been cut back to make them more bushy. While allowing me to pass while carrying a 4'x 8' of ½" ply without too much hindrance.

It reached 88F by lunch time but I had still managed to fit the third panel. The fourth [or north] panel is out of direct sunshine so should be slightly easier to work on. I am having to trim the boards around the timber brackets and floor joists under the awning first. It proved just too hot for me to cut the 4th panel so I took a siesta after lunch.

The hornets, which are busy building a nest in the shed, were kind enough to let me take an old 12" electric fan away for use indoors. The hornets have been very good so far. As I go in and out collecting tools as they are needed. Wasps are grazing the shed and observatory timbers too but haven't troubled me so far.

I've told them that if I get one sting I shall eradicate the lot of them. Probably with a soapy water bath in the workshop vacuum cleaner. They have built nests in the shed in previous years and it has resulted in only a single sting. Which inevitably resulted in an extinction event that year. Provided they pose no threat I'll let them carry on.

I managed the 4th panel before cycling off to do some shopping in 86F heat. My dark grey T-shirt was literally black with dripping sweat when I stopped work.


Click on any image for an enlargement.

*

22.7.18

Dome build: New insights.

 *

The weight of the dome and overcoming its inertia is an important factor in its use. Rolling resistance is really quite low once it is moving. The deliberately large, dome supporting wheels have nicely low friction and massive overcapacity for any likely loading.

The thin, plywood, covering panels weigh 35kg in total. The shutters will probably add another 50kg. While I could load the dome to test the changes in effort to rotate it there doesn't seem much point. Because I really can't do much about it.

A sturdy handle, extending downwards to a more comfortable working height, will ease the pushing load as age takes its toll.  It is not normal to have to push anything above head height as I had to do with the ribs for the video.

I had a new insight into stiffening the octagon building. I had been dreading having to add heavy timbers to "triangulate" the structure. It might end up looking like an old water or windmill inside the octagon. Instead, I can add slender, stranded steel cables, tensioned by turnbuckles, to minimize any obstruction. This will also avoid having weak, load bearing, compound miter angles on the ends of struts. There are no very sensible joining angles in an octagon.

The freedom to simply run I-bolts through joists and join tensioned cables between them would be a vast improvement over lengthy 2x4s or larger timbers. Cables tension, while solid struts are usually working in compression. Both bracing systems are usually crossed, or arranged in series, to manage loads in both directions.

The cables can be run well above head height in dead [unused] spaces. Moreover the cables can be optimized for 45 x 45 x 90 degree triangles for maximum stiffness.  This will allow plenty of clearance for storage or carrying long instruments "upstairs" to the observatory. Being of such small diameter there is considerable freedom to site cables without interfering with the independent, pyramidal pier. Which, itself, almost fills the lower building. Making storage options, at ground level, rather limited.

______________________________________________________

I also had a new idea about the upper tier of the dome covering panels. I'm tired of endlessly struggling with long, narrow and flimsy triangles of thin plywood and awkwardly angled struts. So why not use much thicker plywood? The heavier plywood becomes the structural material. The struts merely backup for joining and weather sealing the panels and minor stiffening.

Shaped plywood strips can be added to the slit frame to widen the supporting surfaces at these vital junctions. The upper struts of the dome skeleton will need to be thinned to match the increased thickness of the plywood. This can be done with the router using a trimming bit.

*

21.7.18

Dome build: YT Dome Rotation Video.

*

Our hero pushing the dome around by hand.

Sony AS15 action cam on a tall window cleaning pole tied to a stepladder. Controlled wirelessly by HomeMemoriesMobile via a Lenovo Tablet.


Now I remember why my hair was standing up on end. I was wearing a black T-shirt over my head to be able to see the tablet. Once the camera started I would throw the T-shirt over the car and put the tablet down. I was struggling with an automatic, 60 second cut-out setting on the camera. Only discovered after the event.

Those of you who enjoyed the Paul Whitehouse comedy sketches will remember Jesse coming out of a shed, turning to close the door and then back to the camera to say; "Mostly I has been..." I thought "the gravel walk" was reminiscent of those sketches so left them in.

More seriously, it has been pointed out that the dome base looks slightly smaller than the supporting timber ring on top of the octagon. This is only true at certain angles of dome rotation. It will require a slight flare to throw rainwater outside the octagon's footprint. The wheels below the dome need to be covered over anyway.

So I need a cosmetically appealing solution to both needs. Inwardly sloping flashing could rise from the building. Leaving only a slight flair required on the dome itself to close the overlap against wind and rain. The reason for the lack of [rain] overlap was the mid-way change from round to 16-sided.

The camera's viewpoint is quite high. Which seems to shrink the dome's diameter yet make it look tall. Having seen the base ring leaning against the building it is odd how much smaller it looks when arranged horizontally. My presence in the dome changes the sense of scale completely. Which was quite unexpected.


*

20.7.18

Dome Build: The real thing! Pulling wheelies.

*

Another hot and sunny day reaching 79F at 15.00 and still climbing.

I spent the morning tidying up the projecting 2x8 at the bottom of the slit which was bumping into the steering wheels. A jigsaw made quick work of cutting the curve to match the inner radius of the dome. Followed by the angle grinder. The carbide faced disks are amazingly fast at cutting. Though a bit rough on the material, they haven't clogged. Nor shown the least sign of wearing out. I smoothed things off afterwards with the orbital sander.

Some of the [skateboard] steering wheels were slightly tight across some dome diameters. So I re-sited the bolt axles inwards and outwards [as appropriate] on the heavy duty [ss] shelf brackets to equal the clearances all round.

The dome almost seems to self steer itself without obvious interaction from the steering wheels. Not that anyone should ever dare to try it without the steering wheels! It is obviously an illusion that they don't do much. Because one can't be watching all of them all of the time. 

Some screw points were slightly projecting downwards into the wheel track of the base ring. It took only moments to rub the offending points away with a coarse, flat file. The points tended to bump noisily over the supporting wheels/rollers as if there were a large step in the base ring track. 

I decided to drill the outer shelf bracket holes and re-site the ratchet strap hooks to clear the large supporting wheels. Everything rotated much more easily after that, without the straps rubbing.

A test with digital, luggage scales showed the dome needed 5-8lbs to get going from a standstill. It varies slightly because the ring isn't dead flat. So some of the time it is climbing uphill and at others is sinking relative to the supporting rollers. Anybody else building a dome should pay attention to base ring flatness and use a good glue for laminating plywood together.

The cheap, construction adhesive I used has delaminated in places. I shall have to find a way of squirting better glue into the visible gaps. Or, I could use a lot of bolts, with countersunk heads underneath. With nuts and oversized washers on top of the horizontal struts.

I uncovered the big GEM mounting and measured the clearance from the center of the horizontal Declination shaft to the underside of the dome overhead. Say about 120cm total at the zenith with probably, 115cm safe clearance overall.

The stepladders are getting in the way at the moment. So I shan't be certain of the true clearance until I can swing the telescope freely [but slowly and carefully] to all possible sky positions. I shall have to slide the [7" f/12] refractor's huge, 10" diameter dewshield in and out until I am absolutely certain of safe clearance. I always feel a refractor should have a "proper" dewshield or it just doesn't look right.

A refractor OTA can also be slid through the tube rings to adjust its height in use. Though this will obviously effect the eyepiece height when pointing near the zenith. Lower it too much and the tail end could strike the inside of the dome. Or make head clearance a serious problem when viewing objects lower down. A star diagonal is normally used with a refractor. So this allows a sideways head position in an emergency.

It was good fun to sit on the top crossbars of the big stepladders so high above the ground. It is quite a view from up there! I can even see over the neighbour's old barn. I have ordered a scaffolding hook to improve my safety while working on the exterior of the dome from a tall ladder. The price in Denmark for the identical hook was three times higher than in the UK. Or about double with postage included.

Click on any image for an enlargement.
*

19.7.18

Dome build: The real thing! Raising the slit ribs and bars.

*

It took me a couple of hours to finally get the slit ribs and crossbars into place. I had to add two lower crossbar battens to allow a three stage lift. 

This involved untying a ladder and using it as a gin pole. Then having to rotate it while under load because it was blocking the ribs from straightening up. Running new cord though the pair of triple pulley blocks took its time too.

Then the orange ratchet strap guy lines were in the way and had to be loosened and moved several times. The props on the ribs were also a nuisance and had to be removed. I was sure the whole lot wanted collapse on top of me except for the support from the tall stepladder.

Here is the view from my upstairs, computer desk window. With the camera resting on the windowsill just about level with the top of the veranda railings.

The dome has now taken on its true shape and size. So I'm glad I fitted the railings. Because the dome would otherwise look rather too big for its octagonal building from certain angles.

Next step is to run a 2x4 straight edge across the dome base ring and measure upwards for the correct, internal slit height at the crossbar. Hopefully it won't need propping or dome rotation might be compromised while I work on adding the rest of the gores.  

Once the slit framework was in place I could carry the gores individually up the internal steps. The bottom struts were previously located by screws. So I could tap nails gently into the existing screw holes to lock the bases temporarily but securely against unwanted movement. The ribs were fixed together with plenty of spring clamps. The ribs have yet to be glued to each other so it would be pointless to bolt them together at this point.

Click on any image for an enlargement.
*


16.7.18

Dome build: The real thing! Raising gores.

*


All the plans of mice and men.. First attempt at lifting a gore proved the lower end of the ladder would block progress. Untie everything and reverse the 2 stretch ladder. Retie and try again. I added a short ladder as a horizontal standoff.

There is more friction than I would have liked on the rope but at least things were finally moving.

1pm, tired and hot. Five up, nine and two half gores to go.

I sweated through the 80F morning trying to establish a rhythm without much success. The gores want to collapse inwards until safely clamped and propped.

The heavy slit framework is impossible to lift safely even with the boat winch. So I'm just clamping the gores together as I plod on. Mostly working from the inside from stepladders. It will eventually reach a critical point. Where inward pressure is balanced by friction between the adjoining ribs.


The afternoon was spent resting during the worst of the 83F heat. Then straightening out the two folding ladders into one, very tall stepladder. First I had to oppose them across the obs. floor over the big  telescope mounting. Then gingerly climb to the very top to tie the ladders together at the crossbars. These [normally] floor stabilizer bars add an extraordinary level of lateral stability. But I'm not taking any chances at that height!


So I added four, orange, ratchet straps as guy lines and to further bind the crossbars more tightly together. I was able to use the sturdy, steel, wheel support brackets as lower anchor points.

The scenic view of the entire project, so far, for scale.

The top of the big stepladder is now rock solid but still falls [?] safely within the dome's internal curvature. Which allows the dome to rotate unhindered if I so choose. I shall leave these ladders up for external, working access, through the observation slit until the dome is complete.

I have taken the slit framework upstairs, in four pieces with the curved ribs seen sticking out on the right. Ready to lift them into place tomorrow. Without the stepladders it would have been impossible to control the sheer weight of the slit frame from below. I can hopefully rest the slit frame's top cross bar on the ladders. While I struggle with the weight of the heavy, birch plywood ribs with my third hand. So I can drive in the long, fixing screws. It might actually be easier to put the slit frame together and lift the whole lot in one go. We'll see how it goes tomorrow. 


Click on any image for an enlargement.
*

Dome build: The real thing!

*

Now I can bring the gores up the ladders and place them on the veranda ready for fixing. I was initially going to take the heavy slit frame up first but decided against it. If I fit the opposing gores the frame will have something to lean against. It's not so easy, up there, to just prop up the curved frame with an upright board as if it were standing on the ground.

I could feel my back aching last night after the struggle with the base ring. It aches a bit this morning too but I can still work on the dome. Deciding on the order of events may change with experience. I have to add adhesive to the bottom horizontal struts and the side of each rib before they can be brought together up on the ring. There is no need for them to be in place for the rib glue treatment. This that can be done on the veranda. Or even working inside the observatory. Perhaps I should add glue to the ring then drop the gore on top?

The plan is to work from the front of the building for easiest and safest access. Rotating the dome to bring the next gore position forwards in turn. But should I raise a taller ladder to bring me well above the dome's waistline? This might be safer when lifting each gore onto the ring. Rather than lifting it above head height while standing on the platform/veranda.

I can never be in two places at the same time. Though I do have lots of spring clamps, I must be able to reach high enough to fit them usefully while supporting the gore with the other hand.

Ten bolt holes, per rib, are already drilled but must be safely reachable without effort.  There is always the option of building a scaffolding platform to work from. But then I'd need to be able to get onto the platform from several levels and directions.


Click on any image for an enlargement.
*

14.7.18

Dome build: Fresh start up in the crow's nest.

*

I give up! No, not completely. I just cannot find a way to complete the top tier of the dome. I have wasted enough time on it now. Weeks, in fact, all told. I shall just have to build the top section of the dome in place. Up there on its supporting rollers. 

Nothing else makes sense at this late stage. I need to glue short sections of ribs together and to the lower ribs sections with deliberately lapped joints for strength. Then the vertical struts have to go on.

 I cannot fix anything to the observation slit ribs or top crossbar until they are all joined to each other. So I can't fix the gores together either. It's a complete mess of loose bits. Once glued they will be fine. Right now the gores sag or are propped up against the slit frame with no secure location.

I shall leave all the [numbered] panels off to allow the horizontal struts to act as a ladder. This will allow me to climb freely on the dome surface itself. It has proven easily stiff and strong enough to cope even when not even glued together. Thanks to the spherical geometry the gores [segments] lock tighter into each other by friction alone. Even the spring clamps were easily strong enough to allow free climbing on the structure.

The gores will be much easier to handle without the frame being closed off by the panels during lifting and assembly. Everything is marked and numbered and my frequent rebuilds have proven it is very easy to assemble. Naked gore frames will also allow my to tie off my smaller ladders for security when climbing up off the outside veranda. I can also work off a ladder inside the dome of course.

Accessing the exterior is easy through the wide, open slit. I have a climbing harness, carabiners and plenty of rope for security and never take silly risks. There is a lot of gluing and sealing ahead but it is not difficult to do. Particularly if I work downwards.

The morning was spent on mass production of fourteen [and two half] gores gluing the horizontal struts to the ribs. I worked under the tent style awning to shelter from the hot sun. Four screws per half rib x 28 had to be backed off enough to squirt some adhesive into the gap with the mastic/caulk gun.

These images show the end of a busy Sunday preparing for assembly up on the rollers. It was a real struggle to get the board-reinforced ring up the inclined plane of two ladders. There is always a point where the crossed battens simply won't go over the mounting. While the ring is still hanging out over the ladders. Finally the ring is back in place on the rollers and spins freely.


*

9.7.18

Dome building: Upper ribs and panels

 *
I have the dome lowered onto the ground mounted on minimum thickness wooden blocks to work on the upper ribs and panels. The temporary, central prop is too high and will have to be shortened slightly to bring the ribs to the correct height against the slit's zenith board.

I used nails pushed down into the existing screw holes to locate the bottom, horizontal struts instead of the original screws. I had planned to do this for speed of final assembly up on the building. So it was a useful rehearsal for the real thing. Once all the gores are in place I can go around, without great haste, fitting all the 6mm screws to hold the ribs together.

Sealer will have to be squeezed between the ribs on assembly. The gores can be safely tipped outwards to allow the gun nozzle to add the sealer. Or the sealer can be added once the gore is on the veranda before lifting it into place against the next gore.

Anything which allows me to quickly assemble the dome in place is valuable in case the wind should pick up. In fact it might be better to leave fixing the lower panels until the last moment. This would provide easy access from both inside and outside the dome for fixing gores down to the base ring. While simultaneously allowing the wind to pass freely through the lower rim. The upper panels would only be accessible from a stepladder through the open slit. So these would be better screwed down and sealed before lifting the gores "upstairs."

The options for lift and assembly are numerous but I still prefer the lifting of separate components approach. The individual gores are easily handled at about 6kg [12lbs] bare.

Friday 13th and I had another look at the dome after a week of health problems. I carefully levelled the base ring and then checked the height at the crossbar at the top of the observing slit. It was considerably higher than expected. There followed a struggle to lower the bar by rotating the slit ribs downwards, towards the center. I'm within a couple of inches now but would obviously prefer it was correct. It is scorching out there in the 78F unbroken sunshine. Tame by some people's standards but certainly not mine. It was an even more unbearable 83F yesterday!

Click on any image for an enlargement.
*

8.7.18

More work on the octagon required.

 *
I still have to add horizontal, 2x4s struts around the base of the walls at obs. floor level. An attachment surface for flashing is required. Not to mention the grooved plywood cladding. Which is intended to stiffen the whole structure thanks to skin effect. The building presently sways an inch or more at obs. floor level compared with the stationary pier if I put some effort into it. The building has a very low frequency. Which will drop still further with the weight of the dome on top.

I'm hoping the 12mm [½"] plywood skin will firm things up. Failing that I'll need diagonal braces with some very odd compound miters at each end. Though I could brace internally between horizontal braces and joists with nothing more than a bird's mouth at each end. I have plenty of 2x4s stacked and awaiting just such a purpose. The problem is avoiding it touching the huge pyramidal pier. Or blocking easy access to an already difficult building shape. There is loads of headroom inside but an octagon is as bad as a cylinder in having no useful corners for storage [or bracing.]

It would so tempting, even now, to take the whole lot down and put a 14' calf dome over a simple square building! The main problem is that it would require an even bigger raised ground area for the building. Probably double the original quantity of self stabilizing sand & gravel would be needed. The original soil level is well over 3' down and falling away from the parking area right in front of the building.

The last lot of sand & gravel had to be shoveled and barrowed manually in from the drive over 30 yards away. For all the bragging rights such foolishness makes little sense. The contractor who promised to come and move it for us had lost interest when I rang him to say that over 20 tons [10 cu.meters] of sand had just been delivered. It was lucky I didn't ask for it to be dumped in the middle of the drive! It took my wife and I several days [as septuagenarians] to shift it all to the building site.

The irony is that the very same contractors work for the local authority on drainage projects. They have been working in the field nearby on several occasions since then. Always using a mini-excavator and several young "onlookers" to move as much soil in a whole morning, as would take me less than an hour with a shovel while working alone. Nice work if you can get it!
  
Click on any image for an enlargement.

*

7.7.18

Dome unbuilding: Bits and pieces.

 *

Friday: The dome is in pieces again. I had to separate the gores to gain access to the screw heads hidden between the ribs. Only then can I loosen the joints enough to allow gluing.

The gores look much more angular now they are separated. A few rib extensions have yet to be glued and screwed due to poor access on the dome top.

The grass looks absolutely awful after weeks of drought and my foot traffic from working outside most days. The shorter lengths have suddenly turned to straw leaving longer green tufts.

It might be fun to speculate on a much lighter, hollow, tubular, glued plywood framework to replace the complex ribs and multiple struts arrangement. The tubes could be notched to fold into neat, angular ribs. Perhaps even expanded foam filled for increased stiffness and strength.

An alternative might be box-section, tubular aluminium ribs. Again notched at the inward folds for neat, sharp bends. Perhaps welded, or the joints reinforced with 'elbow' aluminium strips. An aluminium covering would seem more appropriate for such a construction. The panels could be ordered to be precision guillotined by an engineering company. Though water jet and laser cutting are also available these days.

The base ring was reinforced with crossed boards, while still lying flat, to keep its circular shape and to stop it bending. There is a major optical illusion of perspective. The "huge" ring fits nicely onto the white rollers up in the "crow's nest."

Later, I trimmed the remaining grass and relaid the base ring on wooden blocks flat on the ground. I need better access to the top panels of the dome. The stands were adding a foot or more to the height. Which required a stepladder to work out of the top of the slit. I also had to step over the bar at bottom of the slit dozens of times per day going both ways.

While I had the ring loose I turned it over and sanded the underside. I also smoothed off the ribs with an orbital sander in readiness for the rebuild.

 
Click on any image for an enlargement.

*

3.7.18

Dome unbuilding: July.

 *

It took a while to remove all the panels. The hundreds of screws were only the few required to hold the panels onto the skeleton. There will be many more when the gores are rebuilt with sealer/adhesive. I bought a cartridge of RAW glue/sealant but can find nothing about it online.

A trial piece of ply and strut were glued and screwed together and left to set. Two hours later, at 75F, the exposed paste was still soft when poked with a screwdriver. Three hours just coming up so I'll check again.

The ply could still be peeled lengthwise off the timber strut after 3.5 hours @ 77F. So I did a destructive test rolling the ply sideways with my bare hands and it finally came apart as can be seen. The adhesive seems quite rubbery at this stage so still offers some flexibility. The glue bond has sheered rather than lifting away from the wood or ply surfaces. Worth persevering? Perhaps I should make another test with fresh ply, glue and timber but leave it overnight for a better strength test. NOTE: An expert suggested these adhesives need much more time than this to cure properly.

Meanwhile I had removed all the covering panels and stacked them in [numbered] clockwise order. I have a new, finer carbide disk for the angle grinder. The 24 grit was too coarse and fierce so I bought one of 36 grade. This is much kinder to the ply and still allowed me to quickly flatten the ribs and struts. Coarse sandpaper disks wore out fr too quickly when tried on this job.

After making several buckets full of sawdust with the angle grinder, I moved onto the orbital sander to smooth things out. The panels had been a bit lumpy when screwed on. So flattening the skeleton surface a bit more was probably worth the extra effort, dust and noise.

Thursday:  I started to dismantle the dome so I could glue the struts together and to the ribs. This is what 140 x 6m x 30mm [1/4" x 1.25"] screws, 280 oversized washers and 140 nuts look like in A4 stainless steel. Ten sets per pair of ribs. I had numbered all the horizontal struts and panels with a permanent marker so I didn't lose track during the dismantling. 

Yesterday I drove to the city to buy the advertised Sikaflex 291i marine sealer. No stock, but they had Sikaflex 591 in black. Then charged they me double as if it really were 291i. So then I had to wait at customer services while they queried the price. Then get a refund. No technical information on the 591. So much for professional service!

Sikaflex-591

Now I am back at home I checked into 591's qualities. It sounds nearly miraculous so my dome should easily outlast the pyramids! I also bought a sturdy wallpaper roller for flattening the edges of the plywood during gluing. The roller should even out the adhesive-sealer bed without moving the panels around as might occur with finger pressure.

Click on any image for an enlargement.

*