31.7.21

31.07.2021 Shutter rib height problem.

*

Saturday 31st July 62F. Windy and overcast. Showers. Possibly thundery, heavy showers later.

Yesterday's effort to install the central shutter ribs showed up a problem. The straight, centreline of the shutter covers was slightly bowed. The outer ribs are too low relative to the central ribs. Or, the central ribs are too high. This has the effect of rotating the individual rectangles of the [spherical] shutters. 

While I prefer the lowest possible, shutter profile, I am limited by drawer slide clearance. Which must miss the undersides of the outer edges, of the tops of the shutters.  I shall have to check the slide clearances before deciding which ribs to adjust. The ribs projecting towards the camera in the image are the slit ribs. Not the shutter ribs. Which are hidden behind the zenith board.

It turned out that the central, shutter ribs weren't exactly straight. In my haste to protect the dome innards from the threatening rain I hadn't fixed the base of the central ribs. So I removed the shutters again to be able to check the ribs with a 2m straight edge and tape measure. I was 2cm out at the bottom of the ribs. So I hammered some angle iron into the ground to fix the base of the ribs.

The image [Right] shows how I access the top of the dome. A large concrete slab rests on the ground to stop the base of the ladder from sliding out. Three slabs in fact. One each at the sides and one at the back of the dome. With two ladders available this saves an awful lot of ladder movements.

The lengths of pipe insulation are both very resistant to compression and have very high friction. Ideal for maintaining the ladder safely on the dome. Without the risk of it slipping sideways or marking the dome. The orange ratchet strap has been exposed to the sun for months and has lost its brightness. It is hooked under the dome skirt on opposite sides and holds down the shutters.

It started pouring again as soon as the shutters were off. So I have stapled a scrap of clear, net-reinforced tarpaulin over the tops of the ribs. I should have done this earlier but didn't have enough material to cover the entire slit. Or anywhere near it. Now there is plenty of light but not enough shelter. 

I found another piece of clear tarpaulin and covered the lower part of the slit. A storm warning for thunder and cloudbursts has been issued. Though nothing so far. Which gave me a chance to tidy away the ladders and tools.


*

30.7.21

30.07.2021 Central shutter ribs in place.

 *

Friday 30th. 65F, overcast and windy with showers. Again, not a day for imaging, nor outdoor woodwork. 

Today I wanted to raise the new, inner shutter ribs onto the dome. The ladder was all set up and I was ready to go but it kept raining. No point in pulling the shutters off in this weather.  Though I might have another go after lunch if it clears up a bit. [It remained dry after lunch.]

I'll try separating the GRP shutters by enough to slip the ribs in one at a time. If I then clamp them together they will be more stable. I need to remove the zenith profiles from all the slit cross struts to make room for these ribs.

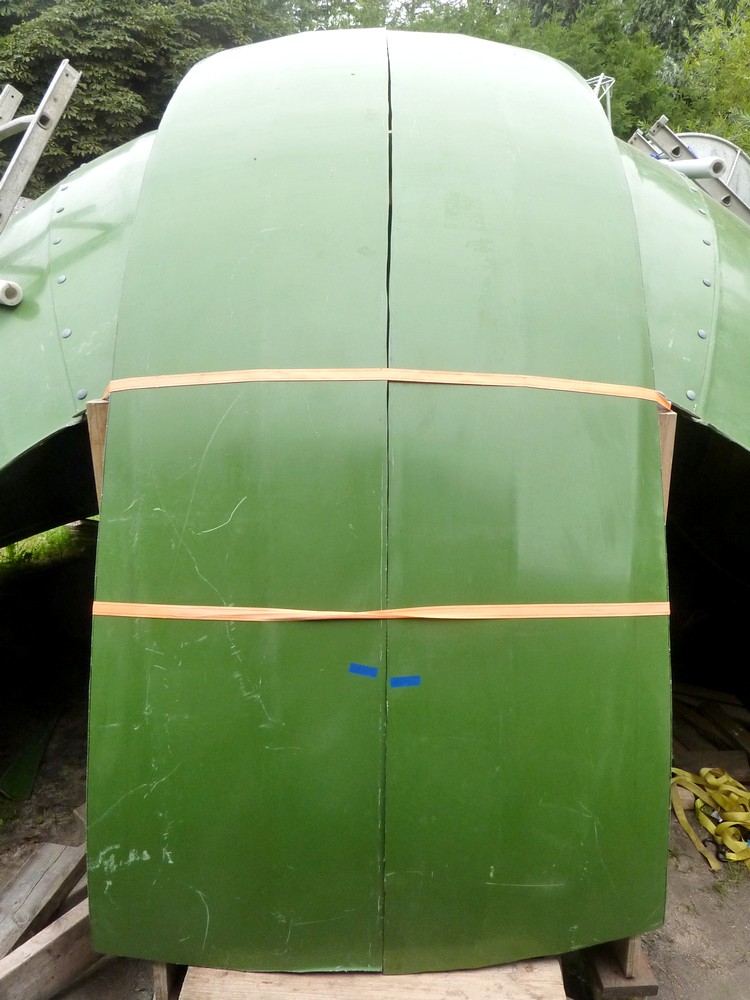
It went quite well once I started. Off came the shutter covers onto the ground. As I have said before they are rather heavy and very flexible. I don't want to slide them down the dome for cosmetic reasons. More marks to polish out before the big lift. Trying to lower them any other way risks them cracking in half!

Then off came the zenith profiles. I lifted the inner shutter ribs into place and screwed them together for stiffness and to ensure the curves matched. 

Adding packing pieces of 2x2 [50x50mm] battens to the tops of the slit cross-braces helped stabilise the ribs by friction. This also ensured the shutters would be concentric with the slit ribs and dome. BTW: The shutter ribs are temporarily screwed to the slit ribs for stiffness and location. These screws will still be accessible when the shutters are built.

Temporary, metal brackets were screwed to the packing pieces to hold the new ribs accurately central. Finally I was able to lift the shutter covers onto the resulting structure. Just to keep the rain out. Ratchet straps completed the security of the heavy GRP shutter covers overnight. It would be a disaster if they blew off and cracked across in the fall. You would not believe the effort which went into cutting them accurately out of the extra roof panel.

The fixing screws will eventually have to come out to separate the shutters but I wanted maximum rigidity. With all the ribs stabilised, by each other, I can ensure the shutters will be accurate. They will need half width, zenith profiles to act as cross ribs between the long, vertical ribs. This should help to stop them twisting on their axes. 

Stiffness is important to ensure that each shutter moves as one unit without flexure. This is a requirement if the shutters are to close neatly against each other when pushed sideways at the bottom. Flexure demands quite a long pole to close the shutters. Not desirable in a sudden downpour! 

Nor is it desirable to have such long objects in the dome. They are difficult to store and could cause damage to the equipment if they fell over. My plywood dome has a problem of detachment at the top corner of one shutter. I need a long pole to push the shutters tightly together at the top. The pole is an absolute nuisance! It usually lies across the floor or against the stepladder. The potential damage to the bulky telescopes while wielding the pole is a serious worry. 

The shutters could have opposing pulleys and ropes to close them at the top. However, the dangling ropes would need to be fed down through screwed eyes to keep them tidy. I already have problems with the [OTA hoist] pulley ropes in the plywood dome. 

I use screw hooks for those but they are always out of reach if a loop should slip off during dome rotation. Which means fetching the stepladder and swinging the telescopes out of the way. The fibreglass dome has no useful ribs to which to attach anything. Drilling a series of holes would invite leakage! Fitting eye-bolts would have to be done before the lift and using rubber washers as gaskets. Any ropes would have to run down the plywood, slit ribs. 

You can't have ropes dangling down inside the dome. Because the telescopes would constantly get tangled in them. You have to remember that the dome base ring is at eye level once it is mounted on its rotation rollers. So the entire dome rises above that level. The top will be somewhere around 4m [well over 12'] above the observatory floor. With the new dome down on the ground I still have to stand on the top rungs of a builder's folding stepladder. Just to reach out through the slit.

________________________________________  


The long delayed, Russian module accidentally ignited its engines while newly attached to the International Space Station. The ISS veered and lost height until the crew regained control.


*

29.7.21

29.07.2021 Bad weather = rest day.

 *

Thursday 29th 61F, unstable, cooler with a gusty wind and very heavy showers. Brief sunshine.

Not a day for imaging nor outdoor woodwork. I have been doing homework on the best materials for reinforcing and sealing the plywood to the dome. The are plenty of websites, forum discussions and YT videos. On cost alone I prefer polyester resin to epoxy.  I have used polyester in the past. Having made telescope tubes and mirror cells, large, bow-fronted aquaria, big kite reels, model aeroplanes and modified the bodywork of my GRP kit car. [Amongst numerous other things.]


*

28.7.21

28.07.2021 Two more ribs and then a 20 minute, thundery cloudburst.

 *

 Wednesday 28th 68F, bright start then overcast and windy. 

My wife has pointed out that time is passing. It will soon be too cool outside to do any glass fibre work.

I had been wondering how to support the heavy shutters while I attach the [heavy duty] drawer slides. Then it occurred to me. I need a simple scaffold on each side of the dome. This will support the tops of the open shutters on a long crossbar over the top of the dome. Then I can screw the drawer slides to the outside of the zenith board. The slides will already have been attached to the shutter's top boards.  

I had an awful struggle fitting the shutter slides to the plywood dome. It was already raised high on the building. So access was only possible through the open slit from a ladder inside the dome. At the same time I was still building the shutters in situ! 

This time I am determined to have the shutters mounted on the dome before it is lifted into place. They will be thoroughly tested while reasonable access is still possible from the ground. Though even here it is a ladder stretch and then belly flopping on the dome.

Now I need lots of short 20mm wood screws for gluing the ribs and base ring. Plus some more birch ply for the zenith boards. 15mm might make more sense than 12mm for this purpose.

So I bought two sheets of 15mm birch ply and some more screws for gluing arcs into ribs.

15.00 Now I am back in the observatory. Windy and fast moving plates of cloud from the SW. With light sprinkles of rain. Still waiting for my first capture of the day.

15.19 & 26 First captures. Uneven brightness and off-band.

I completed gluing the two, central shutter ribs later that afternoon. 

It was lucky I tidied everything away because there was a five ten 15 20 minute thundery cloudburst starting around 7.25 pm. One, small window had been left open upstairs. To help to cool the day's warmth. A fierce gust caught it and whipped it wide open. No harm done and I was sitting at the window at the time. It sounds as if the bad weather is still coming over. With even louder thunder and more flashes of lightning. The DMI's radar map suggests we could get a full half an hour of this! I'll update later if it continues. The deluge eased off after 20 minutes but it continued raining.


*

27.7.21

27.07.2021 More arc and rib making.

I made good progress cutting out and trimming ten more arcs for the centre, shutter ribs. It has become routine. Mark out the arcs on a  fresh sheet of 12mm birch ply using a prepared plywood pattern. [Finished arc] Reduce the spacing between the arcs to a minimum.

Then use the jigsaw to cut in the centre between the marked lines. So only one cut is required instead of two. I use a spring clamp to support the half cut arc with the last arc lying flat on the plywood sheet. Otherwise it sags and may even break off before I reach the end.Then I use a 12mm [½"] trimming router bit around the same pattern to cut back to the lines of the freshly sawn arcs. The pattern is always away from me and supports the little bearing on the end of the router bit.

I use 4" G-cramps to clamp the ends of the arc and pattern together. Then slot the pair vertically into the B&D workbench and tighten. Rout one edge and then flip over 180°. 

A visor is a valuable aid to avoid the fountain of coarse and fluffy sawdust throw up by the router. Ear plugs are vital. I am throwing the sawdust onto the bare ground inside the dome. To try and keep it dry to walk on. After several months in the shade of the dome any remaining grass has long gone.

I completed 10 more arcs today but need only eight. 2.5 x 5' arc lengths per rib length. Doubled for strength to 24mm with staggered joints.

I had no short screws left to hold them together while the glue dries. So I have had to put it off until tomorrow. I need many more screws for the base ring too, when I glue that. The arcs are all prepared but I may decide to have three layers for extra strength and stiffness. 

The base ring is the running surface for the dome rotation rollers. So it wants to be flat and stiff. The base ring also helps to keep the dome round. In addition to the moulded rib just above the skirt. The ring also completes the circle across the previous doorway. It also ties in the bases of the slit and shutter ribs. Which are further supported via the rotation rollers. 

What is left of the original doorway, each side of the observation slit, will be filled with the remaining, dome, panel material. These spherical triangles will become structural elements to help support the slit ribs and base ring.


*


27.07.2021 Morning imaging.

 *

Tuesday 27th 70F, bright start becoming cloudier. Possible thunder storms and cloudbursts later.

10.10 [CET] 08.10 [UTC] Imaging again. Though the seeing looks more transparent the results aren't what they were yesterday.

I had to drop back from the 2x GPC to the 1.6x on the camera nose.

10.40 The cloud is racing across the monitor now as the changing weather moves in from the south.

I can't space the pictures properly. They won't drag and drop as they should. On the blogger composing screen they all look equally spaced. Grr!

11.10 Still bright but almost solid cloud. I had better get on with the dome shutter arcs/ribs.


*


26.7.21

26.07.2021 Three main solar features:

 *

Monday 26th 72F, warm and steamy. Overnight thundery rain with lightning. Mostly overcast this morning. 

I fitted the second, outer shutter rib under the shutter. Now I need six more arcs to make the inner shutter ribs.

11.30  A brief sunny period teased me into the observatory. Solid cloud from the south ever since!

Now [literally] capturing through speckled cloud.

Lowered the power with a 1.6x GPC on the camera nose. Expanded the field of view to 912x912 frame size. The upper right corner is outside the PST etalon's sweet spot.

Three main solar features.


*

25.7.21

25.07.2021 Part 2 Imaging. Teddy on the sun?

 *

Sunday 12.30 72F, sunny periods, cloud from the south and windy from the east.

I have glue another shutter rib together. Then the sky cleared so I'm trying to image. through renewed cloud.


Still lots of cloud.


*

25.07.2021 Resolution with bells on!

 *

Sunday 25th 65F, heavy overcast, gales and at least two days of rain forecast. Possible thunderstorms with cloudbursts.

Yesterday's late afternoon seeing improvements never happened. I was wasting my time watching clouds racing across a mushy sun. 

So I pointed the telescopes at a chimney 260 yards away instead. The ASI174MM mono camera went into a  T-S 1.25" diagonal in the Vixen 90mm f/11. Replacing the Lunt 1.25" solar wedge. I then captured my usual 500 frames and processed them through AS!3. 

Certainly an improvement on the detail visible on the monitor. There some slight wind movement of the telescopes and a light thermal agitation after a warm 78F day with sunny periods. ImPPG didn't seem to work on this subject matter. Instant graininess! 

Then I pulled all the H-alpha filtration off the 6" f/10 iStar H-a. A 2" no-name, dielectric, star diagonal held the same camera via the usual eyepiece adapter.

An instant upgrade in resolution and detail! If the Vixen had surprised with its remarkable clarity the bigger iStar totally eclipsed it. The image was much larger too.

How about the crosses in a pair of 8mm diameter, cross-head screws on the chimney flashing? These were clearly visible at that distance. 

I stared at what looked like a five legged Daddy-long-legs spread-eagled on the chimney. Or perhaps a spider? The texture of the sand in the cement pointing between the bricks was clearly visible. AS!3 made everything even crisper. 

The telescope images above have been borrowed from Google Photos "reduced quality." The originals are on the laptop. I ought to do a comparison with those on the high-res. monitor. Comparisons are far from odious if something can be learned from them.

It was an interest exercise to play with all the usual "astro" features. Like the DIY electric focuser and drives on a terrestrial subject. The focuser movement was far too fast and had to be dialled right down. What does that say about focusing on the sun? 

Presumably it is a matter of seeing conditions. In perfect seeing I would need a slower focuser movement. How the imaging software reacted was interesting too. SharpCap had options like frame size, Gain and exposure. I habitually capture in 8 bit AVI. I should be using 16 bit SER! The difference is noticeable on a chimney. 

In fact I felt I learned more in a few minutes using that chimney as a target. Than in all the time I had been solar imaging. Part of the problem with the sun is judging the scale. A typically small segment remains of unknown extent. I usually capture and process using much enlarged boxes on the 27" monitor screen. The final result is inevitably much smaller and sharper. The enlarged solar image is also subject to thermal movement, going in and out of focus and softening by the seeing conditions. The chimney was relatively untouched by these familiar problems.


This image is taken this morning from about ten yards away. Using my Lumix G9 and Leica 50-200mm lens. I have flipped the image horizontally, resized from 5k pixels down to 1k and converted it to B&W. The "spider" is a star-shaped crack in the brick. Dark plant material [liken?] has filled the crack. Making it appear more visible. Finer cracks extend to the corners of the brick.


Last night: Eventually I was called in for dinner but the light was going anyway. I quickly lifted the first shutter rib into place on the dome. Thankfully it was much too long. Rather than painfully too short. The GRP shutter covers have shrunk from being lifted up to the new radius. [Pi D] Though the length should still be fine.

*


24.7.21

24.07.2021 Afternoon imaging and the first shutter rib.

 *

Saturday afternoon. 71F, still cloudy but I'll keep trying when the sun shines.

13.35 First image after lunch. Too much cloud! Etalon poorly tuned with asymmetric brightness.

I think this is the only true spot on the sun at the moment.


13.35 After this the seeing became so bad I could no longer focus!


With the seeing not cooperating I went back to the dome woodwork. I glued six arcs into the first shutter rib. Only another three ribs to go. This time I used wood screws instead of spring clamps. Better location and holding power.

It also meant I could safely lift the partial rib to turn it over as each arc was glued. Using clamps denied me the ability to see that the joints were well butted together. Deliberately skewing the joints spread the loads along a much greater length of arc. The joints were staggered by half an arc to spread them well apart. If I thought I were more skillfull with a router I could have made T&G joints.

I used a stiff, nylon, washing up brush to spread the glue. It worked very well. Better than the former scraper. I gave the brush a good swirl in water afterwards and then left it to soak. Titebond III wipes easily off the hands with a damp rag. Followed by handwashing, once I had finished, of course.


*

24.07.2021 Mid-morning imaging.

 *

Saturday 24th 10.00 am 65F, bright start became overcast from the east. Sky cleared, the optimist crossed to the observatory. Sky covered in cloud again. I can't even get five second captures! The
seeing looks promising but there are violent thermal currents when it clears. Perhaps they are convection currents between the clouds. Or under the clouds which have just passed over the sun.

Cloud keeps coming. Making a complete video with clear skies impossible.


I took a break from imaging to screw some arcs together to make a shutter rib. Barely more than two arcs needed per rib. So there will be plenty to spare after I double them.


I was able to capture some 5 second 500 frame videos at 100 fps from 10.15 to around 10.30. The focus seemed to go off around 10.30.


11.51 The sun came out again.


 11.55 No PhotoFiltre 7 NO processing.


11.55 With PF7 processing.


12.18 Fighting with large plates of cloud again.


*


23.7.21

23.07.2021 Shutters and ribs.

 *

Friday 23rd 67F overcast and calm. The dry weather continues until later on Sunday. When several days are forecast to be wet.

The shutters remained safely in place overnight.

This morning I added more slit cross braces. With the zenith profile attached to each. This helped the shutter covers to assume the correct, spherical relationship. It was comforting how the newly parallel gap between the shutters closed up.
 

  An internal view of the shutters and 2x4 cross braces.

 There is no particular spacing. As all the braces will be removed once the   shutters are completed.

 The dark plank shown is supporting the top of the dome to avoid sag during this vital construction phase. The wide angle lens has distorted its uprightness.

 The folding, builder's stepladder is a vital tool, within the dome, to reach the   zenith. At 4.3m in diameter the dome height is 2.15m + skirt packing for level on  the uneven ground. Say 2.3m average or about 7'6" in old money.

Using the 360° laser as a guide I marked the bottom of the second shutter. Then cut it off with a fine tooth blade in the jigsaw with the shutter in situ. 

The second shutter then settled more naturally on the stack of timber I had arranged at the doorway.

The bottoms of the shutters are now much tidier. These should also follow the spherical form. So I will need sturdy radius boards for the drawer slides to attach to. Probably lots of laminated birch plywood.

The next step is to check the required radius of the shutter ribs. These will eventually be joined by horizontal ribs between the shutter's vertical ribs.

I tried a shutter rib mock-up. Then went ahead and router trimmed all the arcs to 227cm external radius and 215cm inside. 

The sun has finally come out though it remains rather cloudy. Worth a try at imaging? Probably not.

Two hours later this as the best I had managed. Boiling and soft on the monitor. Soft and featureless after AS!3. ImPPG and PhotoFiltre7 rescued what little there was hidden in the mush.


*

22.7.21

22.07.2021 Spherical shutters meet at last!

 Thursday 22nd 69F. Overcast again.

I cut out and fitted plywood, zenith profile boards to the slit, cross braces. A second profile doubled the thickness of the zenith board. I also bent up some angle brackets out of roofing plates. These fix the corners of the slit ribs and zenith board together using lots of well spaced screws.

I should now be able to lay the shutter covers over these raised profiles so that they lie together correctly. And they did! Of course they did. With a struggle. They are ridiculously heavy yet flexible! I used some light ratchet straps to secure the shutter panels in place against the slit ribs. Otherwise they might slide down overnight if there is a wind.

The next step is to trim the remaining shutter horizontally across the bottom. I had done this to one shutter but left the other untouched. Which caused it to rest on one corner in a rather unstable manner. 

I shall use the laser level this time. The first was trimmed using a builders level as a guide. Worse, I did so without the shutters being properly supported as spherical units. The resulting cut line remains a bit of an unknown. Now I have the shutters correctly aligned and spherically supported I can correct any [hopefully slight] error.


*

21.7.21

21.07.2021 Just checking.

 *

Wednesday 21st 68F, mostly overcast. No sunshine at all. I have been pondering over possible ways to reduce the height of the shutters above the dome. Aluminium, channel sections could have been glassed in over the top drawer slides to carry the rain away. The loss in height would have been minimal. So not worth the effort. 

I lifted off the GRP shutter covers. Which had been secured, while resting over the observation slit cut-out. Then I spent some times carefully aligning the slit rubs to be parallel with the dome's surface. I ensured that each rib projected by exactly the dame distance above the dome over their entire length. The spacing of the ribs is now maintained parallel by several 2x4 spacers. I then checked the slit ribs were straight with a 2m builder's straight edge.

The 360° laser level was used to double check that the dome skirt was still level. Then I propped up some base ring arcs to check the level of the base of the slit ribs matched the rest of the dome. The green line continued along the base ring and around the top of the dome's internal, horizontal, moulded rib. Above which I intend to fasten the base ring. This will sink the rotation rollers above the dome skirt by roughly 125mm. Allowing a much shorter weather-proofing skirt. Probably an up-stand of thin  birch plywood instead of something hanging down from the dome skirt. Though I may duplicate the skirts for better wind resistance. This can be decided when the dome is in place. I won't risk having a fragile skirt in place during the big lift.

I removed the zenith board and used it as a pattern to mark out further examples. These will thicken the zenith board by further [3x12mm] glued and screwed laminations. I shall add the same, faceted, convex top profile to the 2x4 slit rib braces. This will ensure the shutters rest correctly for checking their geometry and the curvature of the shutter ribs. 

At the moment the shutter covers are only supported at their outer edges on the slit ribs. Which made them collapse downwards at the centre. Which in turn made the centre edges overlap in a deep curve. I know the edges are dead straight when the shutter covers are lifted correctly to match their faceted, spherical profile. They cannot be otherwise since these edges were cut to a straight line from spare, dome material.

Only when correctly aligned and supported will the shutters' inner edges meet along their length in a straight line. I will then know the lateral angle required for the top edges of the outer shutter ribs.  Which must remain upright to close flat against the slit ribs when closed. The central shutter ribs must also be upright of course when brought together. 

Much of this is just re-checking that I haven't made any horrible [and potentially expensive] mistakes. The dome design is all in my head. Which can't always be trusted to keep an eye on every, likely problem. 

I admit that I have been dragging my feet while I wait for inspiration. With none forthcoming the shutters must be built the way I had originally imagined. Though I shall be using lots more GRP for sealing and adhesion of the ribs. Rather than purely mechanical fastening via steel brackets and bolts.


20.7.21

20.07.2021 Of shutter ribs and things.

 *

Tuesday 20th 60-69F mostly cloudy.

 I have been having another look at the shutter ribs. I cut these to radii to match the slit ribs plus a little extra for clearance. Only later had I added the zenith board. Which had raised the shutters at the top to allow the drawer slides to clear the outer edges of the spherical shutters. They curve downwards from centre to edge.

Logically [?] the shutters should be parallel to and therefore equidistant from the dome throughout their considerable length [and width.] This avoids the complexity of having tapered, shutter ribs. Though in practice there is nothing very difficult about providing them.

Let us assume I shall build the shutters to follow the dome's curvature. That leaves me with a lot of rib arcs which no longer match the shutter's internal radius if they are raised. Nor will the arcs inside radius match their newly raised position. Whoops!

I had hoped to have the outer shutter ribs almost [or actually] resting on the dome. This would provide even support and better weatherproofing when the shutters are closed. 

Now what? Make another lot of arcs? I could move them downwards to rest on the dome as planned. A second set would be made to the correct radii. With a vertical overlap. The problem with that is a step on the lower, very exposed, outer ribs. Rainwater and snow would collect there. Perhaps causing delamination over time. 

A reversed arrangement could have the overlapping rib on the outside.With the inner ribs resting on the dome. I want at least two laminations of 12mm ply anyway.  

I have screwed some 2x4 spacers across the observation slit to fix its width. I then raised ladders around the dome to reach the top from three sides.  Several mock-ups followed to see how the shutter ribs looked with different heights of packing pieces.

The shutters are presently too wide for the slit. This provides the opportunity to have some overhang at the outer edges for better weather protection. Or, I could allow the shutters to be slightly offset to each other. So that one shutter overlaps the other, at the centre, when closed. I would have to add an overlap weather strip anyway. So why not use the full thickness fibreglass for this purpose?

What I do not want is a sticky closure once the dome becomes very inaccessible. Closure has to be effortless and flawless for those sudden rain showers. Though the option exists to have ropes and pulleys to help me close the shutters from the observatory floor. 

I sometimes use a pole with the present shutters. They are beginning to stick sometimes on the zenith board. This is due to the drawer slides fixing board slowly detaching from the outer ribs. Easily fixed from a ladder raised inside the dome. Though I can't see the point. Not this late in the plywood dome's expected life.


*


19.7.21

19.07.2021 Base ring arcs and "Solar Astronomy."

 *

Monday 19th 69-72F, cloudy start but brightening. 

Being denied the sun meant I had to do some work on the new dome. So I made seven more [base ring] arcs to match the pattern I made yesterday. I'll drag out the reserve stock of 12mm birch ply and mark out some more arcs. There is room for seven arcs on one sheet. I'll cut them out, close to the lines, with my jigsaw. Then use the pattern again for trimming with the router. 

At the end of a hot day [72F] working in sunshine, I had 16 arcs neatly trimmed.

I don't think I mentioned that ASCOM[AWR] no longer recognises COM3. "Does not exist" for several days now. So I have no planetarium support. The serial adapter no longer flashes either. 

I tried imaging but the seeing was beyond dreadful all day. Even in the late afternoon when [normally] at its best between 18.00 and 19.00. Quickly followed by immersion into the local trees.

My English language copy of "Solar Astronomy" has been delivered. It is packed with information on every aspect of solar astronomy and has countless images on high quality paper. Truly a reference work for anybody interested in the sun. With a very determined lean towards the serious, amateur solar observer and imager.

Types of solar instruments are discussed in great depth. Including the complex constructions by some incredibly advanced amateurs. Cameras, filters, etalons and image processing are all covered. With enough maths to satisfy any audience. 

The quality of many of the solar images is beyond belief! Setting standards which this particular, bumbling amateur can only ever dream of achieving. The dedication required to capture and process such images is astounding. The books provides careful analysis of the methods, science and results for every level and for every taste.

With a soft cover, A4 format and 2cm thick, with 478 pages, this important volume weighs a ton! To the amateur solar enthusiast it is worth its weight in gold. 

Solar Astronomy Book | Observing, imaging and studying the Sun  [Axilone Astronomy 2021]


*

18.7.21

18.07.2021 Mush seeing. Routing an arc pattern.

 *

Sunday 18th 72F. Cloudy start, becoming clearer with some sunshine. Breezy from the north west.

I have set up the router with a new support layout for the trammel [radius bar] and plywood arc. Having one accurate arc is all I need now to replicate it repeatedly. Using a trimming router bit with a ball race on the tip. 

It is a bit fiddly to get the ends of the arc equally distant from the 2 meters distant, pivot point. It pays to take light cuts to avoid the router bit digging in or causing vibration. Both potentially leading to vicious chatter. Which will really ruin a nice, smooth arc.

Lunch over. With the sun now out I am drawn towards the observatory to see if the seeing conditions are favourable. I was able to improve the image yesterday by tilting and etalon adjustment but the seeing was mush. The images looked "busy" but lacked any fine detail. 

The seeing was absolute mush again today! Worst ever! Impossible to focus. 

So I went back to finishing the routing of an accurate pattern for the base ring arcs. I need at least another ten arcs to make one more layer of base ring. 2.15m outer radius to fit the dome's inside curvature. 15cm wide, so I made the inside 2m radius. The arcs are cut from sheets of 12mm birch ply 1.5m x 1.5m. I mark them out with the pattern and cut outside the line with a jigsaw. Then trim them accurately to size using the pattern and the router with a trimming bit. 

The compact, little Makita router is a delight to use compared with the hefty standard routers. They do a rechargeable model now but I bought the mains model to avoid frequent battery changing. That said, the cable is often a nuisance when sweeping over 5' long, plywood arcs. When near the workshop I arrange a "sky hook" to support the cable from above. This can be as simple as a projecting, overhead batten or large, shelf bracket. 

A batten can be thrust through the hedge for a quick method of cable support. A short length of cord fixes the cable to the batten. It is easier and cleaner to work out of doors when making lots of sawdust. An arc takes only seconds to trim. So hardly registers on the DB scale compares with the neighbours' decades of chainsawing for firewood. 

*

17.7.21

17.07.2021 Late afternoon imaging.

 *

Saturday 17th 78F bright sunshine from a clear blue sky. Back to see if the seeing conditions had improved. Only a little. It was still all but impossible to focus accurately at the best of times. 

I still managed to capture some of the interesting, surface features.

The 2x GPC provided a bit more scale.

AR2842


AR?


AR2844


*

17.07.2021

 *

 Saturday 17th Clear, bright, warm day. 

10.03 The seeing will not support more than the 1.6x GPC. Soft with thermal simmering. Difficult to find focus.

Despite my hopes for a cure, from the 1.25x etalon GPC, the lighting and on-band area is still not even across the entire frame. 

This one is using 800x800 and I spent a lot of time adjusting the PST etalon. The lower half of the frame has a different texture to the upper and is lighter. Suggesting it is on a different wavelength.
 

I have spent the morning repeatedly dismantling the etalon and rebuilding it. Changes in tightness achieved nothing useful. I removed the Baader 1.25x GPC, behind the etalon and refitted it. Playing with the settings in the software did not offer any improvement. The seeing remains thermally shaky and mushy!

On a positive note: The HitecAstro remote control for the DC focuser motor is working perfectly. I have it set to 50 [arrowed] and can jog the focus in and out in tiny steps with a light tap of the mouse in the upper boxes. 

Holding the cursor there will run the motor continuously. A further tap will stop the motor. Remote control means the telescope doesn't need to be touched. Trying to focus a shaky image on the monitor is hopeless. Particularly when the focuser is over six feet away from the monitor.

The user can purchase a second control box so that two motors can be controlled independently. Handy for twin OTAs on the same mounting. For this, it is important to purchase the correct control box.  You need a DC & a DC 2 [ringed.] Note that both are V2 models just to add to the confusion. A separate software driver for the DC 2 has to be downloaded from the HitecAstro website too.

Focuser position is repeatable but never intended to offer the precision of a stepper motor with matching timing pulleys and belts.

12.15 78F in the dome.  I have given up trying to image due to the dreadful seeing conditions. The dome has been turned to the north. To shade the contents while still allowing free air movement though the slit.

I so rarely turn the dome away from the 180° of the southern sky. It seems very odd to have overhanging oak trees only a few feet from the dome.

My wife grew all of these red oaks [Quercus rubra] from acorns. The once, tiny saplings seem to have doubled in height every couple of years since they were planted. I am allowed to trim branches which press against the dome but am denied full chainsaw approval.

The tallest oak is over twice the height of the dome now. Her willows [Salix "moonrocket"] have grown from pencil sized off-cuts, to three times that height!


*


16.7.21

16.07.2021 PST Etalon + Baader 1.25x GPC as collimater.

 *


 Friday 16th. 75F, clear, calm and bright.

I have spotted a loophole in the PST optical limitations in Christian Viladrich's discussion on etalons. Spreading the sweet spot with a longer focus collimation lens behind the PST etalon.

I had a weak, negative lens in the form of as Baader 1.25x GPC. The rear, AOK Swiss etalon adapter has a baffle. The opening is slightly too small for the Baader GPC. So I opened it out slightly, to 28mm, in the lathe. Only a few tiny cuts were necessary.

This allowed the Baader GPC to drop neatly into place. It is then clamped securely in place by re-inserting the PST etalon body.

I have not added any camera GPC in the first, trial captures. Just the Baader GPC right behind the etalon. The seeing is very soft so far. Finding best focus was a problem. I'll keep trying different etalon adjustments in the hope of improvement.


10.22 The seeing is improving slightly. A more even spread of brightness?


10.29 1.6x GPC added to camera nose.

11.03 The seeing will not support a 2.6x GPC but I am trying anyway. I have now rotated the dome to allow things to cool down in ventilated shade. The ASI174MM Gets very grainy from noise at 50C! The farmer chose that moment to spray the field outside the hedge. So I retreated indoors to sit in the  blast from a fan.

These tests are not just about sharpness. So much as looking for even distribution of brightness across the entire frame. I have been using 800x800 frame size today. The scale changes only as a result of the GPCs placed on the nose of the camera. The higher the power the more the seeing is exaggerated. I never saw any real detail on the monitor. The processed image on the AS!314 screen was little better. ImPPG pulled out what you see here.

12.45 I went over to have another try but the seeing was too awful to capture anything. 

It reached 85F in the afternoon with all day, solid sunshine, from a cloudless, blue sky. 

17.30 I shall try again in the hope of better seeing conditions.

18.10  Started to capture today's interesting surface details. 

The brightness is  not even over the whole frame but is much improved over the naked, PST etalon.

All of these images were with only the Baader 1.25x just behind the etalon.


18.54 Last worthwhile image as the trees covered the sun. 


The filter stack is now about 12cm longer. Just enough room for me to fit the 2" helical focuser. 

Now I can set the etalon at 200mm. Then use the helical focuser to bring the sun to focus. Final focussing is done with the motor driven FT focuser over fractions of a millimetre. Being remotely controlled I have no need to touch the telescope for adjusting the last degree of sharpness.


*