*
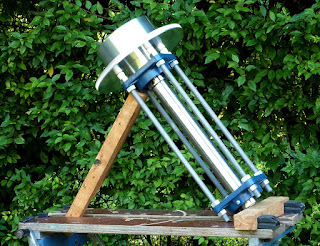
 Having the wormwheels finally available meant I have to seriously consider their placement. The large 11.5" RA wormwheel could be placed above or below the polar axis housing bearings.
Placing it at the top under the axis joint cylinder looks smart but increases the cantilever above the top [Northern] PA bearing by 45mm. To make it into a "boater" hat.
While placing it at the bottom shortens the distance between the bearings by an equal amount but limits overhang to a minimum. I don't believe that torsion loads on a 50mm [2"] shaft are worthy of serious consideration. So won't let that sway my decision about wormwheel placement.
By allowing the RA wormwheel to rest on the plastic cups on top of the studs any extra flexure for the Dec overhang will be reduced. With the top flange bearing reversed there is no bare shaft above the bearing. Though that makes a compressed bearing housing much more difficult. I shall have to reverse the top bearing back to 'normal.'
A Teflon/PTFE disk could be fitted between the wormwheel and cylinder to provide even less flexure. The wormwheel and cylinder effectively become one unit. Carrying the applied loads directly from the top [North] bearing into the declination bearing housing without reduction in cross section. Russel W Porter would approve.
The Tollok bush is a delight to work with and instantly releases its tenacious grip on the polar shaft with half a turn of a single extractor screw. That is, providing the tension screws are all slacked off first. Likewise, the large studs allow rapid adjustment of bearing spacing and shaft projection to try different arrangement in only a few seconds. The bearings are also captive on the shaft via their grub screws. Which gives considerable freedom to adjust friction.
 It all makes for a simple and almost effortless assembly and break easily down into its separate parts without special tools. I say "almost" because the weight increases with each additional part. The Polar axis assembly, as seen here, is already reaching just beyond my comfort level [at 55lbs] to carry in and out of the workshop. Naturally this goes with the territory of building a heavy mounting to support larger and longer telescopes in particular. Otherwise, why bother?
The drive worms are easily attached via sturdy alloy plates threaded over the four studs and tightened with the existing nuts. The worm support plate could be used to further increase load spreading against the end of the [still potential] plywood housing.
After I had completed the brass packing sleeves the large wormwheel had some run-out. So I dismantled the arrangement, opened out the radial holes to 9mm. I tried a rotation of the sleeve by 120 degrees to achieve an instant improvement. I have ordered a sheet of 3mm PTFE/Teflon to at as a low friction filler in a sandwich between the bottom of the cylinder and the wormwheel. I am hoping this will act as a disk/plate bearing to further improve the truth of the wormwheel and stiffen the combined assembly. It will also act as a clutch to supplement the wormwheel's radial screws. Since the cylinder runs perfectly true and it is rigidly attached to the Polar Axis shaft it should damp any possibility of the large wormwheel having any remaining play. It is currently of the order of under 2mm at the rim.
I thought I might seek out a square tubular metal option to compress between the flange bearings but have drawn a complete blank. My usually metal outlets had only plate or small profiles in aluminium. No combination of my larger and heavier alloy profiles suits the spacing of the studs nor the size of the bearing flanges. These suit a 8" diameter round pipe but a 5"x5" square PA tube makes far more sense. A square, steel tube of that size, in any reasonable wall thickness, would probably need a crane to lift it.
Another alternative for the bearing housings is to use laminated kitchen worktop. I have a length of unused hardwood 60cm/24" wide which could be routed with longitudinal slots to house the threaded rods. [studs] Applied compression forces by the studs should be much better resisted by the hardwood than the weaker "end grain" laminations of the birch plywood I had intended to use. The lamination should make stable but unusual and attractive bearing housings. The worktop has been standing on end for a couple of years in the workshop so should be well seasoned by now. The only real problem I foresee is deciding on corner treatments where each of the four boards meets on edge. A 45 degree edge would work but would be critical of exact fit for neatness. Provided I get it right the studs and axis can be fed endways through the assembled hardwood strip [tubular] housing. Then the flange bearings added and the washers and nuts tightened.
Click on any image for an enlargement.
*

No comments:
Post a Comment