*
 It proved to be impossible to drill the underside of the fork blades with the pillar drill. No orientation of the drill head, relative to the base, would reach. So I clamped the blades up as level as possible and drilled by hand using stepped drill sizes. Finally l was able to tap the holes M8.[~ 5/16"]
I haven't decided whether to counter-bore the base plate to sink the socket head screws below flush. When I tried I discovered I didn't have a suitable 14mm drill to sink the screw heads. 13mm was too tight. I even used a 13mm router bit to make the holes flat on the bottom. Still the screw heads won't fit.
I shall have to buy a 14mm drill when the shops re-open. I have already had to buy a 13mm and 16mm to make progress on my mounting. I could turn the heads down slightly in the lathe but that would remove the rust protection.
 As shown, the bare fork alone weighs 12kg or about 25 lbs. All thanks to the 20mm [3/4"+] thickness of the blades and base plate.
Once the six screws are tightened the blades feel very firm indeed. I may reduce the base plate length slightly at the rear depending how much clearance I need for the RA wormwheel.
The six screws holding the fork blades onto the base plate are all part of my completely overkill, belt and braces design strategy. The PA bearing housing is clamped firmly between the fork blades with a large, 16mm, through stud, tensioned by large, load-spreading washers and domed brass nuts. I am using ordinary nuts for the moment to avoid cosmetic damage to the brass ones during construction.

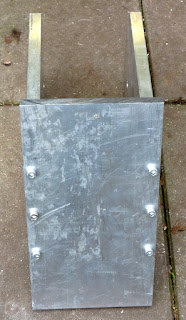
The underside of the mounting base plate can be seen after counter-boring the holes 14mm to sink the M8 socket head screws flush. This required I re-drill and tap the six holes in the undersides of the fork blades by the depths of the screw heads. Thereby increasing the thread depth into the bargain for greater holding power.
The typical, small, Chinese pillar drill cannot easily cope with drills larger than about 10mm. The chuck runs much too fast even in bottom gear and the head bearing assembly is not remotely rigid enough anyway. So I started each hole by gloved hand on the top pulley of the drill and only started the motor to finish drilling to the depth stop. Once centered in the hand cut hole and safely below the surface the drill could no longer wander. I ought to make a much larger, low gear pulley for the drill but it would require a longer belt. The smallest drive pulley is already at the lower limit of practical diameter.
Finally, I ran a 120 grade flap wheel, in the angle grinder, over the bottom of the plate to clean it up a bit. I am rather pleased how well the entire fork looks considering it was made from junked metal out of a skip at the scrap yard. There is some more work to do to improve the cosmetic appearance but I still hope to leave the aluminium bare. I need to try different different abrasive papers or flap wheels to see what works best. Scotchbrite maroon fiber is a useful finishing material but it cannot cut through a really coarse, 'sanded' finish. I even managed to get a piece of the abrasive fiber to fit under the orbital sander's retaining clips. It just needed something wide enough to push it under the clips instead of trying to use my bare fingers.
Click on any image for an enlargement.
*
No comments:
Post a Comment