*
Here I have added some more images to better show the buildings construction from different angles. The octagon was deliberately chosen for visual interest. The shape makes a far more decorative, if ridiculously tall, gazebo than a simple rectangular [brutalist] block. The octagon more closely matches a circle.
The rotating roof, or "dome" will turn on a ring of wheels mounted on the very tops of the eight support posts.
The observatory floor needed to be high enough to allow me to see above shared boundary hedges. None of our neighbours, in 20 years, have shown the slightest interest in hedge clipping. I have a go every couple of years but the prickly blackthorn hedges are now over 12'.
Our modest rural cottage dominates the southern boundary of our property. Often denying views of the Moon and planets from the back garden. The house does still shelter me from the major airport, landing strip "security" lights of neighbours to the south and west.
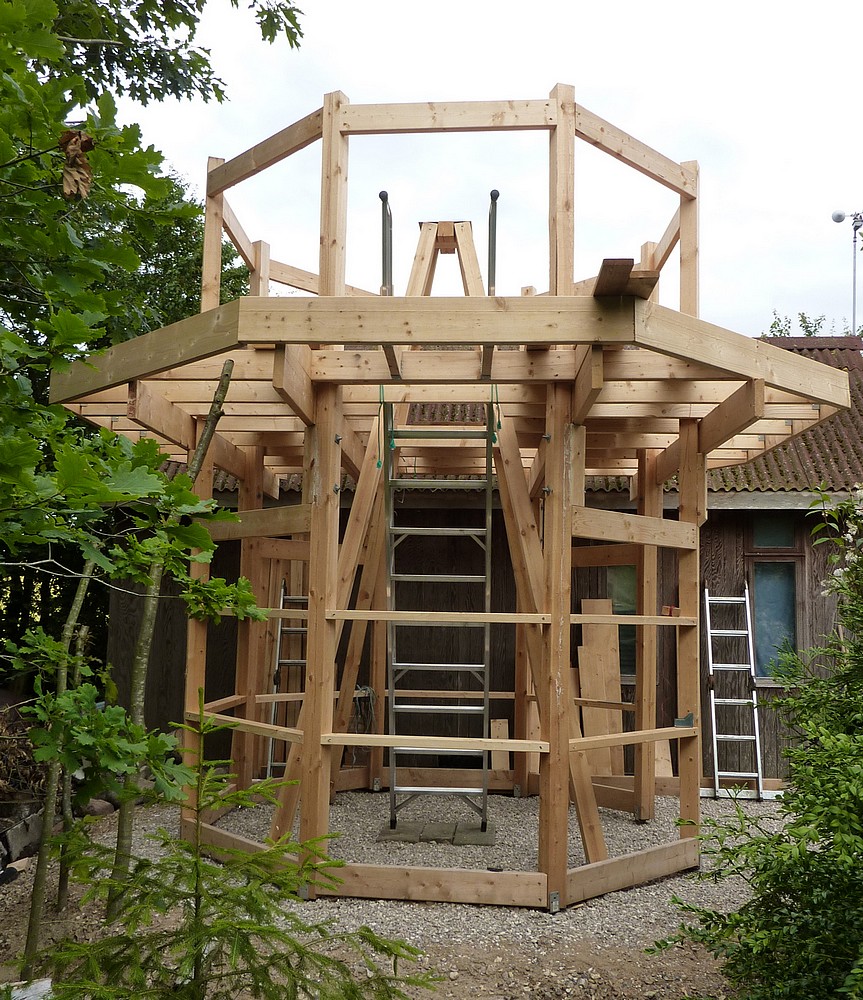 The view from the west shows the four [2"x8"] main beams running
east west. While the obs. floor joists run north-south.
The view from the west shows the four [2"x8"] main beams running
east west. While the obs. floor joists run north-south. All of the observatory floorboards [and planks] are still loose and required for my safe movement around the obs. floor as I work on the joists.
The problem throughout was to lift the observer and telescope high enough to be able to see enough sky in the arc from east to west.
The building is based around an octagon of 4x4s resting on carport anchors as footings. These posts are tied together with multiple braces and support a largely decorative veranda. Whose primary purpose is to visually enhance what was really a simple and boring octagonal building.
The veranda added weight and girth which needed to be carried by the posts. This was achieved, on the advice of CN forum's observatory building experts, by adding the four main, horizontal beams. These are supported by timber "brackets." Each of which is screwed, bolted and fixed with building adhesive to the relevant posts. The observatory floor joists were then laid over these beams.

A
view from low down in the south, looking north. The camera distorts
some of the straight lines but the basic construction can be easily
seen. The direct entrance to the building from the south has been left wide open to ease access for building materials. It will eventually be closed off with an access door. Possibly with a decorative porch to protect the entrance from winter weather.
The large ladder, with handrails, was deliberately chosen to avoid accidents while climbing to, or descending from, the observatory floor 'upstairs.' The ladder was housed inside the building to avoid ice and snow preventing its safe use in the dark when I was very likely to be tired and even older than I feel at present.
The building will eventually be clad in vertically grooved, sheathing plywood for strength, long life and shelter. A simple handrail will be provided for safe use of the veranda. The wall above the veranda is insufficient to provide a remotely normal, door height. So I had absolutely no desire to be balancing on a snow or ice covered platform, in the dark, high above the ground, while I crouched low to enter or leave the observatory. Safety helmets shouldn't be necessary for hobbies.
 Hence a normal access door at ground level and the oversized and overbuilt internal ladder. This will allow me to carry essentials, like a laptop or camera in one hand, while I climb in reasonable safety. All the while sheltered from wind and weather.
The ladder treads are broad and ribbed to provide a high level of balance, feedback and adhesion missing from a 'normal' runged ladder. Ask yourself if you would be happy climbing constantly to your own first floor on a runged loft ladder. If it were a normal building you would probably prefer a normal stair and lighting. My choice of ladder was made very precisely for all of the "normal" reasons of comfort and safety.
I know I am repeating myself frequently on my blog but most visitors will probably just dip in here and there. Perhaps interested in some aspect of my reasoning and choices for some part of the construction. I try to share as many images as a slow visitor's connection will allow. Rather than being arranged as a decorative elements in my wordy discussion of the detail. All of which has been gone over hundreds of times as I analyze each aspect, only to change my mind in the end. Or have it changed for me by a much better idea.
Suggestions are always valuable if only to make me think outside the box. What you see here has evolved from plans for a simple, square, exposed platform attached to the shed rafters for observing and imaging. My seemingly endless discussion [usually with myself] is my way of covering every potential angle or avoiding costly mistakes. I am most grateful for those who had a hand in making it a much better design than I could possibly have managed alone.
 My long suffering wife and "lifetime hobby widow" has also been incredibly supportive and helpful. Endlessly forgiving my obsession with seeing the project through to completion. Repeatedly making useful suggestions which I had completely missed. Trimming back specimen 20' oak and willow trees she had grown herself from carefully selected acorns or cuttings. Unfortunately they had grown up on the only site available for my long planned observatory.
Do you know anybody else who would completely voluntarily work for days on end? Digging, loading and wheel-barrowing 20 tons of sand and gravel? To be wheeled in from the distant drive gates the 40 yards to the building site?
Would they still do it cheerfully at 70 years of age? Could they even imagine themselves doing it? Are they remotely fit enough both physically and mentally to do it at a third of Her age? Without any demands for reward or revenge. Or pound of flesh to be exacted in payment for services well beyond the call of wifely duty? I am indeed fortunate to have shared half a century of such endless "fun" with my lifelong partner. For those who are interested my wife is petite and extremely camera shy.
An update on my damaged observatory ladder. It was quickly replaced on safety grounds. 👍
An update on my damaged observatory ladder. It was quickly replaced on safety grounds. 👍
Click on any image for an enlargement.
2 comments:
This is a great project!
I am making plans to build myself an elevated platform, like 2 meters above ground, to observe the SW sky above the trees.
I will follow your build closely, thanks a lot for sharing it.
Sorin
Hi Sorin
Thanks for the kind words and good luck with your own project.
2 meters is quite a lot of height above the ground so you need to build something really sturdy. Not only must it be safe but must not flex from side to side when you walk or move around up there. That means diagonal bracing and quite possibly heavy support beams depending on platform size. You'll need handrails to stop you falling off in the dark.
You will also have to consider isolating the pier to avoid platform vibration reaching the telescope. Prefabricated chimney block piers on concrete foundations are strong and stable for tall piers.
I found a lot of helpful information on Cloudy Nights forums. They have experts on building woodwork and observatories in particular. They really helped to refine my own rough design ideas.
YouTube also has a lot of great information on building platforms. Just search for "decks." This is the US name for raised platforms. So you'll get plenty of ideas to avoid making mistakes in your construction.
Regards
Chris
Post a Comment