*
 As it was a very wet
and miserable day I couldn't work outside. So I decided draw a plywood cutting plan using
PhotoFiltre before assaulting the plywood with my usually untidy pencil marks.
As it was a very wet
and miserable day I couldn't work outside. So I decided draw a plywood cutting plan using
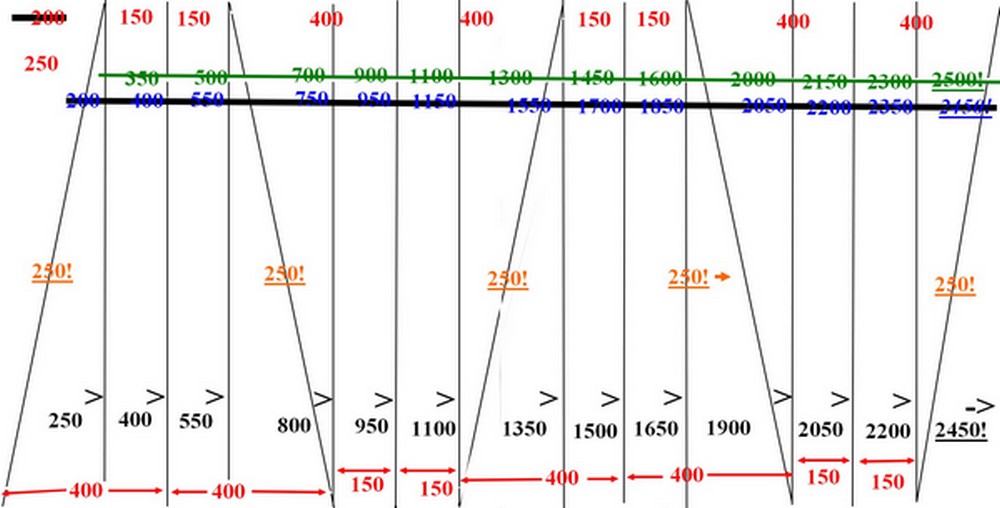
PhotoFiltre before assaulting the plywood with my usually untidy pencil marks.However, I made a simple error in the very first measurement and didn't realise it. Only at the third attempt did I finally see my "deliberate" mistake. I was using half of 400 when I ought to have been using 250mm. i.e. 400-150mm. Grr! The black numerals are the correct measurements from one end of the 8'x4' sheet. The red numerals the nominal widths of each component on the drawing. It's lucky I wasn't allowed anywhere near the real materials because of the bad weather.
In my defense I did actually manage to [deliberately] make each side of the octagon just under a full sheet of plywood. Eight sides x 4' amounted to the 10' diameter building which I needed for my long refractor.
I also bought another box of 100 Torx joist hangers screws while I was at the timber yard. It is amazing how one goes through screws on a project like this. I am already on my second boxes of the 3" and 4" Torx screws. Thank goodness I didn't use nails! I 'inherited' loads of different boxed nails from a neighbour years ago. They have very mild surface rust which makes them incredibly hard to drive in!
Nails also damage things [badly] when they may have to come apart for half time improvements in design. Or to overcome cutting or measurement errors. I am not a professional carpenter so don't expect me to be more than a hobbyist. I much prefer Torx screws and a rechargeable driver/drill to nails. Just make sure to get a really powerful driver with lots of torque on the higher ratchet-clutch numbers.
My almost new, DeWalt is having to be used on the "Drilling" setting all the time for driving every single screw and it really doesn't like it. It is getting harder and harder to return the collar to numbered clutch/torque settings from 'Drilling.' Even the 15. [16?] torque setting has no guts for driving even short 35 and 40mm screws before it soon starts clicking wildly. Big disappointment! So be warned.
Perhaps there's some fancy "snake oil" which professional carpenters use to help wood screws go in? I can still remember a chippy showing me how he rubbed his hammer face on his greasy hair to make nails go in straight. That was way back in my teens, in the last century. I don't have enough hair left to rub every screw I use and I wash my hair every day anyway.
Click on any image for an enlargement.
*
No comments:
Post a Comment