31.8.19

Solar 31.08.19 Prom + surface in H-a

*

Afternoon solar: Captured some WL videos and H-alpha. Plus some stills.

The image is my first attempt to overlap surface and prom images in Photofiltre.

Rather rushed before dinner so made no attempt to match perfectly. Lost the surface detail as I brought out the prom details.

Not too bad for a first try.

Sunday morning and I transferred all the SharpCap captures from the SSD to my PC expansion drive. Half an hour at 180Mb/s via USB3.

It is a constant battle to have enough memory free during imaging sessions. The Laptop refuses to save new videos to the external SSD despite being told to save all new files there. So the laptop fills right up. Then the files have to be transferred manually to the SSD. Then manually deleted from the laptop before I can capture anything new. Crap!!

I discovered that the PC expansion drive won't work through my new USB3 hub. Its presence wasn't even identified despite plugging and unplugging several times. The SSD worked fine but I have two free USB3 ports hidden away amongst the tangled cable knitting on the back of the PC. Which I can borrow for major file transfers with a bit of fiddling with an LED torch. Not that it made any difference to the SSD. File transfer rate was identical via the hub. And they call this intelligent technology? Seriously?


A Sunday morning cycle ride for 20 miles, for a while in torrential rain, produced two tins of matt black, blackboard paint. This afternoon I managed the 7 upper, wall panels. With still a little paint left in the pot.

Quite pleased with the finish. I spent a lot of time trying not to paint the structural timbers. Which left quite a crisp effect. To paint or not to paint them? That is the question.

The water based paint smelt strongly and I now have a headache. So I have probably reduced my lifespan by a couple of years. All for the convenience of buying from a discount DIY chain which opens on Sunday. So that I avoided postal charges and could have a ride in heavy rain. Another 7 panels to go but it means grovelling sitting on the observatory  floor.. Wish me luck. NO flowers please. 💀

Monday 2nd is cool but breezy. So I have opened up the dome to clear out any fumes. It doesn't smell as strongly as yesterday and the nicely even, matt paint finish is surprisingly acceptable. Painted four lower panels. Three more to go. I may paint the structural timbers as well for a more uniform finish. I'll sleep on it before making a decision.

A beautiful crescent Moon presented itself in the early evening but was already too low to see from my observatory due to trees.


Click on any image for an enlargement.
*

29.8.19

Thursday: As if through a cloth darkly.

*

The need to darken the observatory interior has been hovering on the back burner since it was built. The rather pale and naked, birch desktop merely gave me a shove in the right direction.

I wanted a low toxicity finish given the hours I often spend in there even when it is hot. The finish had to ignore the occasional leaks and the existing black stains on the dome's birch plywood. I had no desire to use a toxic fungicide on this either. What to do? Put it off for another month.

Then I thought of black, garden fleece. A non-woven fabric used for suppressing weeds. I wanted a dark colour but black was not available locally. So it was off to the city to a chain of outlets which [unusually] has no online sales system. The traffic was awful with a couple of hours completely wasted in traffic queues at well over 80F watching receding, but unmoving brake lights through the windows of vehicles in front.

The fleece material comes in two options. One at 50g/m^2 and the other at twice the weight. The thicker stuff was in narrower strips than the lighter. So I bought enough of both. The dome gores will be cut from the heavier cloth running vertically. The walls cut from the lighter  but running horizontally. I didn't want any unsupported seams.

My wife has been using this stuff in the garden for years and can confirm the quality of this particular source of material. She has even used it as windbreaks and it has lasted well. Much of the competition is reported as flimsy and literally falls to pieces in no time at all. I should get a few years wear out of this better stuff.

The dark material will be stapled to the dome's wooden framework. Leaving an air gap from the dome's outer skin. Being able to breathe freely it should avoid dampness. It might also block some solar heat gain coming through the plywood skin. Best, is that it will hide the ugly stains from view. Oh, and make the dome darker inside.

A little practice on scraps showed that stapling to birch ply is hard work. No penetration! So I will have to staple the cloth only to the framework rather than the ribs. Then I just have work out a neat way to tidy up all the edges to my satisfaction. Yet again the flat, trapezoid panels reward me in my not having to manage a sphere.

Now I just have to drag a set of stepladders upstairs to be able to safely reach the dome's zenith. Two done by lunchtime. About half an hour for the second. Any creases can be undone by removing staples locally and easing. I chose to cover only the bottom three panels in each drop. Since the upper panels do not share the same frame.

Six drops in total by 16.30 when I had finished one bag of fleece. Getting into a routine now but a bit slapdash on the final edge trimming. The cloth appears very dark indeed when up-lit only by the open stairwell and open front door in bright sunshine below. It will be even darker when the entire interior is covered in fleece. I think the finished result is acceptable rather than great. It would have been so much easier to slap a load of matt paint on the inside of the dome to hide the worst woodworking atrocities.

Friday: Woke with an aching back from yesterday's paper fleece hanging exercise. Perhaps I'm still recovering from the gravel shovelling? Plodding on with the "blackout curtains." More done, 5 to go. Cut the pieces of cloth to length and width in advance to save running up and down. Tried a fire test of the polyester[?] cloth with a match. It is slow to catch fire but then burns like plastic. Dropping melting "fire drops" onto the floor. Nice!

Pm: Plodded on again until I had used up the second bag of fleece. Now only one full gore and two "halves" to go. The drop in scattered sunlight is quite useful for solar but difficult to capture with the camera. Matt black paint would have been darker. The effect is certainly cumulative as each new surface no longer allows reflection. A slight worry is off-gassing from the cloth. It is not sold for interior use. Though the dome is as [air] leaky as I could manage. Various forum members have set my mind at rest on its use.

I have just been watching a small bird from the window. It was climbing all over the observatory and veranda in search of insects or perhaps spiders. It was so agile, as it walked effortlessly up and down the plywood walls, that I imagined it to be a Treecreeper. The binoculars soon helped to identify it correctly as a female or juvenile Greenfinch.

Click on any image for an enlargement.

*

Saturday: Mostly observatory improvements.

 *

Saturday: All day sunshine promised. Hong-Ha is showing proms which might be worth a try. I couldn't bring out the proms without over-brightening and showing the mask. I tried ASICap but it was no better regarding the mask and was much more limited in scope.

So I gave up and fitted some larch skirting boards to the back two sides of the observatory. This area has never been accessible until I had dragged all the reserve timber out. Just to check if it was dry and not being attacked under the tarpaulins. A few mouse droppings suggest they like the shelter.

The remaining larch boards are so long ~7m or 22', it is impossible to store them inside the shed. I thought I might buy some strong shelf brackets for the shed wall and lift the boards high off the ground. It would probably end up with birds nesting on top! Now I need some more gravel to raise the ground level above the bottoms of the skirting boards. Otherwise the wildlife will just burrow underneath.

I could fit some larch skirting boards inside the observatory to use up some of the reserve. Though I had planned to fit the grooved cladding plywood on the inner walls first. This would certainly improve the appearance. Then it might be a problem if damp got inside the walls. I'm not sure insulation in the walls is a particularly good idea in an observatory. If it keeps the heat out then it keeps the heat in. Ideally indoor and outdoor temperatures should quickly equalize. Otherwise a heat plume can pour out of the slit and ruin the seeing.

After lunch, I went off to collect some gravel to resurface the surroundings of the observatory building. Only to discover the sand and gravel man's big bucket loader was broken. So I had to fill my own trailer with a borrowed shovel! Once I returned home I had to shovel it all back out again. In scorching 77F in full sunshine. And I'm 72 you know! 👶 What a hero! Stop sniggering at the back! 😏

Tuesday sunshine, 82F, finishing off the gravel and re-stacking the larch board reserve on wooden blocks. 82F in the shade under the veranda and 86F inside the unopened dome. Thunder and cloudbursts were forecast. So I didn't bother to open up.

Wednesday 28th Tidied the observatory and looked at options for using up some larch boards. Skirting boards in the dome look like the most promising use. It's a bit warm up there even with all the doors and observing slit wide open. 82F in the shade at 13.30.

*

23.8.19

Wednesday evening & Thursday sparks.


Wednesday evening I went over to try and capture Jupiter again. The seeing was even worse than last night! Absolutely hopeless results. Mind you, Jupiter was cruising along just above the ridge of the house and about to be eclipsed by the chimney. No heating on, of course at this time of year, but the sun had been shining on the roof for most of the day.

Thursday: The sky is very milky with high and low cloud. The forecast is for more cloud than sun. I had better do some work on the electrics instead of wasting my time on the sun clouds.

Trenching a narrow groove for the conduit took an hour or so. Best achieved with a nail lifting crowbar to cut down through the gravel. Followed by a narrow garden trowel to avoid widening the trench.

I have two 10m draw cords but it is impossible to push both through in one long length. 10m is about the limit when the conduit is pulled perfectly straight. So I had to do the conduit in two halves and pull half the cable through at a time. Then there was new light in the observatory if not the first. Now I need a main switch so I can put the lights and power on from downstairs as I go in.

I need to isolate the telescope drive with a local switch. Just in case it starts tracking without my going up to check. I don't want to find the telescopes and cables wrapped several around the pier. The horizontal parking allows maximum clearance as only the PA rotates. The Dec cable is the main problem and would soon run out of slack. It isn't a problem provided I stay in a southerly arc. Next time I make a mounting I'm having a hollow PA for the Dec cable!

Friday: Improved the security of the main doors to the observatory building.


*

21.8.19

It's the morning after Jupiter Tuesday!

*

Wednesday: After a frustrating day trying to capture the sun between endless cloud [yesterday] I went over after dark to collect the laptop and to tidy up. Jupiter was just visible in the south just above the ridge of the house. Nothing else for it but to start everything up again and home in on Jupiter. Not forgetting to remove the usual solar filters just to be able to see anything at all. Solar has become my normal interest. So off came the solar prism and on went the star diagonal. The 90mm Vixen was well out of reach so I added the ZWO camera to the 7" refractor. 

Just as expected Jupiter was a total mess! Boiling and soft and only the slightest hint of a belt and a spot. I captured a number of 1000 frame videos. Then ran one through Registax. The result was as at least awful as I had imagined it would be. Nothing I tried would improve the final image.

As usual, all of this is still on the laptop, so I will have to post from the laptop once I set up for more solar work in the dome. SharpCap has had an update to 3.2! It is lucky I have a fast wireless connection in the observatory now. This was thanks to moving the laptop out of the radio shadow of the mounting and telescopes.

Today, Wednesday, I was hoping for some solar, H-alpha imagery but the cloud soon became impossible. There was even a sprinkle of rain.  

Unfortunately the rippled mask is still there. I used the enlarging button to increase the live, image size to 300% and found the mask had become a checkered pattern. How a rippled mask can become a checkered pattern by enlargement is beyond my limited knowledge. I may be forced to change to another capture software after all.


Click on any image for an enlargement.
*

19.8.19

Monday 19th. Drives stalling during slews.

*

Monday: The AWR, RA, stepper motor drive regularly stalls during slews. I have tried tension screws to fine adjust the pressure between the worm and the 11" wormwheel. It didn't help and there was still lots of backlash due to the huge clearance between the worm and wheel.

Today I thought I'd try a tension spring. The theory being that any eccentricity in the worm wheel would be taken up by the spring. Absolutely hopeless! The slightest tension on the spring and the motor stalled. I checked the balance of the OTAs and that wasn't the problem. It poured down so hard during my slewing trials that it was impossible to hear the motor.

The next plan is to slack off the clutch screws in the RA wheel hub. Then I can check for concentricity without adding balance problems as an unknown variable. I can check the balance at the same time of course.

While it was pouring down I have pinned down the worst leakage. It is in the shutter joint half way up. I used a butt joint lying over a 40x40mm timber cross brace. Obviously not good enough despite the expensive filler/sealer. It was impossible to get plywood long enough to cover the entire shutter in one length.

Due to the geometry and position of these seams I cannot use aluminium profiles to ensure the rain passes straight over the joint. Rain would merely collect in the Z-profile. So I will have to strip the paint off and waterproof glue a strip of ply over the top. Once the glue has gone off it can be painted to hide the repair.

Further thoughts suggested sloping the tops of the patching strips outwards and downwards to throw the rain clear. Otherwise it would probably leak under the wide overlapping strip which weather seals the middle of the shutters when they are closed.

Tuesday: I was all set up for some solar imaging and it started raining. Grr? So I made a 15° reclining stand for the AWR IH2 drives paddle out of a larch upstand and a plywood base. I also drilled two leaning holes in the desk for the cables. It's a shame I didn't have any square drills. Or the holes could have been made smaller to just let the square plugs pass through. I have glued a small strip to the plywood base to stop the IH2 from sliding downwards. The IH2 is a nice snug fit so doesn't move about. It is now very pleasant to read and to use compared with upright fixing or lying down.
 

*

18.8.19

Utter confusion on the electrical front.

 *

I still need to get serious about the mains wiring. Damp-proof sockets and separate switches would be so much easier. Not to mention being much safer than lots of daisy-chained, extension cords, multi-sockets and pulling and/or inserting plugs all time. Fortunately the very low electrical demands do not threaten my rather amateur supply system.

I'd rather avoid the huge waterproof plugs and sockets typically used on building sites. IP44. Shock and splash resistant plugs and multi-sockets would be preferable. There is also a class of plugs and socket intended for lawnmowers, hedge clippers and similar garden equipment. These normally use two pin plugs and sockets and twin core extension leads.

Then there is a type of waterproof socket which can be fixed to a post in the garden. I think these are earthed and must be installed by a qualified electrician.

Most existing Danish homes don't use earthed sockets indoors. Earthed electrical equipment is quite a recent invention here apparently. They have confused the issue even further by having Schuko earthing. Which is not to be confused with UK, US, European or Danish earthing systems. Confused? So am I!

A trip to a builder's merchant chain was a complete and utter waste of time. Racks and racks of Big Name, power tools fitted with mains leads. ALL of them with round, moulded on, black plastic plugs with ONLY TWO PINS!

So, it seems there is no middle ground between bulky IP44 and normal, INDOOR, domestic lighting, 2-pin sockets. There is no REAL multi-socket option for building workers using commonplace 2-pin mains equipment out of doors! Not unless they cut off their neat, fixed plugs and fit whopping great 3-pin EARTHED IP44 plugs to all their 2-pin, 2-core, double insulated, cabled equipment.

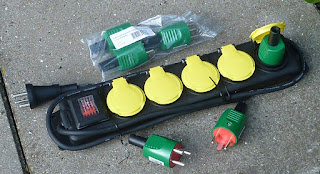
Famous last words! I found another builder's merchant today with a helpful member of staff. He pointed me at the items in the image. A multi-socket with shielded outlets [when devoid of a plug] and a rubber covered switch. Possibly illuminated? I haven't tried it yet.

As he pointed out, the plugs are shatterproof and being round, seal much better to the round sockets in damp or rainy conditions. Moreover the plugs have rubber cable sleeves to exclude rain and act as a resistance to side pulls on the cable. The multi-socket body is provided with secure fixing points. So I can attach it safely to my pier. Helpful when pulling plugs and keeps it off the floor.

There is no need to connect the cables to the earth pins unless so desired. Not much point, or even possible, when the connecting cable is 2-core. Though the sockets might gain some safety margin for being properly earthed. Much smarter than the white, domestic, multi-sockets I have been using so far in the observatory.  The total cost for the items shown was about £30 equivalent. I could have got them cheaper online but when you have such helpful staff you invest in the bricks and mortar.


*

17.8.19

More tidying and summary of recent improvements.

*

Saturday was another wet day but eventually it petered off. So off I went to see what I could do to improve the observatory. I can't open the slit for perfect, daylight lighting in the dome when it is raining. It is just not the same working by artificial light.

In their original position, the AWR electronics boxes were pushing out the new chest of drawers. So I re-sited these boxes on the pier. By moving the simple angle brackets up and further away. Rewiring, to tidy all the knitting took rather longer. Though I didn't need to drill any more large holes. Just re-route and push the wires and oversized plugs through different holes in the pier's 18mm plywood cladding.

Before long I had half of the observatory floor clear too. The rest went into boxes for easy removal. I just seem to leave a trail of accumulation behind me. Tools, bits of wire, boxes of screws, timber off-cuts and screw hooks just follow me around. Then get tired and just fall to the floor when I'm not looking.

A cluttered floor is no good in daylight or in the dark if there are always things to fall over. Or narrowing the foot traffic routes. Though I am usually looking south across an arc from SE to SW. So anything on the floor to the south is not so much of a hindrance. Had I a reflector, the opposite would be true. I'd need free floor space on the southern arc and then have nowhere sensible for the computer.

I do hope I'm not developing unnecessary pride in the appearance of my set-up. It won't last. It never does. I am now very happy with the newly counter-weighted trapdoor and new veranda doors. A vast improvement for several reasons. Mostly ease of use and much easier access.

I have tended to develop user habits based entirely on the ease of use or access. Now I can stop being lazy and be much safer into the bargain. I can also go out onto the veranda without it being a chore involving a 5 minute struggle with warped and sticking doors.

The new, 27" monitor screen is superb and something I should have done ages ago. Software, which was impossible to see on the 4k laptop screen, is now easily visible and really big!! This alone should really boost my efforts at imaging. Highly recommended if you have a suitable shelter or observatory. Not so clever if you image from a puddled lawn under a threatening sky!

The L-shaped desk top is now proving itself as I fix the simple problems it raised. Not least in providing 100Mb/s Internet speed thanks to the new resting site for the laptop. Where it is no longer shielded from the home router by the pier, telescopes and mounting.

The drawer cabinet is neatly housing all the telescope's accessories. While providing easy access and protection beneath the desk without needing extra space on the floor. The snap-lid boxes are no longer shelf-mounted behind me which was always a problem. Sunlight would fall on that entire area during solar observation or imaging. No doubt leading to heating in the closed tubs.  

The 3.5" FT focuser is absolutely superb on the 7" refractor and even better with DC motor focusing. A vast improvement on the 2" Vixen focuser. It is absolutely secure, always perfectly aligned, moves and rotates easily and is rigid in its effortless support of my heavy prisms. Costly, but one of the best upgrades invested in my imaging progress.

I am still using the buttons on the red, HitechAstro box for remote focusing. Though the new 64 bit driver should be available soon. To provide remote and comfortable keyboard/onscreen focusing without searching for tiny buttons in the dark.

Tidying the observatory building downstairs made much more room. I have even made yards of clear shelf space for countless jars of screws etc. on the existing construction timbers. The jar contents are now easily seen and accessible for the first time ever. A bright, overhead LED light for this downstairs area was well worth installing. Its careful siting ensures it doesn't shine upstairs in the dome.

The effect of all my improvements is cumulative. Ease of use, comfort and efficiency provide much quicker access to use the telescopes. I can be viewing or imaging much more quickly. Without interruption, delays and endless confusion along the way. I spot the moon is out through the bedroom window and can be viewing, with tracking in under five minutes. I now have all the different leads for the laptop hanging in screw hooks ready for immediate insertion into the laptop's sockets. [Or ports for the pedantic.]

The steadily improving ease of use means I observe more often per week,  now, than I ever did in many months when it meant setting up out of doors. I have also raised my viewing level by enough to make observing far more worthwhile. Previously, it was like observing from the bottom of a well.

Many of the mental and physical hurdles to viewing have been removed. Everything I do from now on can only smooth my path to enjoying the sky. Solar observation and imaging have become a major interest. Allowing me to familiarize myself with the routines of setting up for observing or imaging in broad daylight.


*

16.8.19

To porch or not to porch?

*

I have a problem [amongst many others] that I am rained upon by the overhanging veranda. This occurs whenever I am entering or leaving the observatory building. The problem [apart from the free showers] is whether to build a concealed roof panel. Simply to throw the water away from the doors below. Or whether 'tis nobler to build a properly showy porch with pillars and whatnot.

And, if pillars, then what kind of pillars? No, not Corinthian. I mean square or round? And of which dimensions to impress sufficiently to warrant the considerable effort?  Is entasis a good idea? Or merely an affectation of the wealthy? Whom can easily afford the craftsmen to accomplish the task for them.

Meanwhile I trimmed the trapdoor ropes to length and tied them with fisherman's knots.

Being strictly non-crafts person. Not to mention remote from the USA market in GRP and timber columns. I am faced with a questionable spot of DIY. Plastic drainpipes immediately spring to mind. If only they weren't usually orange to avoid digger drivers chewing them up once laid underground as intended.

White or grey? They'd still look like a PVC drainpipe standing on its head. Though entasis is easily achieved with a few notches, some PVC solvent cement, a heat gun and a strap wrench or two, but still. It certainly makes one think of the possibilities. There is no need for load bearing construction. The veranda is self supporting and the columns merely [and hopefully] decorative. What puts me off the whole idea is the clash with my rustic ethic of bare wood and plywood.

It's getting worse! The green, "wood protection" paint on the dome is bubbling up all over. As it, quite literally, lifts bodily off the white primer. The green paint was top quality and supposed to last for 15 years. How do you sand a whole dome up on the second floor? It looks as if my ladder lashups are in for a repeat showing. I shall have to buy in a load of sanding sheets for the orbital sander. Next spring sounds like a much better idea. Given a typical winter, half the paint should have fallen off by then. No point in accelerating the breakdown of the plywood. Meanwhile I shall be seriously considering alternatives. Though [hopefully] not polyester resin and glass matt!

Because the dome was made to a trapezoidal panel design it does not suffer from sphericity. In other words, it does not follow a 3D curve. So flat materials can be fixed or draped over it. PVC tarpaulin, for example could be covered in complete drops from the top to the bottom of the dome. Only the edge seams would need to be welded. By heat or by solvent. Since there would be no horizontal seams the rain would roll off without seeking entry to the structure. The obvious downside is reaching the entire structure. Oh, and increased weight. Though there is the option of removing the plywood panels and rely only on the PVC for sealing. The dome would become a tent.

In a perfect world there would be the perfect adhesive tape. Tape the seams, paint to match [if need be] and the job is done. I have no idea if such tape is available with long guaranteed lifetimes of adhesion out of doors in all weathers. Despite the claims of the vendors, real world users claim otherwise in their reviews.

*

15.8.19

Friction wheel, manual dome drive.

*

I have had the friction wheel, drive assembly clamped to the octagon since I built it. There was every chance it would fail to perform or become unreliable. So I left it clamped despite it looking ugly and unfinished. 

Today, I decided to screw the parts to the octagon top ring.  I chose to use 100mm [4"] galvanized, roofing sheet screws. These have an 11mm hex head which means I could use a hex socket ratchet for speed and torque. 

The bicycle crank, fitted with a cut down plastic pedal spindle, is fixed to a sealed, bicycle, bottom bracket bearing and axle. The hole for the BB is skewed in the 2x4 lever arm to bring the 4" industrial urethane wheel tangential to the dome's base ring.

I had to find the longest, one piece, sealed BB axle available. This was to ensure clearance for the crank as it turned in one inner "corner" of the octagon. It just clears the hold down disk on the nearest dome support wheel bracket. Provided the handle [plastic pedal spindle sleeve] on the crank is used normally there is no danger of trapped fingers.

The far end of the 2x4 lever supports a 5kg [10b] weight. Due to the leverage, this provides a much greater upward force on the 4" friction, drive wheel under the dome's base ring. The upward force is enough to produce clearance from the nearest dome support roller. If the roller were to take up any of the downward load then the friction drive roller would probably slip. I left the support wheel in place as insurance to avoid changes in dome level as the drive roller rose and fell.

In practice there is never any slippage and the effort required to turn the drive crank is absolutely trivial. The push or pull on the crank is so light I can turn the dome with my pinky. [Little finger.] Yet it has provided a 100% reliable drive since the moment I installed it.

The lever's pivot axle [fulcrum] is mounted in the pressed steel frame from which I borrowed the 4" urethane roller. The BB bearing is clamped to an aluminium plate via its own clamping ring. The plate is then bolted to the lever arm.

I had to remove the bearings from the friction roller to make it solid with the crank axle. Otherwise the crank would just turn and the roller [and dome] stay still. A square axle, cut down crank boss was pressed into the roller bore. I needed my lathe to make the crank boss nicely square to the BB axle and cylindrical to the exact size [Ø] to fit the roller bore. I still have plenty of old bike spares bought as complete bikes for donor materials. It was cheaper to buy a whole mountain or racing bike, back then, for less than £5, just for a nicer brake. Than to buy a single brake fixing bolt from a bike shop. All the bike frames went to the recycling yard eventually but I kept any spares which might come in useful.

Most observatory owners go to enormous lengths to avoid manual drives. They use computers and software and racks and gears and endless complexity to use a drive motor with all that entails. When I am observing or imaging I rise from my seat for only a moment. Give the crank a gentle turn and the dome rotates effortlessly to its new position. Though it can get noisy when I really rev it up for a few practice turns.

The drive is also instantly reversible and faster accelerating and spinning than most amateur's [or professional's domes.] The length of the crank and the ratio between the 4" wheel and the 10' dome base ring has proved to be absolutely perfect. Though a real perfectionist would add a chain drive to bring the hand crank down to a more comfortable level. I have never felt the need so far. Besides, I'd probably walk into the pedal spindle in the dark!

I'm afraid I have absolutely no idea who that old bloke is in the video below. He seems to hang around here most of the time. He keeps muttering; "All me own work, Guv!" As if it was supposed to mean something. Though, admittedly, he does make quite a handy "extra" for when I need the dome cranking and that sort of thing. Simple jobs like that. I don't let him near anything sharp in case he hurts himself and sues me.


Because YouTube no longer allows embedded videos, without automatically showing new suggestions, I have had to set the video to loop. Hopefully this will save any of Google's porn from showing up on my blog which might be viewed by a younger person. It used to be possible to simply tick a box on YT to stop video auto suggestion after an embedded video ends. Power corrupts. Google power corrupts absolutely.

Click on any image for an enlargement.

*


ZWO & SharpCap mask continued.

*

Wednesday: Sunny periods allowed intermittent testing of various capture software and the two cameras. [ZWO and Neximage5.] The masking seemed far less obvious until I tried H-alpha with the ZWO and SharpCap RGB24. I captured a number of screen shots with various combinations to have a comparison. 11.30 It has now clouded over completely so I must pause in my trials. 11.33 Now it is raining hard and the temperature has dropped like a stone!! Thanks goodness for an observatory! It takes only a few seconds to close the shutters to guard against the elements.

The USB3 to 4xUSB3 hub has arrived in the post. A few seconds later all the USB devices were working properly and I still had one empty USB3 socket left on the laptop. I used to smile at all the cables dangling from imager's instruments. Now I know why they have so many. It has started raining heavily again after a pause.

Using ASICAP produced a glistening, ground glass mask. I couldn't be certain it wasn't a thermal effect. Like looking downwards into vast dish of boiling water so fine were the individual boiling elements. Rather oddly, I was unable to see any surface detail in WL or H-a. Which was quite easily seen in SharpCap behind [or rather below] the concealing mask.

The Neximage5 crashed SharpCap repeatedly. I had to Restart Windows several times. A cloud over the sun was enough for the camera signal to be lost. Then a large warning box came up which could not be closed nor any of the button choices have any effect. The screen loudspeakers complained with a loud bong every time I tried to close the message box! Solid cloud arrived as I planned to try FireCapture.

The strange thing about the mask in SharpCap, with the ZWO camera, is its "organic" appearance. There is never any suggestion of digital artifacts. In fact it looks more like a sharper version of H-alpha surface detail. As if it were literally worn into the screen. Or had dirtied the screen like an algae film. Though it can't be either because it instantly migrates to each new screen I try. Logic suggests the camera is responsible somehow. Though that would surely mean the mask or film should rotate with the camera?

*

13.8.19

13.8.19 Rippled mask effect on ZWO in SharpCap

*

Tuesday: A little sunshine in the late afternoon gave me a chance to look at the rippled mask effect again.

I have confirmed that: Rotation of the camera, PST filters and PST etalon have no effect on the mask.
This is actually positive news because it suggests that neither the camera nor any of the H-alpha optics are damaged. 

The mask is absolutely fixed on the SharpCap capture screen.
It shows no lateral, nor up and down movement with any telescope movement or degree of focus.

The mask is unaffected by any setting within SharpCap yet it appears only on the capture screen.

The type and size of monitor screen has no effect on the mask. The mask merely grows or shrinks to fill the space available. The relative scale to the image remains the same.

The fixed mask appears to lie just above the real image as if it were a "real" physical entity. A plastic or glass plate laid over the computer screen would have an identical appearance. Hence my use of the term "mask."

The mask is incorporated into all digital 'snaps' and astro camera stills and videos.
As if it were a real part of the image. This can make later processing almost impossible. 

The mask is most visible in RGB24 in red H-alpha light.

It does not seem to be directly affected by image brightness, gain or exposure settings. For example when clouds pass over the sun or clear the sun. The mask remains until too dark to be seen.

Not affected by chosen frame size, nor AVI or SER file selection.

Not affected by RAW8, RGB24, MONO8 nor RAW16 selection.

I tried the Neximage5 in the dying rays of the sun but saw only a ground glass effect.
Needs much more light and more time to confirm any differences. A tree intervened in the sun's path as I set up the new camera.

I need to try another capture software but the Neximage software doesn't recognise the ZWO.

Until now it was impossible to use FireCapture because of its complete intolerance of screen resolution and screen size.


*

12.8.19

Monday 12.8.19 Solar with the new screen. Lunar lunacy.

*

It was mid afternoon before I went over to see if solar imaging was even possible in the gusty winds. As expected, the new 27" monitor was a revelation in ease of use compared with the 15.6" laptop. I found it incredibly easy to focus on surface detail and the limb using the bigger screen.

I noticed that the rippled masking is only visible in the H-alpha telescope. A snap of the screen appears alongside. Showing the huge solar disk even without a Barlow in the ZWO.

There was nothing to see on the disk in H-a so I captured some white light videos of fine surface detail. I used the 180mm and the 90mm refractors in turn to make a valid comparison within a short time frame. Then processed the videos in Registax6.  I'll share these videos when I bring them over from the laptop. 

The sky has cleared and the wind dropped a little so it may be possible to see the Moon later. The sky remains bright, so late at 55° north, that lunar contrast is always a problem in the summer.

I went over after dinner to try to image Jupiter as it scraped across the southern horizon. The Moon was still below the neighbour's trees. Dimmer Saturn lay in between the two. I fitted the ZWO to the 7" and was shocked at the sheer size of Jupiter on the 27" screen. It was huge and soft and a wildfire of thermal movement was crossing the planet. I took a snap of the screen with SharpCap set to the smallest 320x320 capture window to show the scale.

Capturing some videos was more for fun than seriousness. How could anything come out of that boiling mess? Eventually the Moon cleared the trees but it was no higher than the planets. Another raging bonfire of thermal effects streamed across the worst view I have ever had of the Moon.

I didn't bother to process the videos last night. Today is forecast for more cloudbursts and rain. There will be plenty of time to play. I tried processing them in Registax, this morning, but it was a hopeless task. 

Lessons learned: I really need to control the brightness of the new screen. Despite being a duplication of the laptop screen it NEVER responds to Display dimming in Windows. The laptop goes dim while the AOC remains unchanged. Sorted! The rear joystick has started working. It didn't do anything sensible when I tried pressing it last time. 

I need more red light at night. I couldn't see the contents of the drawers and banged my head on the telescopes and Dec shaft while moving around in the dark. A red light under the desk should light the drawers. Another red LED bulb overhead on the opposite side of the slit would be useful to reduce shadowing. I bought 1W bulbs last time but slightly brighter ones would be useful. Or more of them.

The 7" focuser can now catch items on the new desktop extension and even the left edge of the screen. I had to turn the white light on to be sure I missed anything important. I can't really move the screen any further west.  Removing the diagonal or solar prism helps provide an extra 4" of clearance. This potential collision problem occurred during a meridian flip when Jupiter was very low and right on the Meridian. I don't usually look at such target positions so it was very unfamiliar.

Having Synced on Jupiter I sent AWR to Saturn just a few degrees east on the RA axis. The Mounting immediately set off in completely the wrong direction! Going West! Remote anything is completely impossible with this set-up!

I really do need to fit a proper finder, or three. Several are sitting in a tub on the observatory floor but the various support systems don't fit anywhere useful on any of my three OTAs. There is no clear view between the closely spaced OTAs. Or they don't stand out far enough to see around the OTA. Nor could I reach them if I had any when the 'scopes are pointing low down at the horizon. Do I need a step-up block to reach?

Fitted the little Vixen 90 finder after rotating the entire OTA to clear the view for the finder. Now I have to find the cap to stop myself trying to find the sun! It's a weird size of just less that 1.25". It must be somewhere.

The keyboard and mouse wireless USB sticks don't work at all on USB3 hub on the back of the AOC screen. Nor very well in the USB3 to USB2 hub. I have ordered a USB3.0 to 4x USB3.0 hub which I can also use for file transfer between the indoor PC and the SSD. It took me all morning to transfer all the captured video files on the SSD at 34MB/s. 3 minutes per video! The new hub can go directly into a USB3 laptop port and hopefully manage most of the existing USB duties. The ZWO camera needs its own USB3 port but that might change with the new hub.


*

11.8.19

Sunday: New L-shaped desk top.

 *

Sunday is promised sunny periods but windy. No point in trying to image when the telescopes are shaking with every gust. If it stays dry I could cut out my L-shaped desk top. I have had a partial sheet of birch ply left over since the build. Though I think the desk top should be quite dark to avoid reflected glare from the sun.

A better day, but very windy with fewer and lighter showers.  I measured twice and cut out my L-shaped desktop once. Fitting it suggested subtle trimming to ensure better isolation from the pier. I lined up the right side of the desk top, with the edge of the pier. 

By sheer chance I had some 70cm long x 45mm Ø flanged, steel tubes set aside for a rainy day. It seemed appropriate to use them given the weather. I used these tubes as legs to support the desk top. By screwing the lower flanges down to the floor. Then the top ones through the desk top. The whole became much more rigid than I might have feared. I used three legs but still have one more in reserve. I have radiused and chamfered the protruding corners to avoid collisions in the dark. Or when I'm not concentrating, as usual.

It is very difficult to capture pictures of the entire desk without using a stepladder. You'll just have to be patient. With the wind being so strong I risked pointing the slit to the north and took a picture from the veranda while standing on my Builders International Standard, beer crate. I hope you appreciate the risks I take. The laptop on the left has been closed. The sheer size of H-alpha solar images captured by the ZWO is evident from the monitor.

I haven't decided how to support the yellow, AWR handset [paddle]. Ideally it needs to be tipped up for easy reading of the screen and comfortable button pressing. The problem is that it has two cables sticking out of the bottom. The yellow connecting plugs isn't very flexible and could be vulnerable to damage. So it needs a slanting hole for these to pass down through the desk. Without their being used to prevent the paddle from sliding downwards. I had the paddle fixed to the pier before and it was very awkward to press the keys. I'd like a useful angle of support and fixing this time.

 Naturally, I'm not keen on boring large holes through my nice, new desk top. Because I am bound to change my mind when the inner genius takes over for the night shift. I just wish he would pay attention when I'm doing things for the first time. Instead of my having to follow him around to mend the usual idiot's mistakes!

I had an indication of the sheer force of the wind today. The 5kg, friction wheel, dome drive, counterweight was nodding up and down to the dome's vertical movements. Given the leverage, the actual base ring lift was very small. Those who were still paying attention during the build will remember I fitted stop disks to prevent dome lift. One disk per steering wheel bracket made eight in total. Each overlapping the base ring. I don't usually spend much time in the observatory during windy weather. It is a noisy and tiring experience as the rubber skirt slaps against the plastic upstand.


Click on any image for an enlargement.

10.8.19

Saturday: Further progress on obs. during endless cloudbursts.

*

Saturday: First "live" lifting of the trapdoor from below. While simultaneously climbing the stepladder and carrying the heavy laptop case in one hand. I pushed the trapdoor upwards and it continued to the vertical parking position without the least effort. It is perfectly balanced and has very low friction. Excellent!

This means I can stop being lazy and lock the trapdoor down from below as I leave the building. Before the counterweight mod, it was just far too much work to lift the trapdoor from below. So I simply avoided doing so. Despite the ease with which I could have doubled up on physical security.

Now I need to rearrange the AWR electronics boxes, assorted power supplies and mains multi-sockets. They were mounted on brackets, low on the eastern side of the pier but now the steel, drawer cabinet needs that space. I'm thinking of mounting the closed laptop in brackets to lie flush with the pier. There are at least five cables plugged into it. So all that needs to be streamlined for quick connection and removal at the start and end of an imaging or observing session.

I re-checked the internet speed with the laptop resting on the eastern desk extension and was shocked to see 100Mbps up and down. With the laptop on the northern side of the pier the wireless connection from the house router was highly variable and often very poor indeed. Probably interference from the massive mounting and the three, big, all metal OTAs spread across a wide arc. Another unexpected, but very positive result from desk reorganization! I never wanted to sit on the east side of the pier so never checked the laptop wireless just there.

If only the desk would fix the weather! Thunder is rumbling overhead and the rain is absolutely deafening on the dome! Eek! Far too late to dash across the yard to the house now! And, so it went on for hours. I would return to the dome during lulls only for it to start lashing down again and thundering.

The dome is leakier than I thought under these extreme circumstances. I'm going to have to make up a long narrow "roof" to protect the screen from any falling drops. It can be combined with shading arrangements from the overhead light for all my solar moments. Though the AOC screen is amazingly matt. So reflections aren't the same problems as the laptop always was.

I'll really have to look at the shutters too. I can see a band of daylight up high which is letting wind driven droplets in. Normally any leakage is only visible as a local wetting of the base ring. Which I really don't worry about. The difference is in the sheer volume of falling rain today and the strong winds. Even at  normal strength the trees are thrashing about. The gusts are probably double that.

The shutters should be closed more tightly together up high but that would need a stepladder. Which I really don't want to house permanently in the dome. I could make up a pair of long tongs to press the shutters together overhead. The tongs would take up no space at all compared with a ladder. Perhaps a simple alloy pole would do it? I'll have to give that a try. No, that didn't work but the shutters had already snuggled together in the windy conditions. Opposing pulleys and ropes could pull the shutters together at the zenith. Provided the ropes weren't too long they needn't get in the way. 


*

New desk & monitor.

*

I made up a trial desk from a suitably large, folded flat, packaging box. The main desk can be 90x40cm. With a soft NE radiused corner to a rear (easterly) extension of the 'L' of 70-80cm x 40cm deep.

The new screen was screwed onto the pier as planned. Fortunately so, because the stand pushed the screen forwards by about 6". Once securely mounted on the pier the viewing distance was perfect. The stand-off now being only 6cm from the plywood face of the pier to the face of the screen. Now I could play with all the astro software which had been driving me nuts with indecipherable symbols and micro-text for months on the tiny 15.6" laptop screen. This was despite resetting the resolution of the laptop screen from 4k to 1080.

Seeing all the fine details on a large, bright, but still razor sharp screen, will change my whole outlook on focusing, capturing and processing. Hopefully there will be a simultaneous improvement in my final results.

I have connected the Display-Port cable between screen and laptop. The former had just arrived in the post. The HDMI cable was also left in place for making later PQ comparisons when I have some spare time. The new monitor feels far more serious than the silly little laptop. The latter felt more like something you'd take camping. Leaving the real world far behind. Based on this short trial a proper monitor is highly recommended for any observatory!

And, a decent monitor a very good reason to have an observatory in the first place. Where everything can be safely set up ready for use, sheltered and shaded. Though I could probably have done with a 24" screen instead of the 27" it will soon shrink once I become more familiar with it.

The screen can be easily "segmented" apparently. To share different sources simultaneously.  Two smaller screens are usually arranged side by side for this sort of thing. I hadn't even considered splitting the screen until now but this option came up in the user manual.

I took the empty shelves down to gain another four inches of leg room from the pier and a wider traffic lane. The lower shelves had been pushing my swivel chair forwards without my realising it. I was hoping for a view of the moon this evening but it started raining out of the grey overcast. A combine was harvesting the field which wraps around the garden. Noisy they are too at such close quarters!


Click on any image for an enlargement.

*

8.8.19

New L-shaped desk and IKEA drawer cabinet.

 *

Thursday: My hip is now feeling much better but I will still have to be careful. The IKEA, steel chest of drawers kit is due to arrive at the pick-up point today. I will have to use a trolley to reach the car with the heavy box. 12kg is 25lbs. 

Once home and assembled, I will [eventually] have a solid, vertical and lateral support for the other "leg" of the L-desk. Until then, I am putting off grappling with a large sheet of thick, birch ply for a one piece top. I'll use existing off-cuts, to make a full L-shaped mock-up. Rather than wasting expensive materials working in the dark.

Provided I maintain mechanical clearance from the pier I may be able to gain an inch, or three, in shelf depth by overhanging the slope of the pier. An adjustable metal leg might be neater on the right nearest the trapdoor. It needs to be laterally stiff without too much bulk. I will move quite frequently from the desk to the telescope focusers on the right over the trapdoor. Anything which gets in the way of my big feet could be a nuisance and potentially a dangerous tripping point.

I had already radiused the corner of the existing desk [laptop shelf] on that side and it has proved fine in practice. I haven't walked into that corner of the shelf yet despite it being a potential traffic black spot. I am often still rising from the last but one tread of the big stepladder when I need to turn sharp right. Then right again to reach the desk chair on the north side of the obs.

A slightly higher shelf height might be worthwhile. The IKEA drawer cabinet is exactly the same height as the underside of my original shelf. Packing the height an inch or two, above or below is very easily done, if needed. I see the chest of drawers as becoming the major anchor point for the new desk. It will help to avoid the [now] free standing desk migrating around the observatory and pier. They have wheels [castors] which I shall forego in the interests of desk stability.

Contact with the pier must be totally avoided to ensure isolation from building vibrations. Even when I am not literally hopping up and down, to test the pier isolation, the wind often acts on the building. Given the very high magnifications of the telescopes. Particularly when fitted with a small chip, astro camera like the ZWO120MC. The slightest vibration will ruin videos or stills. The wind can also catch the top ends of the telescopes. so I leave the dewshield off the 7".

Friday: I spent an hour trying to image the sun as cloud moved across and then thickened.

As you can see from the images scattered here, the IKEA chest of drawers kit finally arrived. It took me an hour to build but a second one would probably take me under a quarter of an hour. Delighted with the flawless finish and genial design. No screws required except for the small castors underneath and the U-handles. The whole thing locks together with tabs pushed through slots and then flattened like a pre-1950s tinplate toy.

I easily fitted all my five, full shelves of astro accessories into the drawers. Still in their snap-on lid containers and I still had room to spare. The drawers slide effortlessly and even have stops so they don't fall right out onto the floor.  Even my wife was impressed and liked my sophisticated colour choice of pale blue rather than black. The Helmer drawer set cost about £25 equivalent plus postage. Quite a bargain despite the DIY aspect.

I have just realized that I  haven't taken a picture of the completed unit. What a silly person! I carried the outer case up to the observatory sans drawers. Just to save struggling up there with too much weight. It needs 3/4" inch of packing to bring it up to the same level as the desk top. Because I deliberately left the wheels off for stability. I don't want my new desk going "walkies" do I?

Click on any image for an enlargement.

*

7.8.19

Trapdoor and new imaging monitor.

 *

Wednesday: Finished off the trapdoor counterbalancing weights and ropes. In the end I used two, 8-day long case, antique, clock weights, of about 10lbs each, hanging below the floor. These provided almost effortless lifting and lowering of the trapdoor. I shall only trim the ropes when I am satisfied after a couple of days of hands-on experience.

Very happy with the set-up so far. It is very easy to push the trapdoor open ahead of me as I climb the stepladder. This was always very difficult before the weights, pulleys and rope took over lifting duties. The pulleys turn so freely, the weight of 6' of bare 5mm rope was enough to run down through the newly made holes in the floor by gravity alone.

My new 27" AOC monitor arrived and is absolutely stunning via HDMI from the laptop. A very matt screen surface kills reflections. With a native resolution of 2560x1440 the new screen is rather wasted on the 1080P home PC. So the AOC will become the new observatory imaging monitor. Though AOC kindly provided a DisplayPort cable amongst several others my laptop only has a mini DP socket. So I had to order the correct cable online. The screen works fine with HDMI but there are supposed to be advantages to DP.

I have also received nicely secure, almost flat, dovetail, wall mounting plates. Which will avoid using up vital desk space without the new screen projecting very far. Not that the smart, stand base is as large as some. I can first confirm the best position for the monitor using the supplied rise-and-fall/tilting stand. Then fix the screen securely to the pier with the wall mounting plates in the correct position. Once locked into position it would be a real struggle to remove the screen. Not without knowing its hidden security measures.

I have strained my hip while trimming tall hedges from high ladders. So a rest day is indicated. I can hardly move at the moment! I still had to go up to the observatory to tidy up for the night. The dome shutters had leaked in the several, torrential cloudbursts we had this afternoon. There was only a little water on the base ring and the floor immediately under it. The problem is that I couldn't match the shape of the shutters to the angled dome segments.

It would be difficult to fit completely new shutter ribs so foam draught-proofing strip might be worth a try. If the inner sides of the outer shutter ribs were rather more accessible I could add thin, flat segments of ply. Just to close off the shutter gaps where they near the dome. Stripping off the plywood shutter covers might be worth it to gain much better access. Thiough they would need to be replaced again without causing further damage. Not likely given the adhesives used to join the two halves of each shutter.

Click on any image for an enlargement.

*

6.8.19

Monday: Observatory reorganisation.

*

With new toys arriving tomorrow I decided to tidy up some more and build mock-ups of potential desk arrangements. Cables and equipment attached to the pier had to be rerouted or removed altogether.

A new 4" pulley supporting a counterweight for the heavy trapdoor. This one is mounted inside the right handrail. Nyloc nuts hold the studding securely in place. [Yet to be trimmed to length.] The pulleys are so free running they need more weight applied to fully balance the trapdoor.

A pair of sliding bolts has been my security against the trapdoor falling accidentally. Now it is fitted with cords and weights it cannot fall. The trapdoor balances when it is vertical.

I shall use a pointed plumb bob to mark the floor for the cords to hang the weights below and out of sight. Once the trapdoor is lowered and the veranda doors opened, I will have free access between the pulleys and cords.The Nyloc nuts are nicely rounded so avoid clothing catching on them.

I spent most of yesterday considering different ideas on a new monitor. How big could I get away with? I would browse options online and then return to the observatory to hang cardboard rectangles on the pier.

An L-shaped desk, wrapped around the north and eastern sides of the pier, would protect a larger screen from being nudged in passing. Nicely rounded desk corners will smooth my movements around the observatory in the dark.

A bigger screen could safely overhang the eastern side of the pier while completely avoiding the danger area over the trapdoor cut-out to the west. I never want anything to interfere with my safe ascent to the observatory floor. No matter how many times I climb the ladder I am certain to completely forget any new intrusion into my path.

Thanks to the sloping sides of the pier the "L" could be made slightly deeper while still clearing the pier for isolation. If I bought a new monitor the same size as the indoor, 28" Samsung, then the best screen could be used indoors. With the runner up still perfectly adequate for imaging duties out in the obs. This pared down the screen choices to a far more manageable range but placed stricter picture quality demands on my eventual choice. I eventually decided to avoid 4k altogether.

When I am imaging I usually capture a video between passing clouds. Then start processing immediately in Registax6 while I wait for another sky clearance. The problem with the small screen of the 15.6" laptop was seeing the fine detail. It was so easy to overdo the processing and end up with a crude daub. Though I would quite often be surprised how well I had actually done when I saw the final  image on a proper sized screen.

Scale is everything when it comes to processing. Using my extra strong reading glasses on the laptop was like using a magnifying glass at close quarters. It was very concentrated work instead of being pleasantly relaxed, at arm's length, on the 28" screen indoors. 

When I return indoors after an imaging session the videos and images are all still on the laptop. Which usually meant I posted them online or blogged on the laptop from the observatory first. A proper screen should greatly enhance my processing. I like a full sized keyboard and proper mouse too. The laptop has never been a first choice for anything. Not even when the indoor PC is not immediately available.

I was teased by brief blue skies and went out to image the sun. There was a huge object eclipsing the sun seen through the 7"! Fortunately, for mankind, it turned out to be a very large moth hiding in the Lacerta prism. I pulled out the eyepiece and it emerged sheepishly and flew off. The view in H-a was still very poor and the rippled mask effect had returned.


Click on any image for an enlargement.

*


3.8.19

Early morning solar. Short lived.

*

Saturday morning I was up early so went out to the observatory to try doing some solar imaging. The instruments were dew covered on the outside after a cooler [50F] night.

The seeing was more steady than I am used to but the sun was devoid of visible features. The Vixen 90mm provided some nice, even granulation after the Wavelet treatment in Registax. The 180mm not so much. 

H-alpha was lacking in anything interesting to lock onto. I toured around the limb several times using the drives. Only one small, pale cloud pretended to be a tiny prom. Though I could not draw it out with added gain or longer exposures. 

The trapdoor is already far easier to lift and lower even with the crude mock-up still in place from yesterday. There is far too much friction. Which dominates the movement in both directions. Even this rough trial suggests an improved set-up will provide almost effortless, raising and lowering. 

After an hour of trying to image, the sun clouded over at about 0900. So I am taking a break. Then I found other things to do rather than spend the day waiting endlessly for the sun to clear. I had a go at clearing the observatory floor of tools and junk. I am still thinking furiously about a far more serious screen. That would mean finding space for a keyboard too.

Even on a 4" high box the 15.6" laptop screen is still too small for comfort. It is forcing me to hunch over it while wearing much stronger reading glasses. [+1.5] My main problem is legibility of tiny script. Back indoors I can sit well back and relaxed while using my 28" screen with much weaker glasses. [+1] This makes a huge difference in comfort.

I do have a very old, Philips 24" screen but it only has a serial port. What is really preventing me from using it was the major upgrade when I bought the Samsung 28." The picture quality difference was really obvious.

The laptop presently sits on a shelf mounted on the pier. Not ideal to avoid vibration after going to so much trouble to build a completely isolated, 14' high pier. I can literally jump up and down on the obs. floor without a high magnification image visibly trembling on the laptop screen. This is with a solar image probably 3' across if it were all visible. Instead of just a small chunk in the SharpCap capture window. Normally I only have to press the start recording button but even that may still set up vibrations. Once started I can't safely touch the keyboard again until the capture sequence is over.

My next dilemma is about using a mobile computer trolley instead. There isn't a lot of floor space around the huge pier. If I build a trolley I might want a bigger screen instead of "just" a 24". I would then sit facing east or west rather than always south on the pier. Which means I'll need improved screen shading during solar imaging. Though this could be considerably improved if I paint the inside of the obs. dark.

The present, light coloured, untreated plywood walls scatter a lot of sunlight. Which greatly reduces screen contrast. A larger screen could still be fixed safely onto the pier, of course. But then the AWR paddle needs space for typing. And, a wireless mouse. And a keyboard. And a mouse mat. And somewhere for a notepad. And somewhere to safely put down a camera or eyepiece! And, and, and.

Then there's my clear, plastic, accessory storage containers with their white, snap-on lids! A poor colour choice, in retrospect, but they were dirt cheap in a supermarket special offer. At night they are easy to find by red light but very awkward to open without having my lap or a firm surface to work on. Great protection for the stored equipment but not without its own drawbacks.
 
Sunday: Early sunshine was soon hidden by a solid overcast. Possible sunny periods? I'm not holding my breath!


*

Counterbalanced trapdoor Pt.4.

 *

I'm going with pulleys and ropes. After an hour of searching online I finally found 100mm [4"] replacement, nylon pulleys for discontinued fitness machines. Absolute peanuts [£2 each] from a large discount chain here in Denmark. Duly ordered. I'll try using the white rope first and only change to steel stranded cable if it proves necessary. I shall notch and nicely radius the trapdoor edges to ensure there are no repeated bending stresses on the rope. I am assuming that low friction is good until proven otherwise.

Once I have the pulleys fixed I can fine tune the weights needed to lighten the trapdoor load. Until now it always meant going down on one knee to stretch to the far end of the trapdoor deep inside the "kennel" cutout in the huge, timber pier. Then to heave up on the massive, solid larch trapdoor. Lowering it again always meant avoiding getting my fingers trapped by the supporting toggles. Merely adding to the misery.

I can't believe I am finally going to do something serious about this heavy lifting problem. It should absolutely transform the safety and ease of use of the observatory. It was so heavy and awkward I would always avoid lowering the trapdoor. Even when I was hanging over the open void to look through the eyepiece! I could have moved the toggles forwards by two inches. To allow a slight trim in weight, but it would have meant major surgery on the obs. floor joists.There was no clearance from the isolated, pier timbers unless I literally moved the floor joists.

I quite like the look of the doors now they are grooved on the insides. [Despite the ugly patches from not having enough material] So I might get some more plywood and cover the inside of the observatory walls. The B-side of the ply was never meant to be seen but would eventually have been painted black. A slight problem is the height of the obs. walls is greater than half a sheet. Though I could use up my small reserve of larch as skirting boards to conceal the shortage on height.

This afternoon I tried setting up an external ladder to simulate how it might look and work. It would certainly be possible but there are too many downsides. Frozen treads, handrails and veranda crusted with snow in winter is but one example. Cats and vermin climbing up to the veranda is another. Birds perching and crapping on the ladder. An open invitation to two legged vermin would not be not the least of my worries. It is far better to have the inside stepladders kept constantly dry and safe to use. Access only available through the secure main doors. With added security features I shan't mention here.

*

2.8.19

Counterbalancing the trapdoor. Pt.3.

 *

Friday: I measured the load required to lift the trapdoor at half way along its length. Minimum of 13kg but actual lifting is not required. Just enough force to make the job of opening and closing the trapdoor fairly effortless. Cables or ropes would run inside the stepladder's handrails to avoid obstructions when climbing the ladder. I certainly don't want t trip wires near floor level! Grooved pulleys can be fitted to the the insides of the handrail extensions.

After passing over the pulleys the cables or ropes would drop through small holes in the floor beyond the top tread of the ladder.  Weights will hang just above the ground/floor of the obs. building to reduce the risk of damage from falling. Downside is that the trapdoor can't travel beyond the pulleys.

See image right for a quick mock-up. The crossbar would be replaced by individual 4" pulleys fixed near the tops of the handrail extensions. I have arranged the ropes to put the weights up high with the trapdoor down. These temporary weights just reached the floor when the trapdoor was fully raised. They aren't heavy enough to lighten the trapdoor properly and the real ones would rise and fall out of sight down near the floor in the lower building. This area is under the stepladder so no foot traffic is possible.

A simple hole in the obs. floor will suffice to let each rope pass unhindered. There is no need for a slot where a rope runs over a pulley to fall vertically under the tension of a weight.

Weights and levers might still be preferable but difficult to arrange. This is due to the angle which has to be covered from trapdoor flat [closed] to beyond upright. Approximately 0-107 degrees at present. I am using sliding door bolts to secure the heavy trapdoor from falling back down again.Though in practice the trapdoor is leaning well past the vertical when open. Once counterbalanced there should be no risk of the trapdoor falling accidentally.


Click on any image for an enlargement.

*

1.8.19

Wednesday: New veranda doors continued 2.


Wednesday: I shortened the trapdoor by a couple of inches to move the hinges nearer the pier. Which meant that the floor boards needed to be extended to throw water well outside the door area. So I cut all new boards from larch for the area where the trapdoor lays flat when open. I undercut these new boards on the sliding miter saw. So they sloped downwards and outwards to drain through the slot between the boards of the veranda floor. Now I shall have to make some rain bars for the outside, bottoms of the doors.

 I have struggled with the tightly fitting, warped doors for so long that it will take some practice to deal with the freely swinging doors. Replacing the handles on the inside would be sensible. I'm still thinking over what would be most useful and where. When the trapdoor is standing [fixed] and nearly vertical it blocks easy access to the doors and any door furniture.

The larch trapdoor is heavy so I want to minimize handling. I keep thinking back to an earlier idea of counterbalancing via weights and levers or cables. It wants to be effortless, foolproof and simple with zero friction.  There may be times when I want the veranda doors open to scavenge heat build-up out through the slit using the prevailing, W-SW winds.

When the trapdoor is opened out flat it stops the veranda doors from closing. It would be so tempting to have the big stepladder outside with access only though the veranda doors. The problem then becomes security of access in all weathers and while carrying loads. The weight of the trapdoor presently sets up a mental hurdle.

The big hole in the observatory floor is an obvious danger when I am using the obs. in the dark. Though it is often the case that the telescopes are hanging over the void when I am solar observing in the morning. Counterbalancing the trapdoor is the obvious way to go. Then I need no longer resist closing it for safety through sheer laziness.

Thursday: I smoothed the floorboards into a slight step and fitted an inner door stop of aluminium angle. Once I had a fixed reference for both doors, I could re-fit all the sliding door bolts. The doors actually open on demand.


*