*
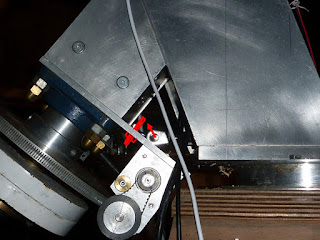
Sunday 15th. Quite a sunny day but rather windy from the S-SE. Making imaging completely impossible.And finally, I measured from the bottom of the PA shaft to a normal dropped
from the PA altitude pivot. Then from the pivot to a normal dropped from
the mounting's C of G. This suggested a 3.3:1 advantage in favour of the bottom
of the PA shaft.
Adding 10kg of weights to the bottom of the PA shaft reduced the downward load at the C of G of the complete mounting + 'scopes by 33kg.
After carefully releasing the PA
altitude pivot nuts I found a much more comfortable balance. Previous
to my adding the weights to the PA the focuser end of the 6" wanted to
rise sharply and needed to be carefully controlled. This is a massive mounting and it needs great respect when making alterations.
Now I have replaced the cheap fencing turnbuckle with the much longer, stainless steel one. A U-bolt was fixed low down inside the support fork's front stiffening plate. A further U-bolt will be clamped through the 10mm thick, RA motor plate tomorrow. It just needs two holes to be drilled at the correct spacing. Job done!
It may be that the PA weights aren't needed with the better quality turnbuckle. This lengthy discussion was all about the difficulty of altering the PA altitude minutely.
I
am constantly monitoring the tracking in SharpCap as I wait to capture
videos in still moments or between racing cloud. I am normally using several meters of effective focal length. With the
old turnbuckle I would often overshoot the tiny, required change in PA altitude. The
tracking error would simply reverse. Which was very frustrating! With a shorter focal length and lower screen magnification the error would be completely insignificant. Lwet's not complain. I chose to do solar close-ups. With all that entails.
But, it gets worse: I also use considerable enlargement of the active image box in SharpCap. Further aided by the large, 27" PC monitor screen hanging form the huge pier. No doubt I am seeing the effective focal length of several more meters while using the WO 2x and 2.6x GPCs on the camera nose/snout.
Assuming the 2x WO Barlow is the true magnification, then this makes the telescope focal length 3000mm. Then there is the 5.6x crop factor of the small 1/1.2" sensor size in the ZWO ASI-174MM mono camera. That is the equivalent of roughly 17m effective focal length if I were using a full frame camera.
It all adds up to a solar [or lunar] disk
several feet across on the monitor. If only I could see all of it at
once. What I can see is every little tremor and any unwanted drift of the image
on the SharpCap crosshairs. I am sitting comfortably in the near perfect conditions of a blackened dome interior. With my high quality, low reflection, high resolution, AOC monitor screen facing north, I have a perfect view! I even wear black clothing while imaging to ensure there are never any reflections to spoil that view.
Probably none of this "messing about" would be necessary if I had £10-20+k to burn on a high end equatorial mounting. Would it be as much fun to be using such a commercial mounting? I really don't know. Pride in ownership? How long would that last? Where would I need to draw the line to get the same load capacity as I have now?
They may claim larger PAs than mine, but my axes are much longer and solid, 50mm stainless steel. Which means I can hardly lift and carry my massive shafts individually. While they can carry their complete and costly mounting outside to image on the drive. I have a 7" diameter disk spreading the loads into the Dec bearing housing. It is solid metal and 4" in diameter at the junction with the massive H-channel section cradle. The huge self-aligning ball bearings are mouted in solid cast iron flanges. The housings themselves far stiffer than any casting. All thanks to 10mm thick plate and multiple, tensioned steel compression devices in all planes.
Tracking error is another game altogether. With fantastic results claimed for the high end mountings. Usefully aided and abetted with software enhancement. Though I can use SharpCap's "experimental" auto-guiding when the conditions allow. I can't imagine it was ever intended for so many meters of focal length, in low contrast, H-alpha, solar imaging.
The posh mounting's Goto ability is listed as 30" of arc. While my [near] perfectly aligned, fixed mounting, using ASCOM[AWR] can't find the sun within 10 degrees. Not even when it is Synced on the parking position before setting off just a few degrees away in summer. The mounting never moves because it is permanently housed. So how can it get so badly lost?
If I ended up with a round telescope shadow on the observatory wall, after a Goto slew, I'd probably think something was badly broken! It has never found the sun [nor the moon] in all the time I have been using it. Posh mountings can be taken outside, plonked down and find the sky all by themselves. That's probably what you pay for.
Mine is mostly scrap or secondhand metal and looks it. Cosmetic issues aren't really unimportant to me. [Within reason] The smart mountings have to be perfectly finished to warrant the incredibly high asking price. You can buy whole houses, with large gardens, for the price of some of these upmarket mountings.

No comments:
Post a Comment