*
29th 58-62F. Heavy overcast and early rain. It eventually dried to just overcast.
A secondary requirement is some means of manually rotating the dome. There are no conventional ribs on my GRP donor dome. So triangulating braces could easily become dome pushing and pulling handles.
The image shows the basic idea. A single ring of bolts would be required at the tops of the braces. The brace works in compression. Which is not ideal with strip metal. It would require a heavier section than braces in tension. Flattened ends on round metal tubing would be ideal. Comfortable to the touch and nicely stiff. I wonder if there are any existing devices like this?
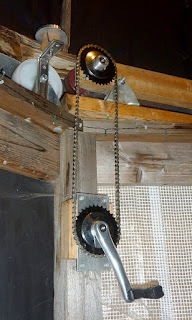
Not obviously from trying a few search terms. The big shed DIY stores have inexpensive shelf brackets. Which have a profile similar to the stainless steel version I have used. They claim 65kg load capacity. The flat, U-profile would allow for a single 10mm bolt to be used. This would not provide handles. But these can be arranged independently if it was worthwhile after initial rotation tests.Whether the heavy dome is able to be pushed by hand is quite another matter. I shall be reinstating my friction roller, cranked drive. Which made rotation of the plywood dome so effortless. Not to mention rotation in either direction. At any speed desired and with instant acceleration. No electrical power required and not a single electronic component. I soon arranged the present crank within easy arm's reach of my imaging desk and chair. The crank handle needed only to be given a gentle push. For the dome to move forwards to follow the sun. Manually rotating the dome, by pushing on the ribs, was very hard work! So the chain and crank drive was a vital addition. One which saved the plywood dome from rapid obsolescence. Or even complete abandonment! I made a short video when the dome drive crank was in the south east of the dome at head height. I soon realised that it would be much easier [and safer to use] if it were lower down and closer to the imaging computer desk. A simple matter of moving the four fixing screws to another timber post.
Later, I used a matching pair of chain wheels and cranks to lower the drive crank to seated, shoulder height. A projecting, black handle at head height in a dome after dark was just asking for trouble. It now occurs to one that I should change the present handle to a plastic ball. These are readily available and would be more comfortable to handle. I used a plastic bicycle pedal with the treads sawn off. To leave just the tubular spindle cover with its bearings.
The image shows the spare material from the dome roof panel after cutting out the shutters. It has been propped to cover the open triangle beside the original, arched doorway. The facets would run nicely if the panel was placed slightly further back.
Which it will do when fixed in the same plane as the dome and blended in. Though I have no plans to trim the panel until much later in the build.The panel formed by the slit cut-out remains as spare material. Which will be used for closing off the other, open triangle.
It reached 62F, though still grey in the afternoon. So I fibre-glassed the remaining slit rib to the dome. Despite adding slightly extra hardener it was too cold. The resin didn't go sticky. The CSM stated lifting on the last bit. After struggling for half an hour to stick it back down I finally stripped that section off. The heat gun had no effect. Fortunately, the next few days should be sunny and warmer. I should have been more patient! Despite decades of GRP projects I have never had this problem before.
*


No comments:
Post a Comment