30.11.20

30.11.2020 Mounting worm housing details.

 *

Monday 30th Nov. 36F all day with heavy overcast. Grey, becoming breezy with wintry showers in the late afternoon.

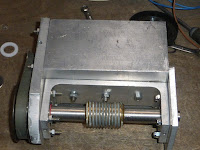
A couple of images showing the complete mounting and detailed construction of the RA worm and motor housing.

The mounting was photographed by artificial LED light.


The L-profile reinforces the box section but also presses against the end of the stepper motor inside the box. Hopefully providing another level of stability for the housing. I suppose I could add many more bolts to hold these parts more firmly together.

The sturdy cross sections should help reduce flexure but seem not to in practice. Note how little clearance there is for the motor inside the alloy, box section profile. I have never noticed any heat from the motors.


 The motor and worm housing seen from the power socket side. The large slot was necessary to allow the motor power socket to slide into the box section. Potentially weakening the box profile's stiffness.

The original channel section worm housing has been considerably strengthened by the added material. Yet still seems to be prone to flexure.
 
I have ordered some angular contact bearings in the original Beacon Hill size of deep groove bearings. 12x28x8mm. Snail mail delivery from the UK. So it could take some time. These should be a straight swap for the old bearings. Though I will need to apply some end loading to benefit from the change. 

Angular contact bearings have a shoulder against which the balls roll to provide much better resistance to linear [axial] loads. While still accepting radial loads.They are similar to bicycle wheel bearings in this respect.

It has occurred to me that I could have kept the original ball bearings. Then applied single row, thrust bearings to the larger diameter of the worm shaft. Previously I had been thinking only about external bearings. For which there was absolutely no room on the drive side.

Once I have a working set-up I could swap the rather mixed screws with the correct length of stainless steel, socket head screws for neatness.

It seems the missing ingredient for my mounting is/are flexible, blade type hinges. Thin metal is sandwiched between suitable plates. [Long bevelled strips.] To restrain bending to only the very narrow, exposed strip. Said strip being all but impervious to flexure in any other plane than perpendicular to the required worm movement. A sort of triangulation by "skin effect." The sheet metal cannot bend in its own plane provided it remains essentially flat. Much like a structure can be covered in sheet material to stiffen it. 

Even doped canvas has a remarkable effect on seemingly flimsy aircraft structures.  Slight hinge movement, perpendicular to the hinge [blade] is all that is needed to achieve efficient meshing. No twist means no backlash. Ideally the "flexor" hinge needs to be close enough to the worm housing to avoid any [series] flexure in its support. Though closeness of the hinge is not vital provided the support structure is stiff enough.


 *

28.11.20

28th, 29th & 30th.11.2020 Videos of RA worm housing flexure.

 *

Saturday. 31F. Overnight white frost but calm. 

A misty and cloudy day offered the chance to capture some videos of the RA worm housing flexure. 

I should have remembered to format the camera card first. There are over 2500 images on there. Which all have to be waited for despite having already been downloaded onto my PC. I took 500 images yesterday so that means more waiting.

Both videos show that not only does the worm have free play in its bearings but the housing are flexing slightly.

I can easily add some washers to take up the end play in the worm bearings.


November 29th. Another cool and overcast day. New videos after dismantling and rebuilding the RA worm housing. I used a temporary fibre washer to take up the slack between the worm bearings. Considering getting some angular contact bearings to replace the original deep groove type. Though it might be sensible replace the whole worm support system. Wheel clearance remains and issue if I decide to go with larger OD bearings.


 *

27.11.20

27.11.2020 Sun and moon.

 *

Friday 27th. Overnight frost followed by pretty, low lying mist. 

10.30 40/38F Clear with bright sunshine. D-ERF and objective misted over. Set dew bands going and used hair drier. Can't reach the back of the objective.  I may need to make an access door in the main tube. Image still soft due to 4" mist spot on objective. 

Went over to White Light with the 90/11 Vixen and Lunt 1.25" with 2x GPC and Baader Solar Continuum filter. Some thermal image movement but better than H-a at the moment.

11.45 45/40F. The 150/10 had interstitial dew which is proving very slow to clear. One dew band at 80F at half way setting. Dew spot down to 25mm. The lead on one of the dew bands is hot to the touch! 94F inside the band! This is now at 1/4 setting. I think there must be a fault. The other band's lead is cold.

12.12 The seeing was so bad in H-alpha that I removed the GPC. Still too soft! Solar altitude 13.5°. The view on the monitor is so bad that I keep refocusing. Which makes it worse until I correct it.

Evening lunar imaging session: in poor seeing. Just like the sun, earlier in the day,  the image was soft and simmering.

I kept increasing the power of the GPC to see if anything changed. Of course it didn't. Making a soft image larger doesn't achieve anything.

There is just a hint of the central crater in Plato in some of the images.

I was obviously wasting my time expecting anything better this evening. So I packed up before 8.00 and prepared for dinner.


*

26.11.20

26.11.2020 RA wormwheel eccentricity

 *

I set up my digital dial gauge to measure the eccentricity of the 11" RA wormwheel. Having zeroed the dial gauge the maximum difference was only 0.02mm. The worm had been deliberately pulled away from its wheel to allow free movement in polar rotation. There was a lightly higher, dynamic reading during rotation which dropped back to a smaller reading when I deliberately paused. 

I was quite pleased with this small degree of eccentricity. It was far less than I had feared. The difference might even be the result of inaccuracy in my measurement technique. Or simply roughness on the wheel rim where I was measuring.

I was also able to measure a 0.02mm variation in the reading by applying heavy pressure to the Dec axis. To act as a lever when the telescope was pointing up at the Pole. Perhaps this variation could be reduced by pre-loading the axis flange bearings. If it was considered necessary. 

Unfortunately I was able to see flexure in the RA worm housing when I rocked the telescope in RA. This occurred after I had re-tightened the worm housing fixing bolts to the big 10mm support plate. The 5mm thick, tubular, box section, motor housings are obviously not adequate in stiffness without further reinforcement. There isn't much room for extra material so I will have to give this some thought.

The Moon was rising in the late afternoon. So I had a look with the binoviewers at various powers and then captured a couple of videos. Mars was just above but too "colourful" to be worth imaging when it was that low. The seeing was simmering fiercely. So I was surprised to have captured a hint of the central crater in Plato.


18.10 These images are hardly worth sharing really. Though it makes a change from solar. 

It might be worth leaving everything set up and coming out later when the moon is much higher. The seeing might have improved by then.

19.30 Went back out as the moon reached 35° but the seeing was still "boiling." Results were even worse than earlier. It almost immediately clouded over so there was no excuse to continue.


*


26.11.2020 AR2785 & 6

 *

Thursday 26th 50/46F, early cloud clearing to sunny periods. Fast moving cloud from the west. 

AR2786 is spectacular. With 2785 dwarfed and almost insignificant. 

11.20 Promising but needs the etalon re-tuning to even out the lighting. Too much thermal boiling to allow the 2x GPC.


11.35 53/46F Still low cloud drifting across the sun.

Changed to 2x GPC as the seeing steadied a little. A narrow bridge is extending southwards across AR2786.


11.44 The bridge appears forked.


Sun only at 13° altitude. The image on the monitor is boiling and going in and out of focus.


12.13  Struggling to keep the forked light bridge visible without losing detail in surroundings.


12.24 White light image. Rotated to correct inverted orientation.

The new PSU has reach 63F in the airflow with the fan running.


*

25.11.20

25.11.2020 WL image of new spots. AR2785 & 2786.

 *

Wednesday 25th Afternoon start after connecting up new PSU and fuse box. After an hour the temperature measured by the probe inside the case had risen to 60F from 40F.

14.18 45/42F Thin cloud and white glare. WL image using 90mm Vixen f/11 and Lunt 1.25" wedge, no GPC. Had to rotate, flip and crop the image to achieve correct orientation. Surprising detail given the haste, cloud and poor seeing!

One capture and then more cloud slid across the sun. Not even a shadow on the dome now.


14.42 Slightly better. Orientation corrected at the camera. 1.6x GPC.

Nice big spot!


Same image but with extra sharpening in ImPPG.


And with added false colour.


*

24.11.20

24.11.2020 MW PSU containment.

 *

Tuesday 24th. A grey, overcast day with a hint of rain in the air. The proper rain!

The "posh" IP44 plastic box. Which I had ordered two weeks ago. Proved to be a few millimetres short for the new PSU. I would have had to modify the box far too much to take the PSU. 

So I looked elsewhere and immediately found a transparent, snap-on lid, sandwich box which fitted the PSU perfectly. 

The opaque, white lid is a better material to make a hole for the 40mm cooling fan. Which would go inside without interfering with the PSU's perforated cage. 

I found a piece of 5mm scrap aluminium plate. Which was the perfect fit to go under the PSU base plate as a heat sink. While neatly holding the PSU clear of the plastic box base. This will provide a wide channel to hide the necessary cables neatly out of sight.

I'm now juggling with different ideas to maintain waterproofing of the PSU in unexpected rain. Any holes I make for ventilation might let rainwater into the box. The cables can enter at the bottom of the box base. When the box is mounted on the steep slope of the pyramidal pier. Perhaps these holes will provide a rain-sheltered exit for the airflow from the fan?

How best to shelter the fan hole from unexpected showers?  Logically it should be in the base and "underneath" when on the sloping surface. Then any moisture will not enter. Thought that would required stand-off feet on the bottom of the box to allow air to enter the fan. An "eyebrow" shield would divert moisture away from the fan.

The lid can only be peeled off the base by lifting a tab on one corner. Trying to pull the lid [or base] straight off the other half is almost impossible. Which strongly suggests the lid should be outwards when the box is mounted. Which is a bit of a shame. Because it would be nice to see the PSU through the clear base. 

Perhaps the lid can be mounted on the pier on rubber feet or spacers. With the PSU screwed to the lid of the box over the heat sink plate. The clear box base can then attached, as a lid, to provide full
protection.

While leaving the lid's corner tab accessible and still flexible enough, to allow a finger nail to press downwards. For when removal of the clear cover is required. While still maintaining the security of the clear box to avoid shock from probing fingers or tools. Or contact with the bare mains terminals. The clear lid will also allow the fan to be monitored for rotation without physical contact.

The images show the result of a couple of hour's practice after talking it to death on my blog. The fan hole was 38mm and cut with a hole saw. 

I used stainless steel Nyloc nuts on the fixing screws to ensure the fan won't vibrate loose. I still need to make cable holes and exit holes for the exhaust air pushed out by the fan.

The last image shows the smart little 6-way fuse box. Though I'm not sure I will fix it onto the PSU enclosure. Perhaps on a plate carrying both items. That will make it easy to hang both of them from the pier via a screw through a simple keyhole.

I'd like some rubber feet to provide enough stand-off to allow free air flow through the base holes. I have the "sandwich box" lying on its side for now. It badly needs the drive electronics resited. They are sitting on the L-branch of the desk as a temporary support for the laptop. Neither arrangement is ideal. 

The AWR drive boxes are physically restrained together and apart by all the cables. The whole set-up gets in the way of the telescope when I do a meridian flip too soon after lunch. With the camera barely scraping the bare desk top I have to "steer" it around the laptop and drives on the paddle. Or there would be a collision. 

*


22.11.20

22.11.2020

 *

Sunday 22nd 48/45F. Clear and bright start but became cloudy with a shower the moment I was set up!

I set the dew bands on half way and No2 reached 79F. No2 reached 75F. The objective is showing a central, 3" diameter dew spot. That explains the very poor images.

11.07 Cloud cleared to remain very milky around the low sun. Still very poor transparency. Sun's altitude only 13°!  The processed H-a image looks more like white light! 

One problem with the D-ERF is that it blocks the sun's heat which might aid dew clearance. There is poor contact with the objective cell because of the D-ERF cell. Which has three huge tightening knobs. The dew band would probably need to be lashed into place to maintain contact with the objective cell.

11.35 A blast of the hair drier helped to clear the misty spot. I have to be careful not to expose the optics to unfiltered sunlight. The later filters help but are not a D-ERF. Still no improvement in image quality. 

I could make a soft muff to go around the D-ERF and objective cell. By enclosing the dew bands it would help to contain the heat and concentrate it where it matters.   

11.41 51/47F There is a dark, petal shaped loop above the spot. I am seeing Newton's Rings on this cropped and enlarged image.

11.50 Still a small spot of mist on the objective. I tried the 2x Orion Shorty Barlow instead of the GPCs. The magnification shot up! The GPCs are intended for the nose of a binoviewer. So the powers quoted 1.6x, 2x and 2.6x are strictly for that position. On the snout of the ZWO camera they are absolute weaklings! Unfortunately the seeing won't support the 2x Barlow. It is a fuzzy mess! 
 

12.00 Swapped back to the 2.6x GPC and spotted a spot on the SE limb. Awful seeing but umbra and penumbra visible!

12.37 53/47F Become very windy. Cropped and enlarged. 2x GPC.

The seeing is boiling furiously now after a steadier morning.


*

20.11.20

20.11.2020 Foggy dew!

 *

Friday 20th 0930 34F, clear sky with bright sunshine after a light frost. The neighbour's tree shadows on the dome are only now moving away. 

10.00 37/36F Everything is fogged up! I have cleared the D-ERF with the hair drier. The rest is a matter of patience and the dew bands.

A spot is just visible in the SE quadrant through the misted filters. The total draw on the new PSU is now 4.5A. 3 dew bands plus AWR drives. The optical mist is slowly clearing to show surface detail. The back of the D-ERF is fogged. I'll give the dew bands a chance before dismantling it.

10.20 Despite a 3/4 turn on the control knobs there is very little heat so far! The objective is misted on all flour surfaces! The second dew band is warming now. 77F. This is on the main tube just behind the objective cell. 

10.30 The misted optics are still spoiling the image. A 3/4 circle of the objective aperture is opaque. 

11.00 42/38F. Objective still misted up but the circles are shrinking. The dew bands have stopped working properly. I'm using the sensor on the Indoor/Outdoor digital thermometer and the reading has dropped right back to 62F. Still drawing 4.5A. 

I became ill and had to abandon today's imaging session.


*

19.11.20

19.11.2020 Increasing the stiffness of the mounting and motor/worm housings.

*

Next I need to provide adjustable resistance to the applied end loads on the worm housing. I am trying to find a way to stiffen the resulting structure in all planes. Pivots are localised resistance with high local loads. Which usually means unwanted flexure. How to spread the loads to become a solid mass or geometrically stiff arrangement with all the resistance, thus afforded? 

For example: A hinge can be replaced, or reinforced, by a flexible sheet of material. A flat sheet is extremely resistant to distortion in its own plane. Much less so, perpendicular to the deliberately flexible sheet. How to constrain such flexible "hinges" so that they do not twist at right angles to the resistance provided? While still delivering the desired compliance?

Spacing can be used to stiffen an assembly where it replaces a short but solid arrangement. The so-called moment of the structure can be increased dramatically. Much like improving the depth of a beam raises stiffness out of all proportion to increasing its width. Though the resulting beam must be restrained from twisting itself into the weaker plane. Cross bracing or "egg box" construction are popular.

A mounting can use well spaced bearings of less demanding quality. Rather than oversized, high quality bearings in a short but stiff arrangement. Opposed, taper roller bearings in a short housing have inherent resistance to flexure. A compact and lighter design is possible at the expense of demanding much greater precision and expensive bearings. 

The much longer, "low tech" arrangement of spaced bearings is bulky and the supporting structure potentially flexible. The beam between the bearings must be very stiff. Many older [now antique] mountings on professional refractors used widely spaced bearings and cast iron housings. Even in smaller apertures the design philosophy holds true amongst professional telescope builders. Naturally the sheer size weight and bulk made them automatically needy of observatory protection. Those who could afford these costly mountings and refractors could afford the protection they demanded.

The modern amateur astronomer makes no such concessions and demands the utmost portability. Literally at any price! Observatories are expensive and static and are often subject to light pollution. So amateurs work outside their homes and house the high tech gear indoors. Or in the garage. Or take to the darkness of the countryside. Which sets a severe limit on what can be easily lifted. Upmarket mountings provide the wealthy amateur with the goods. Often at a total cost of buying a house in some markets.

I have a protective observatory and lifting aids like winches and pulleys. My low tech mounting must overcome flexure, where possible, but I have no absolute need lightness and compactness. Though I'd prefer both if they were free of other major handicaps. Like being hideously expensive!

Back in my youth I constantly read the ATM series of three volumes. Where amateur astronomers cast concrete mountings. Or welded up massively heavy constructions.This is almost unheard of today but must have provided stability and stiffness which only a few wealthy amateurs can dream of. 

My mounting axes, bearing housings are self reinforcing through box section, assembled 10mm plates. The heavy threaded rods which clamp the flange bearings to each end are heavily tensioned to provide immovable resistance. Multiple cross studs clamp the plates rigidly together and lean on the larger rods for added stiffness. The 20mm thick PA support fork tines are clamped either side of the PA bearing housing with a 16mm through stud for extra stiffness. 

Then I dangle the drive motor housings from 10mm thick plate clamped under the same, rigid bearing flanges. So far so good. 

Or is it? The flimsy, worm/motor housings are held on by a couple of relatively tiny screws. These screws pass through 6mm box sections of aluminium. Does not compute!! Fail! Must try harder! 

The linear "hinge" movement of the worms relative to the wormwheels is minute. What about using rubber bushes bonded into metal tubes like car engine mountings? Adjustable screws can provide the limiting restraints on total worm movement relative to the wheel teeth.

I decided to drill new holes in the motor housings spaced well apart. Then I dropped tiny O-rings over the fixing bolts and sandwiched them between the support plate and the motor housings. The noise from the motors dropped remarkably and there was no more backlash. I can adjust the worm/wheel mesh by tightening the relevant fixing bolts.

*


18.11.20

18.11.2020 Worm housing reinforcement.

 *

Wednesday 18th. Wind, heavy cloud and possible rain.  

I now realise that my worm support is totally inadequate to the loads being placed on them. The long refractors have such a moment that they suffer from serious lag and overshoot when asked to move to drive and guiding commands. 

Refractors have very heavy objectives in their metal cells placed on the very end of the tube. This has to be balanced at the other end by the focuser and any additional viewing or camera equipment. Which effectively doubles the moment of the objective alone.

I'll need to study my scrap aluminium collection carefully for suitable materials to beef up the worm housings. At present the drive motors are housed in 6mm thick, box section tubes. With the original Beacon Hill worm housings [simple channel offcuts] bolted to the tops of these square tubes. 

I had reinforced these housings with sturdy, motor mounting plates and bearing retaining screws. Thinking I had flexure covered. I obviously hadn't. The drive mounting plates are substantial 10mm aluminium plate trapped by the flange bearings. Quite a  good base but the rest is obviously not up to the task. 

After studying my metal stock I chose some 6mm angle profile. I made it fit snugly inside the motor box section with the inner end pressed against the stepper motor base. The other [upright] leg of the angle is now bolted to the worm housing.This provided the missing reinforcement of the free end of the worm housing. The profile's "leg" inside the box stiffens both the box section and the end and underside of the worm housing. 

Parallel and mutual reinforcement using the same principles as the rest of my mounting. I have no castings. So must use multiple means to achieve the same stiffness from flat plates. A cast, box section is inherently stiff. Assembled plates of the same thickness are not. Not unless they are welded or bonded together. So I must use clamping forces in as many planes as possible. Using the screwed rods [studs or all-threads] themselves to self reinforce the box form. Tensioned rods are inherently far stiffer than a similar rod without.

I mounted the reinforced motor assembly loosely onto its supporting plate. It was easy to add an experimental push-off screw using an eye-bolt, two nuts and an angle bracket to resist the spring tension. The camera is tipped to match the PA altitude angle so the image actually looks upright instead of sloping.

*

17.11.20

17.11.2020 Testing the ASCOM[AWR] drives [again!]

 *

Tuesday 17th 53/50F. The 40mm cooling fans have arrived.

While I had the RA drive separated I counted the number of teeth on the timing belt pulleys.[Several times.]  I must have done this several times before in the past. In a desperate bid to discover why the Goto slews are so utterly hopeless. But no, they were to spec. 14:34T. 

The overall drive ratios seems to be okay too. 287/2 turns of the worm to slew from east to west The AWR factory build sheet shows 14/34T x 287T x 200 = 139400.  287 is the  number of teeth on both of the wormwheels. 200 is the number of motor pulses per rotation. 

I just checked the factory specs again on the AWR IH2 handset/paddle. 139400. Okay. It is correct on both axes. So that's not the problem.

I have now used the digital clinometer to set the OTAs horizontal. With the Dec axis pointing north. Which means the telescopes are pointing east and horizontal in their normal parking position. I'll try some slews from East to West using C-Du-C.  First I checked the balance of the OTA and around the PA with the worms withdrawn from their wormwheels. No problem.

I am avoiding using Home because it knows those coordinates. So I am sending the telescopes back and forth between stars, low in the east and west. Any errors should be cumulative.

Well, that was interesting. The telescopes stopped very time they passed the Meridian. With a bleep and message on the IH2 handset. Except that the telescopes were 45°from the meridian! The drive system has completely lost the sky while trundling back and forth in Declination only! ASCOM, AWR and Skycharts have all crashed. With the cursor well below the easterly horizon. Meanwhile the telescopes are pointing up at 45° in the west! 

Reset to Home manually and rebooted. Synced on E and Horizontal Parking Position. Set Pk.

Showing Meridian Crossed at 42° Altitude and 310° azimuth!! What utter nonsense! Skycharts showing the cursor in the western sector, high on a line between SE and NE! AWR IH2 now reports Below Horizon and will not continue the slew to a western star! From 42° altitude!

Observatory coordinates are correct in both C-Du-C/Skycharts and AWR. Time is correct. LST is correct. I'll send the telescopes to Home. [Parking.] The return to Home was fine. Correct coordinates. at 90°E & 1° altitude. Makes no sense that it doesn't know where the Meridian is.

13.00 Lunch time.


*


16.11.20

16.11.2020

 *

Monday 16th. Rain and gales! The postman came early, bringing new toys. I have a smart little fuse box and sweety bags of assorted, blade fuses. From 2A to 7.5A. These will protect my mounting and associated equipment from the new PSU. 12V at 12.5A.

A big, round, graduated bubble level is fun and was cheap and cheerful. There were no useful surfaces for a builder's level on the mounting.  So I will lay the round bubble level on the mounting base plate. This will allow me to quickly and easily check any change in level of the massive pier. 

Two 40mm cooling fans for the PSU are on their way and will also arrive today. [Delayed in transit] The plastic PSU case hasn't been dispatched yet. So that job is on hold.

I can drill and fit the U-bolt to the PA motor plate for the longer turnbuckle. It is probably best to remove the motor plate. Which is trapped by the lower, PA, flange bearing. That should be fun! I'll have to take the newly added weights off the wormwheel and spacers. Then undo the four 16mm nuts to allow the flange bearing to slide off. Only then can the motor plate be freed. 

I hope the weight of the instruments and their balancing counterweights will allow me to remove the lower flange bearing without a struggle. I may have to employ the pulleys to help relieve some of the top-heavy weight. 

Next time I should remove the telescopes! It was a real struggle to remove and replace the flange bearing and motor plate. Only when I relieved the pressure on all the fixing, including the latitude pivots, was I able to get the bearing on and off. Just as I intended when I designed it all in my head. Compression in all planes via the contacting studs. [All threads.] 

The new turnbuckle seems to work much better than the previous one but I shall still oil it. Helping to reduce friction even further. It did. I can now adjust the PA altitude more finely by hand strength alone. The old turnbuckle needed a lever to turn the body.

While I had the drive separated I counted the number of teeth on the timing belt pulleys.[Several times.]  I must have done this several times before in a desperate bid to discover why the Goto slews are so utterly hopeless. But no, they were to spec. 14:34T. The overall drive ratios seems to be okay too. The AWR factory build sheet shows 14/34T x 287T x 200 = 139400. 287 is the  number of teeth on both wormwheels. 200 is the number of motor pulses per rotation. I'll check the factory specs again on the AWR IH2 handset/paddle tomorrow. 139400. Okay. It is correct on both axes. So that's not the problem.


*


15.11.20

15.11.2020 And finally.. PA altitude adjuster Pt.3. Director's Cut.

 *

Sunday 15th. Quite a sunny day but rather windy from the S-SE. Making imaging completely impossible.

And finally, I measured from the bottom of the PA shaft to a normal dropped from the PA altitude pivot. Then from the pivot to a normal dropped from the mounting's C of G. This suggested a 3.3:1 advantage in favour of the bottom of the PA shaft. 

Adding 10kg of weights to the bottom of the PA shaft reduced the downward load at the C of G of the complete mounting + 'scopes by 33kg. 

After carefully releasing the PA altitude pivot nuts I found a much more comfortable balance. Previous to my adding the weights to the PA the focuser end of the 6" wanted to rise sharply and needed to be carefully controlled. This is a massive mounting and it needs great respect when making alterations.

Now I have replaced the cheap fencing turnbuckle with the much longer, stainless steel one. A U-bolt was fixed low down inside the support fork's front stiffening plate. A further U-bolt will be clamped through the 10mm thick, RA motor plate tomorrow. It just needs two holes to be drilled at the correct spacing. Job done! 

It may be that the PA weights aren't needed with the better quality turnbuckle. This lengthy discussion was all about the difficulty of altering the PA altitude minutely

I am constantly monitoring the tracking in SharpCap as I wait to capture videos in still moments or between racing cloud. I am normally using several meters of effective focal length. With the old turnbuckle I would often overshoot the tiny, required change in PA altitude. The tracking error would simply reverse. Which was very frustrating! With a shorter focal length and lower screen magnification the error would be completely insignificant. Lwet's not complain. I chose to do solar close-ups. With all that entails.

But, it gets worse: I also use considerable enlargement of the active image box in SharpCap. Further aided by the large, 27" PC monitor screen hanging form the huge pier. No doubt I am seeing the effective focal length of several more meters while using the WO 2x and 2.6x GPCs on the camera nose/snout. 

Assuming the 2x WO Barlow is the true magnification, then this makes the telescope focal length 3000mm. Then there is the 5.6x  crop factor of the small 1/1.2" sensor size in the ZWO ASI-174MM mono camera. That is the equivalent of roughly 17m effective focal length if I were using a full frame camera. 

It all adds up to a solar [or lunar] disk several feet across on the monitor. If only I could see all of it at once. What I can see is every little tremor and any unwanted drift of the image on the SharpCap crosshairs. I am sitting comfortably in the near perfect conditions of a blackened dome interior. With my high quality, low reflection, high resolution, AOC monitor screen facing north, I have a perfect view! I even wear black clothing while imaging to ensure there are never any reflections to spoil that view.

Probably none of this "messing about" would be necessary if I had £10-20+k to burn on a high end equatorial mounting. Would it be as much fun to be using such a commercial mounting? I really don't know. Pride in ownership? How long would that last?  Where would I need to draw the line to get the same load capacity as I have now? 

They may claim larger PAs than mine, but my axes are much longer and solid, 50mm stainless steel. Which means I can hardly lift and carry my massive shafts individually. While they can carry their complete and costly mounting outside to image on the drive. I have a 7" diameter disk spreading the loads into the Dec bearing housing. It is solid metal and 4" in diameter at the junction with the massive H-channel section cradle. The huge self-aligning ball bearings are mouted in solid cast iron flanges. The housings themselves far stiffer than any casting. All thanks to 10mm thick plate and multiple, tensioned steel compression devices in all planes.

Tracking error is another game altogether. With fantastic results claimed for the high end mountings. Usefully aided and abetted with software enhancement. Though I can use SharpCap's "experimental" auto-guiding when the conditions allow. I can't imagine it was ever intended for so many meters of focal length, in low contrast, H-alpha, solar imaging. 

The posh mounting's Goto ability is listed as 30" of arc. While my [near] perfectly aligned, fixed mounting, using ASCOM[AWR] can't find the sun within 10 degrees. Not even when it is Synced on the parking position before setting off just a few degrees away in summer. The mounting never moves because it is permanently housed. So how can it get so badly lost? 

If I ended up with a round telescope shadow on the observatory wall, after a Goto slew, I'd probably think something was badly broken! It has never found the sun [nor the moon] in all the time I have been using it. Posh mountings can be taken outside, plonked down and find the sky all by themselves. That's probably what you pay for. 

Mine is mostly scrap or secondhand metal and looks it. Cosmetic issues aren't really unimportant to me. [Within reason] The smart mountings have to be perfectly finished to warrant the incredibly high asking price. You can buy whole houses, with large gardens, for the price of some of these upmarket mountings.


 *

15.11.2020 PA altitude adjuster continued.

 *

Sunday 15th and another cloudy day. Though with lots of small, blue "teasers" in between the fluffy stuff.

9.30 51F and it is sunny but windy form the east! Blowing straight into the dome if I open up now.

After yesterday's struggle to remove the turnbuckle's U-bolts I discovered my proposed changes would not help. I would have to dismantle the entire mounting to add extension plates with all that entails.

The upper horizontal arrow shows the present position of the cheap, fencing turnbuckle. As can be seen it represents a smaller radius tangent than a longer turnbuckle fitted below. With a U-bolt fixed on the RA motor plate. 

Even then, I don't think I gain much in radius and the stainless steel turnbuckle is still too long. This needs more thought. I don't have any more 20mm scrap aluminium for new [support fork] side plates. 

Though I could move the pivot southwards to improve the overall balance of the pivoted mass. Though at the expense of moving the bulk of the the entire mass even further southwards. 

That could be fixed by moving the altaz hole in the base plate southwards too. Which would shift the whole mounting mass northwards. Though that means there is no room for the RA drive motor. Not unless I cut a huge chunk out of the pier! Not possible! 

Though I could rotate the RA motor mounting plate to the top or to one side. Being low down it was out of the way when I moved around south of the pier. It didn't catch on my bulky winter clothing. Pointing the motor plate to the east would be best. This would fill the gap where the laptop sits on the desk.

It's Catch 22 whatever I change. Including separating the mounting into units. Each is so heavy that it needs paired and lashed stepladders and the chain hoist! The pulleys could never cope and they might tear down the top of the dome along with the zenith board! Not worth the risk! I should only use the pulleys for changing telescopes. Dragging a pair of builders stepladders up to the dome is very hard work. Lifting the heavy chain hoist up to the top is even worse!

This all needs very serious thought before I do anything. Rotating the RA motor plate is relatively trivial. Drilling the support fork is only possible if it is free of any load to allow dismantling. The tines need to be stacked on the drill press table to ensure coincidence of the 16mm, drilled holes. Placing 10kg of weights on the bottom of the PA is far too little to help improve the balance.

A further idea would be to tilt the fork tines backwards [to the south] some more. This would move the C of G of the entire mounting. It would still need the fork to be free so that I can drill and tap new holes in the base of the tines. This would arguably be the best option. It shifts the perpendicular of C of G. While simultaneously moving the RA motor away from the pier. The contact faces would be much longer as well. 

Some drawings, overlaid on photos of the mounting, soon showed that the entire mass would overhang the base plate if I redrilled the support fork tines for the altitude pivot. Not clever! I would have to move the tines northwards to compensate. 


*


14.11.20

14.11.2020 Climb every mounting.

 *

Saturday 14th 10.45 48/47F. Early cloud clearing to watery sunshine. Thin cloud drifting slowly across the field of view. Causing a rise and fall in image brightness. The image is so dimmed that I'm not using a GPC. [Yet.]

I have an enclosure for the new PSU in the post. Plus a fuse box and multiple, blade fuses from 2-7.5A. Should all be here on Monday. These will provide a greater element of safety with the new and much more powerful PSU. 12.5A at 12V.

12.30. No useful images captured all morning. 

I examined the mounting. Looking at possible improvements and weaknesses. Having set the Dec housing horizontal I could check the balance point on the pier with a weighted loop. To my [slight] surprise I had placed the C of G very close to the centre of the large disk on which the mounting rests. There is a 16mm threaded rod holding the mounting onto the pier. This allows azimuth adjustment when required.

The C of G of the mounting and instruments falls perpendicularly from the centre of the Dec shaft where it lines up with the PA axis. The complete mounting's C of G cannot be more than 1-2 cm south of optimum. 

The disk itself is centrally placed on the pier top. So one could argue there is a very slight tendency for the pier to lean southwards over time if the concrete anchors on the south side should sink. These anchors were buried in well compacted self-compacting gravel. They haven't moved yet.

I have never had to adjust the pier "feet" height to bring the top of the pier back to the horizontal once achieved. Any error of level is still within a couple of millimetres. Given the pier's height [12' 10" or 3.93m] and the considerable weight resting on top, I think it can safely be judged successful. Though I should probably have arranged the pier to point north-south, east-west. As it is the mounting is skewed on the laminated top of the pier.

Provided no short circuits exist between the building and the pier it is well isolated against my heavy footfalls on the obs. floor as I clomp about in my huge, winter boots. 

The four, 100x100mm [4"x4"] timber pier legs rest on tapered concrete anchors with adjustable height, galvanized steel brackets clamping the timber firmly in place. The top of the pier above the obs floor is clad in 18mm plywood. I used thinner, 15mm ply cladding below the obs. floor.

The image shows a very early state of the pier legs standing inside the octagon framework before plywood cladding was fixed. The pier feet were pushed out to the inside edges of the octagon to provide a strong four sided, pyramidal form of maximum footprint. The builder's ladder shown here was soon replaced by a professional quality, warehouse stepladder with handrails. 

This stepladder has been a huge safety factor in my long term comfort and survival. The deep treads provide feedback to help me balance while constantly carrying stuff up and down. While I can rest my elbows on the handrails when I am carrying heavy loads with both hands. The hatch at the top of the ladder rises up to stop between the tops of the handrails. Allowing sliding, door bolts to quickly secure the hatch in the open position.

The pier's plywood sheeting was only extended downwards far enough to allow plenty of head clearance while standing on all four sides under the pier. This allowed free access to the outer area of the octagonal base of the building for timber storage. 

I literally climb the stepladder inside the pier to reach the observatory floor. Much as I did on the ladder shown.  I had to cut out a dog kennel shape to allow my head to rise unimpeded for the last few steps. Most days I climb up and down the stepladder at least a dozen times. There is always something to fetch. Usually tools. The obs. floor height is 2.64m above the concrete slabs laid on the ground floor.

13.10. Still, no clear sunshine. I have parked the telescope and am going in for lunch.

I spent the afternoon working on the mounting to find a better position for a longer turnbuckle. I wanted to re-use the existing, stainless steel U-bolts but they were fitted to the bearing housings. With the nuts deep inside. Which required a lot of work to remove several bearing housing plates to reach them.


13.11.20

13.11.2020

 *

Friday 13th. After days of leaden overcast we are promised some sunny periods this morning. Which. in practice meant a few brief seconds of brightness so far.

Image captured through cloud at 11.34.

10.30 49/47F Uniformly grey skies but I am set up and a waiting to centre the sun. The cloud is coming from the SW with a cool breeze increasing. Thin mist in the distance.

Meanwhile I am testing the heat bands on the new PSU while there is nothing to image. The diminutive "outdoor" sensor from a digital thermometer is handy for this. On half heat setting, on the AstroTech controller, these bands take a long time to warm up! 75F after ten minutes from 50F ambient in the dome.

Now I have rigged the Ammeter in the PSU circuit. It is drawing a steady 4A on two dew bands and the AWR drives. Restarted drives after meter connection: Now a steady 3.8A.

11.10 51/48F. Second dew band holding at 73F. Momentary brightness. Two spots visible. One on west limb and the other on the SE. Managed a couple of quick video captures of each without a GPC. Fitted the 2x GPC and waiting for closeups if the cloud ever clear again.  Blue overhead. Racing cloud over the sun! None of my captures were worth it so far. Just a mess of fuzz.

Switched off the second dew band. One band showing 3.5A with drives. Temperature dropped like a stone on the 1st band. It may not be working. Turned up the control knob. 3.6A but still only 66F. Turned it down to zero for 3.1A on the AWR drives alone.

11.33 & 1.34 52/49F First images processed. Detail lost through cloud. Still no blue sky over the sun yet. Cloud now coming from the south.

12.40 Constant cloud. Giving up.

13.00 The watery sunshine has been visible for most of the time I have been enjoying lunch. 


*

11.11.20

10.11.2020 New PSU for the drives and dew bands.


 *

Tuesday: Days of serial, heavy overcast continue.

My new Mean Well RS150-12, 12V, 12.5A, 150W PSU has arrived.

NOTE: This "industrial" PSU is designed to be encased for consumer safety. It would normally be hidden inside closed equipment requiring tools to be opened.

Things did not start well when I read the yellow notice to check the mains input voltage before switching on. With no label to suggest the voltage setting as supplied. Nor where the switch might be. The arrow actually points to it but I had no idea what I was supposed to be looking for at the time.

The online dealer would not answer queries from a private customer. Nor will I ever deal with them again. Except for possible guarantee issues.

Fortunately there were helpful souls online in the astro community who could help. There was quite a large, red, sliding switch just visible inside the perforated case. But only once I had the correct light, at the correct angle and I was wearing my strongest reading glasses. I also used a magnifying glass to help me focus through the perforated screen.

Once confirmed at 230V the first connection trial went well. My two Astrozap dew bands now worked normally via the AstroTech 4-way controller. Drawing much less current than I had expected given the short life of their recently purchased PSU. Only 1.7A with two knobs set at full on. This should not have caused premature failure of the replacement PSU with only half way settings.

Next came the AWR drives. Their original PSU had died prematurely too. The new, 5A replacement was getting warm. Now the drives worked and slewed normally once I had connected the shielded speaker plugs to the more robust PSU.

I shall have to return the month-old 5A PSU for a replacement or refund. It is always handy to have a replacement in case of further failures. They do seem to be prone to premature death. We have already had two failures of the fibre optics Internet PSU. One would assume they would choose quality over cheapness.

In the meantime I shall have to order a cooling fan and protective case for the new PSU. It is designed to be "embedded" [fully enclosed]  to protect users from shock on the bare, mains terminals. The manufacturers also ask for a metal plate mounting to act as a heat sink. I have several sizes of large, box profile aluminium sections. So I will see if anything suits the PSUs dimensions without being too bulky.

I have ordered a plastic case, with screw down lid, for the PSU and a near silent, 40mm cooling fan. I wanted basic weatherproofing and isolation from the live terminals. The aluminium box sections were so heavyweight they were total overkill. I would still need to seal the ends. 

So I searched online for properly sealed, electrical installation boxes instead. The small fan size will allow it to be mounted on the lower end of the box to avoid rainwater ingress when it is pier mounted. I should have room inside the box for an L-shaped heat sink plate for maximum area. Initial tests showed only 1°F increase over ambient on the perforated case. This was while running two dew heater bands and slewing continuously on the AWR paddle.


*
8.11.20

8.11.2020

 *

Sunday 8th 48/44F. Everything in the dome covered in dew. Dew heaters not working. Clear with bright sunshine. White sky towards the sun. Cleared the D-ERF of dew with the hairdrier. The HitechAstro dew heater controller is showing no red LEDs. 12V 5A PS measures only 5V DC on my DMM! I only used the dew heaters a couple of times at half way. 

Astrozap shows they draw a little over 1A per 6" [telescope aperture] band. Perhaps the PS hasn't enough "welly?" The Hitechastro unit is rated and fused at 6A max. The PS and cigar plug are both showing LEDs but not the 4-way control unit.

Seeing is steady and clear. [At last!]

11.08. Tried the 2.6x but it was too much. The thermal agitation has started already. [Internal?] So back to the 2x GPC.


11.11 51/46F 2x GPC.


11.29 Experimental 16 bit SER capture instead of AVI.

I usually save from ImPPG in 16 bit .Tiff. But capture in 8 bit Mono in SharpCap.


Something wasn't right.

12.23 I re-tuned the inaccessible etalon. Which I had rotated yesterday to null the off-axis brightness.


12.37 Another re-tune.


12.46 Still tuning.


12.46 with a bit of added colour.


14.35 A white light capture. Vixen 90mm f/10 with Lunt wedge and Baader Solar Continuum filter.  The 2x GPC on the nose of the 174 camera.


15.30 The sun is still visible but the seeing has gone bad. Overall it's been a good day though.


*