31.8.21

31.08.2021 Afternoon domeworks.

 *

Tuesday 31st August 70F Remaining sunny.

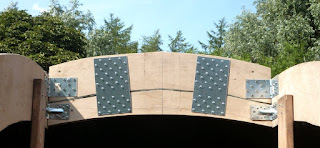
The package with the new shelf brackets has arrived. Interestingly [?] the [gentle] curvature of the dome affects the right angle. The base ring would be pressed down if the shelf brackets were bolted directly to the dome. 

Could this downward bias be used to my advantage? It might help to resist upward pressure from the rotation rollers. The alternative is packing washers to make the bracket fit the angle forced by the dome's curvature.

I was only able to order a maximum of fourteen brackets from the supplier. I need six of those for the new steering rollers. Which leaves only eight for the base ring. Think of a number. How many brackets do I need? The dome's circumference is about 11 meters where the dome skirt is not missing due to the arched doorway. Even one meter apart seems a bit mean.

15.00 70F. Fibre-glassing: The temperature is fine for glass fibre work.Though I want to halve the quantities of activated resin. A half litre of resin has gone off twice now during lay-up. A quarter of a litre is probably better. I just need to divide the hardener into four. Which I can do most easily by sharing a full bottle equally between four empty. 

First I divided the polyester resin into 1/4 litres in empty coffee jars. Then I found an old syringe to decant 3ml of hardener for the first jar.  Which was less than the recommended 2% hardener due to the day's warmth. 

This went well and it did not go off after 20 minutes. There was just enough resin to completely wet out one rib length of 300g/m² CSM. 

So I completed another layer on top of each rib. The brush went into a jar of acetone this time. Rather than discarding it to harden. I also recycled the same pair of rubber gloves.

17.58 [CET] Started imaging. The seeing is "boiling" again. Just as it did yesterday. It is supposed to settle down but hasn't.

18.20 The trees have already eclipsed my sun!


*

31.08.2021 Imaging AR2860

 *

Tuesday 31st 60F, bright sunshine, clear sky.

10.17 [CET] First image. Seeing conditions look different from yesterday. Much more thermally mobile. With a "greasy filter" effect.  I may need to retune the PST etalon.


10.26 Over-sharpened for detail but with blocky artefacts.


10.37 Using 1.6x GPC for larger ROI.

Exceeds PST etalon sweet spot. With brighter areas on the left.


10.47 Back to 2x GPC.


 10.53


 11.49 Tried the 2.6x GPC but the seeing is shaking too much. 

Back to the 2x but reduced the frame size form 912x912 to 800x800.


12.02 Tried with and without PhotoFiltre7. [ImPPG only.]


12.15 Cloud has arrived from the NE! 

12.21 Sudden steadiness.


 12.41 Getting shaky again.


13.00 The seeing has gone bad. Pause for lunch.


*

30.8.21

30.08.2021 AR2860 Worth the wait?

 *

Monday 30th 63F, overcast clearing to cloudy. Fast moving from the east. Which is very unusual. 

I shall wait until it is is warmer, this afternoon, to  do more fibre-glassing.

10.30 Set up for imaging but very cloudy. Long waits for clearances. I haven't had a chance to capture AR 2860.

10.40 Managed to get AR2860 on the screen briefly. The odd weather direction makes it impossible to monitor the cloud for clearances. 

10.47 First decent capture. 75/500 frames 912 x 912.


11.16 Still capturing when I can.

Lots of cloud coming from the NE.


12.40 Another capture. Note the changes between the different images.


Paused for lunch. Then more fibre-glassing of the slit rib. Still very cloudy.

15.30 66F. Back to imaging. Seeing high frequency agitated. Leading to blocky artefacts in ImPPG.

16.14  Seeing steadied a little: Flaring to the left of the most eastern major spot. Was visible growing "live" in mere seconds on the monitor.


16.22 And again. Flaring in the east.


16.28 A Bright arc in the centre. Looked like a beam in the live view.


17.33 Seeing steadied again. Transparency keeps changing.


 17.38 Complex light bridges over the spot's umbra.


 17.47 A winder view without the 2x GPC:  Only the 1.25x GPC just behind the etalon. To spread the sweet spot.


17.59 1.25x +1.6x GPC.


 18.00 The seeing has gone mushy and agitated as it nears the trees.


*

29.8.21

29.08.2021 Braces + handles.

 *

29th 58-62F. Heavy overcast and early rain. It eventually dried to just overcast.

I have been considering options for reinforcing the base ring against upwards movement. Most shelf brackets wont work because they use a multitude of small screws. I need something which uses single, 10mm bolts to match those on the rest of the dome. 

A secondary requirement is some means of manually rotating the dome. There are no conventional ribs on my GRP donor dome. So triangulating braces could easily become dome pushing and pulling handles. 

The image shows the basic idea. A single ring of bolts would be required at the tops of the braces. The brace works in compression. Which is not ideal with strip metal. It would require a heavier section than braces in tension. Flattened ends on round metal tubing would be ideal. Comfortable to the touch and nicely stiff. I wonder if there are any existing devices like this? 

Not obviously from trying a few search terms. The big shed DIY stores have inexpensive shelf brackets. Which have a profile similar to the stainless steel version I have used. They claim 65kg load capacity. The flat, U-profile would allow for a single 10mm bolt to be used. This would not provide handles. But these can be arranged independently if it was worthwhile after initial rotation tests.

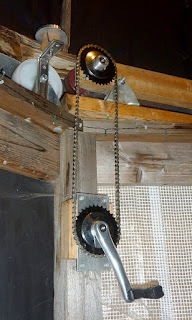
Whether the heavy dome is able to be pushed by hand is quite another matter. I shall be reinstating my friction roller, cranked drive. Which made rotation of the plywood dome so effortless. Not to mention rotation in either direction. At any speed desired and with instant acceleration. No electrical power required and not a single electronic component. 

I soon arranged the present crank within easy arm's reach of my imaging desk and chair. The crank handle needed only to be given a gentle push. For the dome to move forwards to follow the sun. 

Manually rotating the dome, by pushing on the ribs, was very hard work! So the chain and crank drive was a vital addition. One which saved the plywood dome from rapid obsolescence. Or even complete abandonment! 

I made a short video when the dome drive crank was in the south east of the dome at head height. I soon realised that it would be much easier [and safer to use] if it were lower down and closer to the imaging computer desk. A simple matter of moving the four fixing screws to another timber post. 

Later, I used a matching pair of chain wheels and cranks to lower the drive crank to seated, shoulder height. A projecting, black handle at head height in a dome after dark was just asking for trouble. It now occurs to one that I should change the present handle to a plastic ball. These are readily available and would be more comfortable to handle. I used a plastic bicycle pedal with the treads sawn off. To leave just the tubular spindle cover with its bearings.

 https://youtu.be/gyI3l5gpZNM


The image shows the spare material from the dome roof panel after cutting out the shutters. It has been propped to cover the open triangle beside the original, arched doorway. The facets would run nicely if the panel was placed slightly further back. 

Which it will do when fixed in the same plane as the dome and blended in. Though I have no plans to trim the panel until much later in the build.The panel formed by the slit cut-out remains as spare material. Which will be used for closing off the other, open triangle.

It reached 62F, though still grey in the afternoon. So I fibre-glassed the remaining slit rib to the dome. Despite adding slightly extra hardener it was too cold. The resin didn't go sticky. The CSM stated lifting on the last bit. After struggling for half an hour to stick it back down I finally stripped that section off. The heat gun had no effect. Fortunately, the next few days should be sunny and warmer. I should have been more patient! Despite decades of GRP projects I have never had this problem before.


*

28.8.21

28.08.2021 Double checking the numbers.

 *

Saturday afternoon: Continuing dark overcast and breezy at 60F. 

Still not in the mood to be making more sawdust.
So I physically checked all the diameters again:

The dome is 4.30m in diameter.
The base ring is 15cm wide. Twice 15cm = 30cm.
The distance between the inside edges of the base ring is 4m.
The centres of the base ring lie on a 4.15m Ø circle.
The building's 14 points also lie on a circle of 4.15m Ø.
Which is only 75mm from the dome wall.
80-90mm from the dome wall for the roller track is probably safer.
The rollers need to be moved inwards, away from the dome wall, for clearance.
This slightly increases the cantilevering of the upward loads on the base ring.

The dome skirt clearance from the rollers is critical during the dome lowering into place on top of the 4m high building. Is it reasonable to expect placement of such a bulky object to within a few millimetres? 

The slightest breeze could move the dome in any direction. Even with a remote control handset the crane driver is going to be some distance below and away from the dome/building. Unless they stand in the building itself to closely monitor the lowering? Would this be considered safe working practice? Despite the advantages of much greater precision. If this were a machine or structural steelwork the load would normally require fixing bolts. Which is far higher precision than I need. Unless they use crowbars are used to move the load slightly?

What can I do to make the lowering an easier and safer task? The dome skirt will have to fit over the building and/or the rollers. The rollers are bright white and the dome dark green. No problem with contrast. The sheer weight of the dome makes certain options all but impossible. One damaged roller could make the lift impossible to complete.

If I removed all the rollers I would have to lift the dome over 20cm/8" in stages to refit them all. This is not a job for crowbars levering against the building timbers! There is no room for jacks. No obvious way to lift the dome safely with a chain hoist from within. I will just have to rely on an experienced crane driver managing the lift safely.


*

28.08.2021 More wet weather and a better base ring.

 *

Saturday 28th, heavy overcast, wet and windy. The picture shows the reality of working outside in the rain. With the ongoing bad weather all thoughts of imaging are gone. So how do I maximise my efforts on the dome when it cannot be uncovered?

I usually picture the details in my mind and scribble endless text. Which helps me to make design decisions. Whether it saves time when the actual work begins is another matter. 

I am afraid of making irrevocable mistakes. You only get one chance to do it right. Hence my relatively slow progress. Making it up as you go along is not how most things are made.

Photography is a vital part of my work ethic. If I lied on my blog the hideous truth would still be obvious in my images. So I use photography as my main critic and stern supervisor. I have to set high standards for myself to avoid crippling expense. There are no spares. No new sub-contractors. No back-up plan if it falls to pieces. 

I had a full dress rehearsal with the plywood dome and octagonal, observatory building. It taught me a lot. More importantly, what mistakes to avoid. I discussed using a calf rearing shelter as a donor dome back then. Luckily I avoided going ahead at the time. I wasn't ready for the challenges involved.

A new idea: Triple layer base ring  on top of the dome rib and bolted brackets. The 180mm/7" rotation roller is placed roughly where it will track and support the dome. The roller's axle is just above the dome skirt. Meaning that quite a low, add-on, weather skirt is required to protect the building below.

The roller track is well out towards the dome wall. So there are no serious cantilever forces trying to lift the ring's inner edge. The upward "leverage" on the base ring, from the roller, is safely minimized by simple geometry. The track can be even less than 80mm from the dome wall. So 90mm reinforced, angle brackets are ideal and readily available. This assumes the dome is perfectly round and runs concentrically. 16 steering rollers will help but it might be a bit risky to aim for minimum clearance!

Triple ply, ring laminations will be very stiff compared to thinner options. Reducing potential undulations during gluing up from multiple arcs with staggered joints. It looks solid enough to be serious.

Longer fixing screws for the brackets can be used from above. Without any risk of them piercing the roller track. The middle bracket, of the three shown, is probably best for this purpose. It has low height where it meets the dome. Helping to reduce any, upward, twisting forces. I'd prefer thicker, reinforced brackets to avoid flexure.

The plywood dome build was [unintentionally] my full mock-up for "the real thing". Lots of things worked well. Some things less so. Most of the problems were due to the materials I used. Plywood domes should be fibre-glassed for weather proofing and strength if roofing felt is to be avoided. Roofing felt is heavy and hot. 

Plywood is difficult to seal adequately. Even using the most expensive "marine" seam sealers. Covering a dome with rubber pond liner is another option. Though usually of limited colour options and very heavy. It will not conform readily to a spherical dome.

You should always go shopping for wet weather clothing during a period of cloudbursts. It concentrates the mind wonderfully. The same goes for building observatory domes. False optimism has no place to hide when the rain is constantly "tipping down." 

You won't get much done without a much larger shelter for a workshop. Working outside you probably won't do anything really daft. Not when you desperately need the shelter of your own construction. To have somewhere to sit and think furiously about what you are actually doing. How many people build their own observatory domes? There can't be that many. Not even globally.

Most dome builds are probably smaller than this. So the scale and costs are minimized. These days most observatory builders prefer a roll-off roof. Which means being outside for observing. Or having a "warm room" and remote control for imaging. I much prefer the shelter of sitting comfortably in a dome. More protection from the wind. Shade from the sun and shade for the computer screen. I cannot imagine being such a keen solar imager. Not if I was sitting within four walls completely open to the sky.


*

27.8.21

27.08.2021 Wet weather and base ring options.

 *

Friday 27th Heavy overcast, wet and windy. I have the shutters arched on the ground to shed as much rain as possible. They usually lie on their sides but that risks the plywood ribs becoming saturated.

A check, after yet more rain, showed several of the upper bolts on the dome segments were leaking. Not badly, just a few droplets running down. I certainly don't want rainwater dripping onto the instruments below after installation. 

Perhaps I can reach these bolts through the open slit. Without removing the tarpaulin. They are, at least, the most accessible. Though not actually covered by the tarpaulin. This job can wait for better weather. Or, not. As it kept showering I decided to go ahead and worked from a short ladder. 20 segment fixing bolts now have rubber washers. All the washers I had. I shall buy more when I can.

Regarding the dome's base ring fixing. I am now thinking I should fit bolts and brackets to ensure maximum resistance to lifting. I intend to fibre-glass over the top of the rings. Though this assumes I maintain perfection in level. Not an easy task with such a very large, and relatively thin, plywood ring. Which is only propped on the dome reinforcement rib on its outer edge. Until fully bonded in. The stakes on the inside are little more than a guide to level. Also to support the rings for mock-ups.

The loads on the base ring are mostly upwards. Because it rests on the rotation rollers. Assuming ~500kg for the finished dome the upwards force will be spread over a comparatively small area of dome wall. Relying entirely on polyester, GRP adhesion over a strip [say] 10cm wide x 10m may be too much like wishful thinking. 

Mechanical fixing would offer greater piece of mind. The dome is thickest down near the skirt. So bolts would enjoy considerable lateral resistance even without the clamping forces from the bolts. They would be very unlikely to tear out. Another ring of bolt heads around the dome skirt would hardly detract from its appearance. Probably just adding to the "Steam Punk" effect like more rows of rivets. I ought to look for heavier brackets than those I used on the shutters.

One problem with brackets above the base ring is that they would be fibre-glassed in. Making removal all but impossible. If the base ring should degrade over time then replacement becomes a real chore. I can't invert the brackets without cutting away the dome's vital base ring reinforcing rib. Beside, the brackets would lie on the path of the rollers. As would any fixing bolts through the ring itself.

The next, most obvious alternative, is to have the base ring under the dome reinforcing rib. The rib would provide enormous resistance to lifting. If only at the outer edge. I would still fibre-glass the ring to carry the dome's own rib stiffness well out over the plywood ring. Bracing the inner edges of the ring would require bolted stays rather than simple L-brackets. There is still the risk of roller obstruction from fixings.

In an earlier post I considered sandwiching the dome's circumferential D-rib with plywood rings. One ring above and one below. With filler rings for increased stiffness. The dome's skirt reinforcing rib is not precisely placed. So there would be some variation in sandwich filler thickness and the exact location of the base ring relative to the rib. 

Which suggests oversized filler material to avoid variations in ring level. The rings then being mounted slightly independently of the dome's reinforcing rib but accurately level with the dome skirt This arrangement would arguably enjoy the best cosmetic appearance. The base ring would be very deep and far stiffer than the other options. 65mm wide softwood could be sandwiched between the pairs of rings. It need not even be curved. But could be fixed with Csk. wood screws to avoid obstructing the roller track.

Having the base ring raised above the dome reinforcing rib provides 125mm more coverage of the rotation rollers. 60cm form the skirt to the rib. Which is 65mm high outside any radius. This extra depth means reducing the required height of the weather-proofing, add-on skirt. 

I do not want another rubber skirt flapping in the wind! Even the thickest pond liner is all too flexible when hanging freely under its own, considerable weight. 

Alternative, add-on skirts could easily detract from the appearance of the mounted dome. I have no obvious candidates. Other than thin, painted, Baltic Birch plywood. Which would extend vertically downwards from the inside of the dome skirt and over the top of the building. To throw the weather outside the building's footprint. 

I plan to have another sturdy, plywood ring on top of the building. Which will provide the necessary circular form. To close any gaps between the multi-sided building and the weatherproofing skirt. Since absolute precision of concentricity is impossible I may need a circumferential, draught excluding brush. Of the type fitted to the bottoms of doors. The self adhesive types are available in 5m lengths.

As the showers continued through the afternoon I propped up some mock-ups of possible base ring configurations. [See images above.]

*

26.8.21

26.08.2021 Cloud!

 *

Thursday 26th 52-56F, bright start. Cloud promised for later. I might manage some imaging this morning. Hopefully the soft focus sky conditions, due to the overhead jetstream, will have moved on. Though it seems it is still there over the North Sea and directly over Scandinavia.

Jetstream Forecast - Jetstream Map Updated Four Times Daily - Netweather.tv

I'm glad I kept the tarpaulin on the dome. It rained in the afternoon [yesterday] before brightening later.

After much confusion the new polyester resin parcel is back in the system. The tracking had been following the last one back to the vendor. Not to the parcel pickup point. Hopefully I can collect it around lunch time today. SMS notification has been received.

09.20  56F, plates of broken cloud crossing from the north. It has arrived much earlier than forecast. Waiting for a clearance for my first capture.

AR2860 in the middle, south east quadrant looks promising. With several spots. It is not looking so promising now. As the cloud becomes much more dense! Only 200 frames of cloud captured in the last 10 minutes. Not enough for AS!3 to recognise anything. I had better get on with the dome. 

Working on the shutters seemed like the best idea. I fitted rubber washers to all the shutter, bracket fixing bolts. Of which there are many. With the rubber squashed under the mushroom heads they should not leak any rain. I shall also silicone seal the edges of the GRP shutters to their plywood ribs. Later, I will add rubber washers to the upper bolts holding the dome segments together. I noticed a couple of these bolts were leaking slightly after heavy rain.

Best not to take any chances when they are so inaccessible after the big lift. It will be difficult to work through the open slit once the dome is in place on the building. Because the shutters will be in the way. Working on the dome from the ground will be difficult to dangerous. It will require secure fixing points on the outside of the dome for tying [or hooking?] on the ladders. An option worth exploring before it is too late. Eyebolts could replace some of the segment fixing bolts. The dome provides very little sideways restraint for ladders on its gently curved, polished surface.

13.00 It rained just as I had finished replacing the last bolt on the shutters. So no fibre-glassing today. Showers continued as I collected my resin parcel in the afternoon. With rain and cooler temperatures forecast for the next three days.


*

25.8.21

25.08.2021 No polyester resin today!

 *

Wednesday 25th. 60F. The weather has changed completely. Grey overcast and windy with drizzle. I haven't yet decided what to do next. The plywood ribs must be kept dry for the fibre-glassing. So the tarpaulin remains in place. I have heard nothing from the polyester resin supplier. The parcel was returned to sender by the carrier. Presumably because it had been damaged in transit. Track and trace suggests a new parcel has been sent. Though I have heard nothing from the parcel pickup point by SMS or email. Track and trace was following the original parcel back to the sender. A new one is on its way.


*

24.8.21

24.08.2021

 *

Monday 24th 46+ F, bright sunshine. Thin, high cloud is softening the sun.  

10.00 CET I am struggling to get a sharp image through the cloud mask. Made worse by the sweet spot ring. The rubber band isn't working today.

The dome is saturated with dew again. I have removed the tarpaulin. 

The new batch of polyester resin should be available later from a local, parcel pickup-point. It wasn't. The parcel must have broken open as it was returned to sender. It was a perfect day and I was looking forwards to fibre-glassing the second slit rib externally.

Imaging is pointless. So I had better look at marking the base ring levels on the stakes. Drilled and pinned to support the base ring. Sawed off the bottoms of the slit ribs to the same level. 


11.51 Large prom on SW limb. Changed to PST BF. Poor image.

It was much cloudier in the afternoon.

I have installed the drawer slides on the glass-fibred, zenith board. I had to Csk the fixing holes for 4.5mm countersunk head screws. 5mm is too large. Completely blocking the inner slides from moving in or out. 4mm drops straight through the fixing holes! 

Crap design for a heavy duty and expensive slide! Some slides even allow dome head screws. This one is folded inwards precisely where the screw heads would lie when the slides moves. Clearance is critical.

I have given the slides a slight upwards tilt towards the outsides. If the shutters' weight makes the slides sag then this should help to keep them level. Otherwise the slope should give a slight closing bias. Better than having to close them "uphill."

16.30 I just checked the sun for imaging but it is still hopelessly soft focus from thin, high cloud. Bright flares and dark filaments surround AR2859 in the middle-east.

18.16 A final attempt at cutting through the soft focus, cloud filter. Note the delicate light bridge across the AR2859 umbra. All the later images were worse!


*

23.8.21

23.08.2021 More thinking aloud.

 *

Monday 23rd. Misty start to a sunny day. Heavy dew.

I have timed it badly to have no resin left as two warm and sunny days mark the end of summer. So I had better do something useful while it is dry and sunny. Not wait until the grass and everything else is soaking wet.

The base ring needs the ends of the arcs trimmed to make accurate joints. The sliding mitre saw is the best tool for this. I need to lay out the complete ring on the ground. Then mark each joint clearly ready for gluing and laminating.

The shutters are easily accessible now they are lying on the ground. So I can fit the rubber washers under the heads of the bolts to weatherproof them.

I need to cut out and laminate the shutter top boards in readiness for the drawer slides. I finally have suitable brackets to fit them securely to the GRP shutters now. The top, inner brackets need the GRP lifting to fix the screws. Better done now than with the entire weight resting on top of the ribs.

The drawer slides could be fitted to the zenith board. I have a safe and proven support system for the open shutters. Which means I can more easily fit the drawer slides to the shutters once they are back in position. This would be more sensible than fitting the drawer slides to the shutters first. Then fixing them to the zenith board afterwards. 

The alignment of the drawer slides is critical for the shutters to slide properly. I might need to compensate for shutter weight causing some sag or twist. This should be done invisibly inside the top shutter boards. Not by adjusting the level at the zenith board. Which might cause bias in the opening and closing of the shutters. Not to mention looking completely wrong if they are slanting.


09.46 [CET] I started with some imaging while I wait for the heavy dew to disperse. 

10.09 Retuned the PST etalon repeatedly to get it on band across the frame. Only partially successful.

10.52 Now relying on a rubber band to tilt the etalon.

11.03 More fiddling with rubber bands.


11.09 It is a struggle to balance the entire frame on band.


11.18


The sun was finally on the dome. So I removed the tarpaulin from the slit and was soaked by dew! There must have been pints pouring off it!


13.00 Paused for lunch having laid out the 4.3m base ring on the ground. It is huge! It seems far larger than the dome itself. 

One tent peg in the middle and a surveyors tape led to more tent pegs. The arcs could then be snuggled up against the pegs as a perimeter. 

Image taken from a stepladder. The poor man's drone. 😉 And a handy, tiered stand for displaying my wife's potted plants.

After lunch I shall put a single screw at each arc overlap. This will provide a reference point for marking out the skewed and staggered joints. The exercise will then be repeated for the second layer.

Joints sawn and lots of stakes hammered into the heart of the dome. The arcs did not want to remain level. So I am waiting until it is darker. Then I will mark all the stakes using the 360° laser level. I'll drill the stakes and push supporting nails through. If I try to drive screws through the stakes they might split.


*


22.8.21

22.08.2021 Zenith board and poor seeing.

 *

Sunday 22nd 69F, overcast start to the day. It brightened to hot sunshine later in the morning. Bringing a breeze with it.

First I fixed the much larger, hole plates to the zenith board. I am leaving the drilling of the eye bolt mounting plate until the position of the drawer slides is fixed.

Then I started fibre-glassing one slit rib externally. I used my last half litre of polyester resin with reduced hardener. This time it went off just as I reached the bottom of the tin. It was nearly 70F and I was working in full sunshine.

I had managed two layers of 300gm/m² of mat over the length of the rib. Thinking it best to do one rib and wait for fresh supplies of resin. Rather than jump back and forth. Wasting valuable pot life. I have ordered three more litres of resin and some brushes.

13.15. Paused for lunch.

14.23 [CET] The AR near the eastern limb. The seeing is mush and mobile!  

13.05 [UT] Marginally better seeing conditions.


15.32 [CET] 68F. Slightly better. Or just different?


17.30 Returned after giving up due to the poor seeing conditions. Waiting for cloud to clear the sun.

18.40 Final image. Boiling image on the monitor. 


*