29.7.19

New veranda doors continued.

*

Friday: 84F hot while I cleared all the detritus in the lower building to reach some large off-cuts of 12mm grooved ply. These will be used to reinforce and flatten the existing veranda doors. They had been standing flattened against one of the octagon walls and had become rather inaccessible. THG supervised, as is Her wont. So all the junk went back in again with room to spare.

Sunday and the struggle goes on. I don't have enough  plywood for a full core layer at right angles for both veranda doors. You can't just glue three vertical layers together or they will curl horizontally. There must be an uneven number of plies all at right angles to each other.

It started pouring down at 12.15 just as I was laying out my various off-cuts on the lawn. A mad dash to put them all away again. Only then did I remember I'd opened the observation slit for more light. You wouldn't believe the excitement I can have on a Sunday morning without even leaving home. Collecting another sheet of ply means taking the big trailer and a 20 mile, round trip on a weekday.

I'm using a core of cross sheet off-cuts made up of three narrower strips all glued together. This will satisfy the need for cross laminations. While leaving the doors 36mm of solid plywood in thickness. I could bi-fold them with central hinges on a vertical line. They could then be folded back to allow me to pass along the veranda without hindrance or having to close the doors to get past. With the trapdoor prevenying me from doing so! Grr?

With the hinge line suitably placed the doors could be folded back against the outer faces of the octagon.This would also allow them to be opened for ventilation without becoming sails in the wind. I'm afraid I have developed a mindset where I rarely used the doors due to the hindrance they caused. I must be careful to make them far more practical this time.

Monday: The three layer doors have been glued and put under weights on the shed floor. I used the trailer as a flat surface last time and it flexed downwards under all the weight. Fortunately the doors gradually flattened out again under their own supervision. The shed floor is flatter and doesn't flex but needs bare floor space for such activities. I stacked the doors on top of each other and then loaded everything heavy I had to hand on top. Despite the considerable total weight the pressure per square wotsit is still very low compared with screw clamps.

Tuesday morning was spent trimming angles on the outer edges of the thicker doors to fit snugly against the octagon posts. The thicker doors need longer machine screws for all the [sliding] door bolts and handles. Counter-sinking [or rather counter-boring] will help avoid making a special purchase. Lock nuts internally will avoid the screws being undone from the outside without easy access with suitable tools from both sides. Wood screws offer no security at all to a determined thief. The screw head's drive sockets can be filled with epoxy but it's a pain if you ever want to remove them in a hurry.


*

25.7.19

Slaving over a hot observatory in a heatwave.

 *

Thursday: Another heatwave. 85.5F by 13.00. First I swapped back to the 14T for the focuser motor pulley. The motor no longer changed tone when it was reversed at the vertical when heavily loaded. Now 18 seconds per cm of focuser movement.

An unusual orientation of the dome's observing slit to the NW to block the sun and let the heat out. THG's oaks are pressing close but dare not be trimmed.  

Then I worked on the veranda doors and nearby obs. floor all morning. I had never fitted a water bar or rain stop. Wind driven rain from the prevailing SW was finding its way under the doors. Luckily I was able to enjoy the breeze today while remaining in the shade of the dome. A couple of the stainless steel, terrace screws', heads stripped and would not come out. They needed a flat crowbar to lift the short, indoor boards free without damage.

I could then fit tar paper over the joists to carry any percolating water outside the lower building's plywood panels. I might use a length of alloy angle as an internal door stop. I'm not too interested in stopping draughts because the entire building is deliberately made as open as possible to shed any heat build up. All the outside gaps between the obs. floor joists are left wide open. Though I may end up closing them off with metal fly-proof mesh. I don't want wasps or their bigger brothers, the hornets, nesting in there!

I now plan to double the veranda door thickness for greater stiffness and ease of use. It just needs a suitable filler for a doubled 12mm, grooved plywood sandwich. I slightly misjudged the width of the doors relative to the veranda. Which means they have to be almost closed again before I can move further along the veranda. Otherwise I get jammed in the gap between the railings and the outer edges of the doors. The single thickness ply meant they warped over time. Which made them drag on the top and bottom of the door frame. Making life even more difficult as I struggled to free myself.

It was never intended to make the veranda doors as the main point of access to the observatory. The veranda was only meant for safe obs. inspection and maintenance without needing ladders. I wanted the internal ladder/steps to remain completely sheltered from wintry weather. Which would have made using the steps exceedingly dangerous had they been outside.

I  normally have a load with me when climbing or descending. Which usually means one hand is holding the heavy laptop, carrying case. The idea of climbing steep, snow-plastered steps with only one hand left for an ice encrusted handrail did not appeal at all. The lack of external steps also gives the building a cleaner and sleeker look. It probably provides greater security with the dome being out of immediate reach.

The sun had come around to the south and then west as I worked on the doors. With the slit facing east into the wind and out of the sun the dome still reached 91F inside. It peaked and then hovered at 86F in the shade for several hours. Too much for me when I was standing out in the sun.


*

Wednesday 24th: Motor focuser continued.

 *

See image right with 20T instead of 14T. The slots in the supplied, motor support plate allowed just the right degree of adjustment. Testing is done by rotating the free knob on the other end of the focuser shaft. There is the same degree of slack as before with the smaller 14T pulley.

I did a quick check, under power from the manual buttons on the HitecAstro controller @ 12VDC. As predicted the focuser moved 1cm in 12 seconds. It also proved that the 20T pulley could manage a horizontal focuser movement. This was with the hefty Lacerta 2" solar prism on its 4" extension. Though increasing angles of the telescope, towards the vertical, became too much.

The motor became far more noisy with increased inclination until no movement was observed with the telescope vertical. It is a horribly miserable, wet, dark and windy day today. We are promised a heatwave over the next four days. So I shall pursue the limits of the 20T motor drive in far better light and far more comfortable conditions tomorrow.

The problem proved to be slackness of the toothed belt. Though the motor can easily be heard to change from free running to labouring as the vertical is reached. It seems sensible to return to the 14T pulley to unload the motor at higher inclinations. Reliability of focuser movement is far more important than mere speed.

Despite another sunny day I didn't go near the observatory today. With a high of 84F in the afternoon it would have been far too hot to sit in there for long. It hit an uncomfortable 84F in there yesterday when it was "only" 77F in the shade. The "seeing" was also awful. With strong turbulence visible in the sun's image on the laptop. Nothing suggested things would be any better today. With the sun devoid of interesting features at the moment it was all rather pointless anyway. I captured a prom on the NW limb yesterday but the detail wasn't up to even my poor standard. The image simply looked "overworked."


Click on any image for an enlargement.

*

21.7.19

Cable dressing and new timing pulleys arrive.

 *

As a change to wasting precious time on the wrong trousers software I'm looking at cable dressing. I need a retaining clip somewhere near the center of the Dec housing. The clip or loop will have to be held by one of the furniture nuts to avoid making and threading new holes. Limiting the cables to the center of the mounting should avoid the constant checking that nothing has pulled tight during a Goto slew.

The sheer range of movement is such that cables can reach their limits quite quickly. The camera is on the end of a 1.3m long lever. Which really eats up cable running back to the laptop on the north side of the pier. Being USB3 rather limits the options to 3m or 5m depending on who you consult. They can't both be right. Can they? For longer extension I'd need to go active. Active USB3 cables cost about £20. The supplied ZWO cable is only 2m. While 3m would have been just enough. I can feel another order coming on soon.

Remind the [idiot] observatory supervisor that AWR needs UT for RTC. NOT local time! Not that it made any difference when I readjusted RTC by the two hours difference. LST now matched the online calculators and C-du-C when I hovered the cursor over S or 180°. The trouble is that it still couldn't find Polaris from a hole in the ground! I kid you not! With no other change [-2H in UT] the telescopes started straight into a nose down slew to reach the North Pole!

It took six days for PostNord to deliver these two tiny, toothed timing pulleys, for £4 equivalent in postage, in a small padded envelope. These are a 20T and a 30T GT2 2mm pitch. Now I'll need to bore them out to 6mm to fit the Skywatcher [clone] focuser motor.

On the last 14T pulley I used a brand new, 6mm drill in the tailstock chuck. The bore ended up rather oversize. So I think I'll use 5.5mm drill instead. Then run a tiny boring tool through to take very tiny cuts until it just fits the motor shaft nicely. This worked but was rather slow. The natural spring in the long, thin, boring tool provided a nice snug fit once the shaft could just enter.

I'll need to confirm that the gear ratio is not too high for the little, gearbox motor when it is driven. It might be better to raise the motor speed in the HitecAstro software. We'll see how it goes. The 30T will need a motor plate redesign to get the pulley near enough to the focuser knob without needing to buy a longer belt.

I hope to get away with the 20T without any change to the motor support plates or the belt. That would give me a boost in focuser speed of 1.43:1. Which would be 12 seconds instead of 17 seconds per cm of focuser movement.


Click on any image for an enlargement.


 *

20.7.19

HitecAstro DC Focuser Software choice for [non-psychic] dummies!

*

As a kindness to those who are not mind readers and would rather avoid endless hours chewing their extremities, I offer the following image:

I have just heard back from David at HitecAstro who has kindly pointed out the bleeding obvious for those of us who weren't born psychic. 

Not to mention those of us have just wasted more than  a whole day of their remaining lives discovering this terrifyingly simple reality for themselves. All because the great minds who put this list together never even thought to tell us!  No thanks required.

Saturday after lunch: First I removed the incorrect [2nd] ASCOM driver and restarted. Then I downloaded and installed the first ASCOM driver on the list. Sadly it made only one difference: SharpCap stopped warning me about the non-functional Hitec focus controller.

The simple control panel remained in the start menu but no extra ASCOM controls nor icons. I could still Connect and the motor driven focuser is proving very useful. Far superior to manual knob twiddling in obtaining a sharp limb on the regularly, cloud-obscured Sun. This is with over 4.3 meters of focal length on the 7" with the ZWO [fitted with the 2x WO Barlow] in the 2" Lacerta solar prism. It is far too cloudy to do any useful imaging but it was an interesting exercise.

But wait! On reopening SharpCap I spotted a yellow bar right at the bottom of the camera control panel. It is called "Telescope Control" and opening the menu shows the Hitec focuser. I have dragged the bar further up the list for easier access. But guess what? Every time I select a box I get an error message: Error communicating with device! Will it never end? Hitting SETUP and ASCOM tells me to use the supplied software.That would be the error prone software, I suppose? Or is there some other software I have to guess at? Is it like a parlour game?

For those who are still interested the 3.5" FT focuser moves 1cm in 17 seconds. That was with the default settings which I haven't fiddled with yet. I have two, new, larger toothed pulleys in the post if PostNord ever get around to delivering them. I could have cycled there and back to collect them by now. Driving the black [direct drive] focuser control knobs proved to be easily possible. Higher gearing will provide higher slew speeds. With slower speeds available within the SharpCap focuser control panel buttons. If only I had a larger screen than 15.6" and could actually read the text.


Click on any image for an enlargement.

 *


Chump's colossal arrogance and ignorance.

 *

Did you see Chump remaining seated on his golden throne while greeting the Apollo Astronauts? That's how much respect he really has for these incredibly brave people. Now he hopes to bask in their glory again by repeating exactly the same exercise fifty years later. Purely as a sales gimmic to his unfortunate followers.  

Will he get off his fat arse for the next group of incredibly brave people when they [hopefully] return from another perilous trip to the Moon? Because they are then HIS incredibly brave people and HIS private property? Rather than the propaganda tools of some supposedly inferior, womanizing president from yesteryear? Whom he constantly badmouths on Junior Twatter.

Do you remember the famous picture of Goebbels intense hatred for humanity when he was photographed by A Jew? Keep that image firmly in mind for when Von Chump is finally brought before the courts. Despite the protection of his vast, inherited wealth and his Brown Shirts.

*

18.7.19

NO HitecDCFocuser Unit Detected!

*

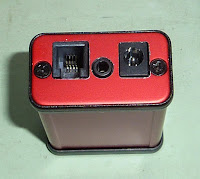
Thursday 18th and the dinky little, matchbox sized, HitecAstro DC Focus V2 Focuser controller arrived. It was still in Copenhagen according to the PostNord tracking but let's not complain. It had taken a week to arrive from ordering online in the UK. Minus the weekend when nothing moves. It just seemed like a very long time to the instant gratification child within.
 
Full of confidence I downloaded the drivers and software from HitecAstro's Support webpage onto the laptop. Including the ASCOM driver.

I duly had the Windows flag to say the device was locked, loaded and ready for use. Only it wasn't. Nothing I tried would produce any sign of recognition of the focuser control software on pressing Connect.

 I changed all the cables, double-checked the voltage at 12.8VDC, center pin positive, on the third 12V PS I had found in my modest [charity shop sourced] collection.

The motor turned effortlessly in both directions on pushing the tiny manual buttons on the end of the box. No surprise there. Because they are probably just make and break, contact switches. Though of better quality, so far, than the Skywatcher clone variety.

But, I didn't pay this much for two contact buttons because I was being denied all the control promised by the software. At least it was a start and proved there was enough voltage and that the motor and cables were minimally functional. I tried SharpCap but saw the same [negative] notice when I tried to allow the HiTec focuser in the ASCOM menus.

Better do a search online to see if anybody else had suffered similar problems but had eventually found a solution.

The only hits were on astro forums going back 8 years. Removal of the software, re-installation and restarting seemed to offer promise on a W7 machine. So I tried that with my W10 but saw NO change whatsoever.

Seeing the same sign was getting rather tedious. The HitecAstro box was present in devices but there was a message about "not migrating" under Events, [Whatever that meant in Nerdspeak.] Followed by a slightly more positive "Device started." Only it didn't. So W10 was lying through its MS teeth as usual.

Hours passed without further progress, but eventually, it was time to take the whole kit and caboodle indoors to try it on the [also W10] PC. Anything in the hope of discovering something new. Download the software, install and try again. Nope. NO change!

I scanned the HitecAstro website again for further information without luck. I had been sent a V2 model which was [very confusingly] described as a "second unit to run in parallel with the [real?] first one." To slightly misquote the "Heads you lose. Tails you lose" garbled message to unhappy purchasers, like myself.

So there it sits on my computer desk. An apparently innocent but non-functioning, £80 blob. Like much of the detritus which passes through my hands. Am I really a martyr to the ghosts of mismatched Com ports? How could I possibly know? I'm an amateur astronomer. Not a bløødy software writer!

After countless more hours working on the problem until midnight last night and then again all day today until mid-afternoon I took a chance and uninstalled software 1.3 and installed the earlier 1.2.

It Connected immediately! As did the laptop as soon as I repeated the same basic steps. Reverting to 1.3 blocked connection on both machines again.

Back to 1.2 and I can now use the basic Hitec focuser control panel on both machines. However, ASCOM/SharpCap cannot find the controller and reports it is faulty on both machines. So I have no access to the far more sophisticated controls [only promised] there.

So I'm still waiting for a response from HitecAstro support. An earlier request for end views of the DC controller by email, on the 11th, 8 9 days ago, went unanswered. You'd think I had might have earned a little respect for my £80 purchase? Not to mention at least 15 hours invested in trying to make the damned thing work? But no.

Perhaps they are on a fortnight's foreign holiday and have no access to emails? These astro vendors must see us as easy prey for their worthless, tech fodder. Worse, they twist their cruel blade by making us work, unpaid, for untold hours, just trying to get their crap to behave itself! Where's the nearest Trading Standards Office to HitecAstro? A refund is not enough. I've invested my own precious time in your abject failure!


Click on any image for an enlargement.

*

17.7.19

Motor focuser Pt.4.

 *

The flat, black, RJ10/RJ10, 5m cable also arrived and fitted the motor socket perfectly. I would imagine some losses over the 5m length of rather slender wiring. So will have to measure its resistance. Or just see if it makes the motor too weak. Getting the meter's pointed probes to reach the fine contacts of an RJ10 plug is very difficult.

The new 5m cable behaves no differently to the coiled example which came with the DC focus motor. I didn't really need 5m but it provides a lot of slack to be able to wander the observatory with the control paddle in hand. In practice I hope I shall be using the laptop for focusing. So the extra length will have to be hidden. I may order a 3m cable eventually if it needs a tidier arrangement. These 'telephone' cables cost only pocket change online.
 
Having discovered the 17.2V DC output of several "wall wart" power supplies, I measured [only] 14V DC from one of my old 12V H&M model train "transformers." I used to buy these up at flea markets as handy and reliable 12V power supplies. I have had two of them in continuous [but normally unloaded] use for years without any problems.

Tuesday 16th: I have now ordered a 20T and a 30 GT2/2mm toothed pulleys in anticipation of improved performance with the HiTecAstro control box and having increased power available.

A few moments of sunshine tricked me into going back into the observatory. To be treated to endless cloud. When the sun did shine the ripple mask was back again!

Wednesday:  Still waiting for PostNord to find my focuser control package which left England early on Sunday morning. No updates on the tracking for three days. Only updated this morning [Wednesday] while I was on the phone to customer services. Just a coincidence? It seems that now PostNord admits they have it they can now take up to five days to deliver it.

I have been struggling to get AWR/ASCOM/CDuC to find the Sun this morning. LST on the IH2 screen doesn't agree with the online LST calculators again by a couple of hours. The system keeps sending the telescope 2 hours west of the correct position. Grr? I changed LST in AWR last time but now I can't remember how I did it. I checked RTC [Real Time Clock and date in the menus] and all the details look correct.


Click on any image for an enlargement.

15.7.19

Monday 15th July 2019: Motor focuser Pt.3. Belt drive.

 *

Monday: Another grey day.

The 14T "timing" pulley and matching GT2 belt duly arrived in the post. I found it easier to drive the direct drive focuser knob rather than the slow motion knob. The direct drive wheel is 44mm in diameter [with 48T] while the 14T is only 8mm. Meaning a gear reduction of 5.5:1. I had to bore the 14T pulley out to 6mm in the lathe because 5mm was the nearest standard size. I feared the tiny pulley would fall to pieces but it survived. My 6mm drills seem considerably oversized despite my infinite care. Beware that some pulleys have a 1/4" bore which is considerably larger at 6.35mm than the "Skywatcher" motor shaft.

When fitting the new pulley system I quickly discovered that the FT didn't like the thickness of my motor mounting plates. Because I had fitted the plates over the rack housing boss they overlapped the conical section. Which caused stretching and locked up the rack pinion assembly! So I put the plates on the disk sander and quickly removed  a couple of millimeters off the thickness. Problem solved. Though I could have safely left them at 9mm thick rather than 8mm. I may end up making new motor mounting plates anyway. To tuck the motor closer in to the rack assembly.

The pitch of the black FT 3.5 focuser knobs is 44mn Ø x Pi/48T = 2.9mm. I'm not sure whether it makes any sense to try and match this with GT3 pulley & belt components. Would it really gain anything to be much closer in pitch? The smaller pitch of GT2 just rides over the FT teeth as it it were a smooth pulley. While wrapped over half a pulley circumference the error would be even smaller with GT3 @ 0.5mm per tooth. So would almost behave like a toothed pulley. While avoiding any chance of slippage.

The little, "Skywatcher" clone, focuser motor had no problem rotating the rack pinion but I haven't tried lifting any loads on the focuser itself yet. The rack will have to go back on before I can try lifting the rather "lumpy" Lacerta 2" Herschel solar prism against gravity. If the motor lacks enough torque I can easily move the motor over to align the belt with the slow motion knob. Though that would provide an incredibly slow drive reduction at ~39:1.

Having now experienced the new belt drive under power I am delighted to report that it works fine in lifting the Lacerta prism vertically. Plus a 4" x 2" extension and an eyepiece. Turning any of the focuser knobs by hand allows the belt to slip remarkably smoothly but with a desirable level of friction. Providing safe, manual override if so desired.

Motor driven, end-to-end of the complete focus range takes almost exactly five minutes either up or down. [Or in-or-out, if you prefer] It would have to be roughly focused first to avoid a long wait. When the drawtube reached the end of its travel in both directions the motor simply stalled.

Fitting a 30 tooth pulley would double the speed of movement of the focuser. With the FT slow motion knob rocking back and forth slightly. I am rather pleased with the results. Fearing the little motor wouldn't have the guts to lift such a heavy load I had chosen the smallest possible motor pulley. It seems I could have been far less conservative. Particularly as I will soon have easy access to higher voltages than the 9V battery.


Click on any image for an enlargement.

14.7.19

Some minor adjustments.

 *

With cloudy weather over a couple of days I spent some time rearranging my bare, LED light bulbs, up inside the top of the dome.  A few random slews had found the bulbs directly in the path of the 7" objective as it passed high overhead. You can never predict the route taken by a telescope during a Goto slew. Interestingly, the mounting will often run both axes together until one axis travel is complete. Then the rest of the slew is all done entirely on one motor until it reaches the intended target.

A general view of the mounting, telescopes and eastern observatory. Next time I build a dome and mounting I must remember to put the crossings of the axes in the middle of the observatory.

The final moments of the slew often sees both motors turn for a few brief moments to bring the target to the center of the field of view. All very clever and quite unexpected until I saw it with my own eyes. It always comes as a shock that the three bulky telescopes can miss the mounting and the huge pier without my having deliberately set any limits.This may be true of Goto slews but is not true of manual slews. The telescopes will quite happily try to pass right through the solid, wooden pier.

For this reason it is vitally important not to leave the drives running when I leave the observatory. If I did not return in time, to avoid a slow motion collision, it would not know when to stop. When a telescope is physically blocked from moving it makes a racket through the stalled, stepper motors.

I still haven't discovered why I keep getting "Exceeds Perimeter" notices on the little AWR IH2 'paddle' screen. Particularly when I am re-setting the starting position at the beginning of every, single session. It can never remember the parking [Home] position after a switch off.

I have the Horizon set at '0'  [default] and could not set it any lower. Trying to input sub-horizontal angles for Horizon [like -1° or 2°] produces crazy numbers like 259°.  359 I could understand, but why 259?

I gave the rough plastic, motor clamping plates a quick polish on the cloth, buffing wheel. The whole assembly is almost invisible once in place on the big FT focuser but every little helps. I should have the new 14T timing pulley and belt in tomorrow's post.

I really ought to go into the AWR Factory settings to check all the initial parameters have not been changed. It could have happened by my clumsy button pressing since the installation. I think I had to change the Max Dec setting to stop the mounting routinely going completely the wrong way via North under the Pole. I could not possibly let that happen with such long OTAs and a hefty Dec drive cable. The telescopes kept trying to swipe my laptop off the shelf on the north side of the pier.

It is still terrifying to see the scopes head the wrong way at the beginning of a Meridian Flip. Though always driven manually on both axis buttons. I still can't get AWR to do a FLIP on command via the IH2. Nor to do so automatically on reaching the Meridian or just past. "Perimeter Exceeded" again, regardless of the original OTA positions. I have already discussed how I had to manually change LST, by two hours, just to get AWR/ CduC to slew accurately around the sky between chosen objects.

Click on any image for an enlargement.

12.7.19

Friday 12th July. Thunder Dome! DC Focuser motor Pt.2.

*

As I prepared to take the images for these last two posts it decided to have a cloudburst. I was in the dome at the time and the thunder of torrential rain on the thin, plywood dome was exciting to say the least! It went on for about 20 minutes as I waited to return to my PC indoors to check the images I had just taken with flash. A complete waste of time and they had  be repeated later with a mixture of flash and natural light.
 
More images and more details will follow next week as the new stuff hopefully arrives in the post. Delivery time is almost always a bit of a lottery. Though some dealers always seem to be much quicker than others. The weekend is intervening and nothing moves on the track and trace.

Meanwhile I have taken the opportunity to show the [rather crude] motor mounting arrangements on the flawless Feather Touch 3545 rack & its finely adjustable body. The screws will be changed to socket head, stainless steel of more appropriate lengths once the toothed belt drive arrangement is properly established. Stainless steel Nyloc nuts will ensure everything stays firmly in place. I ought to polish the plastic parts I have added. Though they go almost unnoticed being in black set against black.

NOTE: I do NOT recommend that you try to remove your own FT focuser rack. AND, I was specifically warned against doing so by Starlight Instruments. It was just easier [for me] to fit the motor mounting to the bare rack assembly without causing cosmetic damage to the focuser body this way.

I had already dismantled the focuser to fit the turned, tube adapter ring. Starlight Instruments will happily provide a superbly finished ring to support your own focuser to match most commercial OTAs. I had special needs for my home made, 7" refractor, so chose another route. This involved my own lathe work on a beautifully made ring supplied by Teleskop-Express.

Starlight Instruments go to great lengths to achieve a superb and absolutely flawless finish and fine adjustment to all their products. Removing the rack assembly is very likely to undo those careful adjustments.

The cost of a failure due to your own, poor mechanical skills would be an absolute nightmare! Imagine the focuser falling off. Or allowing a costly camera to drop off, onto concrete! The OTA would immediately lose its balance and crash, nose down against its pier or even the ground. A fine, large aperture APO objective might be impossible to replace at ANY price!

I have a very long lifetime of experience of fine mechanical work to call on. So I took all the risks involved from that secure knowledge base. You copy my example entirely at YOUR OWN RISK!


Click on any image for an enlargement.

*

12th July 2019 "Skywatcher" DC Motor Focuser update Pt.1:

 *

I am having to return the Skywatcher [clone] focuser motor to the dealer. [I had ordered a Skywatcher, as per their website, but this is Denmark and there is no consumer protection here.]

The two control paddle buttons stopped working almost immediately. Meaning that the focuser would continue to move in one direction even when the button was released!

While the other button was completely dead to any prodding or pressing. Because one button was in constant contact the 9V battery was rapidly drained. Hopefully without burning the motor coils! Now costing £50 equivalent for the complete kit and still advertised on the dealer's website as a "Skywatcher" product.

https://fullerscopes.blogspot.com/2019/03/260319.html

Update: I decided not to return the motor focuser kit to the dealer and bought a HiTec-Astro DC motor, focuser control box instead. This will provide software controlled focusing from the laptop screen and will still use the existing gearbox motor. The HitecAstro box is provided with a downloadable driver to be used under the ASCOM umbrella. So it should be accessible without much effort thanks to the ASCOM[AWR] set-up already controlling the mounting.

I have ordered a 14T GT2 pulley and a 200mm drive belt. Calculating belt length was a bit of an unknown even using online calculators. I have had to ignore the number of V-shaped teeth on the 31mm Ø Feather Touch, slow motion knob. So I just used the overall diameter in the end.


Faced with a simple drawing I realised that calculating belt length was actually very simple: 2CD + [Pi x PCD1/2 + PCD2/2] My motor's Center Distances are fully adjustable between 50 and 60mm. So, 100 + 73mm = 174mm. Or, 120 + 73 = 193 mm. As the belt will have to ride over the FT's slow motion knob, a 200mm belt should be fine. If not, there are hundreds of outlets for ordering slightly shorter belts.

The FT's gold anodized, slow motion knob is 31mm in diameter and has 35 conical teeth. Giving it a pitch of ~2.8mm. Quite close to 3mm. Which suggests I should have gone with GT3 instead of GT2 toothed hardware. I shall just have to see how the belt reacts with the odd "teeth". There is no question that the drive will be continuous. Simply due to friction over slightly more than a semi-circumference. The 14T was the smallest pulley I could find for the motor shaft. I anticipated obtaining the maximum possible gear reduction. I can't very well make the FT slow motion knob any bigger. Well I could, with a press-on arrangement but it seems rather unnecessary.

The original O-ring drive, with home turned, brass motor pulley, was too difficult to remove for rapid focusing over longer distances. Hopefully the new drive will be quick enough not to strain my patience.

The "Skywatcher" drive was incredibly slow and crawled even at "full speed." Though being driven by 12V. Or [more typically] 13.8V, instead of 9V, should provide a little extra oomph. I might have to move the drive belt over to the direct focuser knob but the Lacerta 2" solar prism + camera is a bit of a lump to bodily lift against gravity. Particularly at high solar altitudes around mid day in midsummer.

It is often very difficult to use the eyepiece with the oddly angled, 67° Lacerta wedge without acrobatics. Using the binoviewer is often impossible around the middle of the day. A 90° Herschel prism would have worked better at this time of year. Though at all other times the Brewster angle is a bonus for comfortable [upright] viewing. Rather like a spotting scope with angled eyepiece. 

I have also ordered a 5 meter RJ10, straight, black, telephone cable to connect the HiTec control box to the focuser motor. The supplied, coiled cable with the DC focuser motor kit was a real pain. Stretching, as it did, between the focuser and my laptop desk on such a long instrument as my 7" f/12. Particularly on such a big mounting. I kept fearing a plug would detach under the tension! Hanging the motor control paddle from the focuser was difficult because of the weight of the coiled cable and the sheer range of movement of the focuser in practice.

[See Pt.2 in the next post.]

Click on any image for an enlargement.

*

10.7.19

10th July 2019 Proms

*

Wednesday 10th: 71/63F full sunshine. Opened up about 11.00. Some nice proms on eastern limb again. No problems with the rippled mask today. Why not? I haven't a clue!

I missed a promising chance of imaging the Moon yesterday evening. I kept waiting for the sky to darken enough. When I finally decided it was time to go out the sky clouded over and it started raining! It was completely clear later when The Moon was much lower in the west. Grr!

These solar images are from SharpCap using 640x960 60FPS 20% of 3000 frames. Left image sharpened and recoloured in PhotoFiltre. Right image natural as captured and as seen on the laptop screen. With a little help from Registax.

The same happened with the moon the following evening. It clouded over in the evening after a cloud free day.


Click on any image for an enlargement. 
*

8.7.19

Back in the hot seat [at last!]

*

Monday 8th July 2019: Back in the observatory watching solid clouds move across the open observation slit. Two layers, moving at very different speeds, only add to the misery. The cloud cover is getting progressively worse.

Same rippled mask problem in SharpCap with the ZWO.

I have discovered a relationship between "Snapshot" image size, image software Sharpening and a strong checked pattern. At original size, Sharpening in PhotoFiltre7 produced an instant cloth type of pattern with only two or three clicks. When image size was reduced by Resizing to 1000 pixels the pattern was much less subtle.

Presumably this is related to debayering. [De-mozaicing] The rippled mask I am experiencing may be a weak debayering pattern. Not that I know what to do about it. It is odd that reducing the image size in SharpCap has NO effect. The overlaying "ripple" remains no matter how small I make the image [frame] when capturing videos or in live preview.

What has changed? This did not occur in earlier video captures with the ZWO and SharpCap.

Tuesday: Having more success with clearer skies. Early results were bettered by a 2x WO Barlow on the nose of the ZWO 120MC camera and painting in the disk for more contrast. Quite pleased with this one.

Imaging later in the afternoon seemed to provide much better seeing. The second image @ 17.00pm [left] shows how quickly the prom had changed in only half an hour. Here I captured both the disk surface detail and the prom simultaneously. Though the disk was bleached by the brightening to bring out the prom you can still see what is normally seen in the laptop's onscreen image.. Earlier I could capture nothing because of the rippled "mask."

The 1727pm [right] is improving despite my clumsy efforts with Registax and PhotoFiltre.


Click on any image for an enlargement.
*

7.7.19

Sunday:

 *

Sunday. The promised sunny periods turned into solid overcast. I partially overcame the problem of seeing fine detail on the laptop by raising it on a 4" tall cardboard box. My fast, but poor, typing skills were hardly improved nor made much worse by the change.

An inexpensive, digital clinometer clings by its magnet to the underside of the 7" refractor's, 8" Ø, steel, main tube. Providing instant proof of the telescope's true parking position: Horizontal, pointing at the eastern horizon, weights down. A green light glows for a while behind the screen, providing excellent clarity, but I was too slow to capture it with the camera.

I amused myself for a while by imaging distant trees with the ZWO and 90mm Vixen refractor. At least I could experiment endlessly with SharpCap settings while I waited for a glimpse of the sun. The trees were thrashing in the wind and it was rather cool in the dome at 60-63F.

After waiting hours for a break in the solid clouds I found nothing would rid me of the rippled mask. There were a few small proms but I didn't bother to capture any videos. Just took a few stills.  The moon rose but the cloud soon thickened again.


*

4.7.19

Rippled glass mask continued.

*

Over the last two days I have struggled with excess cloud. As I tried to rid myself of the overlaid rippled mask while capturing some short solar videos. The mask was still clearly visible in RGB24 AVI in all frame sizes regardless of my button pressing over on the right in SharpCap.

I have loaded the videos onto the SSD so I can have a look indoors on the PC's 28" screen. Thus avoiding needing my stronger glasses just to see the 15.6" screen properly in difficult light. I have looked at putting a larger monitor out in the observatory but the laptop would get in the way.

The larger screen would need to go above the open laptop and there is little room left on the big pier at that height. Worse still, my older 24" monitor screen doesn't have any modern sockets, ports, or whatever. Serial only and I upgraded to my 28" Samsung for a much better picture anyway. I could run a modern screen off the laptop using HDMI and a wireless keyboard, but that would mean even more expense.

I do have an old PC with a serial port but it really is old with no USB3 ports for the SSD. The small, internal hard disk couldn't cope with the ZWO camera's prodigious file output. XP is also so yesterday and half the imaging software probably wouldn't be happy without W10. I'm not buying a new PC just for imaging and my present PC is only four years old. So is no hurry to be banished to the observatory. I just had a look online and can't believe how expensive PCs are these days!

Whatever happens I still need to be able to see the screen properly to check for unwanted artifacts.

Friday: I tried both cameras again in H-a. The Neximage5 immediately showed "cloth" patterns in iCap 2.4. The ZWO showed the rippled mask in SharpCap. I tried capturing the visible proms but I was wasting my time again. I even tried the [wedge] adjustable camera plate but it didn't make any difference as I rotated the camera and played with the adjustment screws to try and optimize the set-up.


*